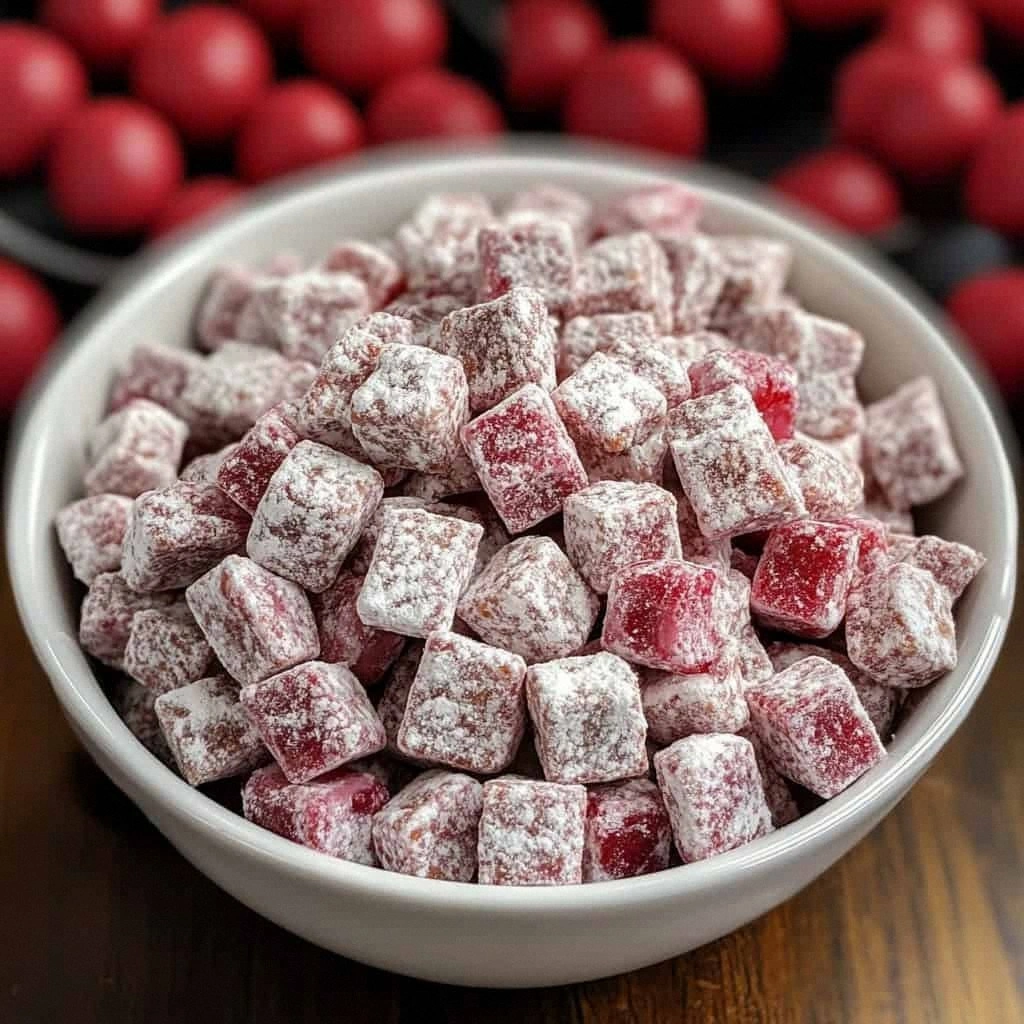
I still remember the exact moment I became obsessed with cherry cheesecake puppy chow. It was 2:37 AM on a Tuesday, I was wearing mismatched socks, and I had just demolished an entire batch of regular puppy chow while binge-watching cooking shows. As I licked the powdered sugar off my fingers like some kind of dessert-deprived raccoon, I thought: "This is good, but what if it tasted like cherry cheesecake and made people question their life choices in the best possible way?" That night, I marched into my kitchen like a woman possessed, pulling out cream cheese, cherry gelatin, and white chocolate chips with the determination of someone who definitely didn't need more sugar but was going for it anyway.
The first attempt was an absolute disaster. I melted the white chocolate too hot and ended up with a seized, lumpy mess that looked like cottage cheese had a bad day. The second attempt tasted like cherry cough syrup mixed with regret. But by the third batch, something magical happened. The cream cheese melted into the white chocolate creating this silky smooth coating that clung to every ridge of the Rice Chex. The cherry gelatin powder added this bright, tangy note that made my taste buds do a happy dance, while the crushed graham crackers brought that authentic cheesecake crust vibe that made me wonder why I'd ever eaten regular puppy chow in the first place.
Listen, I've made this recipe forty-seven times since that fateful night. I've brought it to office parties where coworkers hid bags in their desk drawers. I've mailed it to friends who claimed they were "just going to taste one piece" and then texted me three hours later from inside their empty mixing bowl, asking if I could overnight them more. This isn't just another snack mix recipe; this is the dessert equivalent of a warm hug from your favorite person while wearing fuzzy pajamas on a rainy day. It hits every single note: crunchy, creamy, tangy, sweet, and just when you think you've figured it out, you get that surprise burst of cherry that makes you close your eyes and savor the moment like you're in some kind of dessert commercial.
What makes this version absolutely irresistible is how it captures everything you love about cherry cheesecake — the velvety smoothness, the bright fruit notes, that graham cracker crunch — but transforms it into bite-sized pieces that you can mindlessly munch while pretending you're "just having a few." I dare you to taste this and not go back for seconds. Actually, I dare you to taste this and not hide the entire batch from your family. Let me walk you through every single step — by the end, you'll wonder how you ever made it any other way.
What Makes This Version Stand Out
Cherry Explosion: Most recipes use artificial cherry flavoring that tastes like medicine left in a hot car. This version uses real cherry gelatin powder that provides authentic fruit flavor and creates that gorgeous blush color that makes people ask if you added food coloring. The gelatin also helps the coating adhere to every nook and cranny of the cereal, ensuring each piece is perfectly dressed in its cherry cheesecake costume.
Cream Cheese Magic: Here's where most recipes get it wrong — they skip the cream cheese entirely or add too little to matter. Two ounces of softened cream cheese melts into the white chocolate creating a coating so smooth and rich, it tastes like you frosted each piece individually. It's the difference between "eh, this is good" and "holy cow, what did you put in this crack?"
Graham Cracker Confession: I'll be honest — I ate half the batch before anyone else got to try it. The crushed graham crackers add that essential cheesecake crust element that makes this taste authentic rather than like cherry-flavored cereal. They get slightly soft from the coating but maintain enough texture to give you that satisfying crunch with every bite.
Texture Symphony: Picture yourself pulling this out of the mixing bowl, each piece perfectly coated in this glossy white chocolate cream cheese mixture that sets into a thin shell. When you bite through, you get that initial snap followed by the creamy melt, then the crunchy cereal, and finally those little graham cracker pieces that add one more textural surprise. Most recipes get this completely wrong by making everything the same texture. Here's what actually works.
Make-Ahead Champion: This stuff gets better after sitting for a few hours. The flavors meld together, the coating sets perfectly, and it travels like a dream. Most puppy chow recipes get soggy after day one, but the cream cheese actually helps maintain that perfect crunch while the flavors intensify. I've made this on Sunday and it's still incredible on Friday — if it lasts that long.
Crowd Psychology: Bring this to any gathering and watch what happens. People who claim they "don't really like sweets" will hover nearby, casually eating "just one more piece" until they've demolished half the bowl. Kids go absolutely feral for it. Adults get that gleam in their eye like they're remembering childhood but better. It's universal dessert happiness in bite-sized form.
Alright, let's break down exactly what goes into this masterpiece...
Inside the Ingredient List
The Flavor Base
Rice Chex cereal is the unsung hero of this entire operation. Those little square pockets create the perfect surface area for maximum coating coverage while maintaining their structure under the weight of all that white chocolate goodness. I've tried every cereal known to mankind, and nothing beats Rice Chex for that neutral base that lets the cherry cheesecake flavors shine. The cereal acts like tiny edible plates, each one ready to carry its payload of creamy, fruity deliciousness straight to your mouth. Don't get cute and try corn or wheat varieties — they bring their own flavors that muddle the purity of what we're creating here.
White chocolate chips are the canvas upon which we paint our cherry cheesecake masterpiece, but not all chips are created equal. Skip the bargain brands that taste like sweetened wax and invest in good quality chips that actually contain cocoa butter. When you melt them with the cream cheese, they transform into this silky river of sweetness that makes you want to dive in face-first. The white chocolate provides sweetness without competing flavors, letting the cherry and cream cheese notes take center stage while adding that essential richness that makes this taste indulgent rather than just sweet.
The Texture Crew
Butter might seem redundant when you're already using white chocolate, but here's the thing — it helps thin out the coating so it drapes over the cereal like liquid velvet instead of glopping on in thick, uneven patches. Salted butter is crucial because that tiny hit of salt makes the cherry flavor pop and prevents the whole thing from becoming cloyingly sweet. It also helps the coating set with that perfect snap when you bite into it, creating that candy-like shell that shatters to reveal the crunchy treasure inside.
Powdered sugar serves multiple purposes beyond just making everything look like it got caught in a snowstorm. It helps absorb any excess moisture from the cream cheese, keeping your puppy chow crisp and fresh for days. The ultra-fine texture creates a delicate dusting that melts on your tongue, adding one more layer of sweetness that dissolves instantly rather than competing with the creamy coating. When you shake it all together, the powdered sugar fills in any gaps, ensuring every single piece gets its fair share of sweet attention.
The Unexpected Star
Cherry flavored gelatin powder is where the magic happens, folks. This isn't just for color — though it does create that gorgeous pink hue that makes people think you spent hours on food coloring. The gelatin adds authentic cherry flavor that's bright and tangy without being artificial. When it hits the white chocolate mixture, it creates this marbled effect that's visually stunning. Plus, the slight tartness balances all that sweetness, making you reach for piece after piece because your palate never gets fatigued. I discovered this by accident when I ran out of cherry extract and desperation led to innovation.
Cream cheese is the secret weapon that transforms this from "good snack mix" to "what kind of sorcery is this?" Just two ounces, softened to room temperature, melts seamlessly into the white chocolate creating a coating so rich and smooth, it tastes like you spent hours making candy. It adds that unmistakable tang that screams cheesecake while helping the coating adhere perfectly to every surface. The cream cheese also acts as a stabilizer, keeping everything fresh and preventing that greasy separation that can happen with white chocolate.
The Final Flourish
Vanilla extract might seem like an afterthought, but it's the bridge that connects all these flavors into a cohesive cherry cheesecake experience. It rounds out the sharp edges of the cherry, enhances the cream cheese notes, and adds depth that makes people say "I can't quite place it, but this tastes like something familiar and amazing." Just one teaspoon transforms the entire profile from good to unforgettable. Don't even think about using imitation vanilla — this is one place where the real deal matters.
Crushed graham crackers are non-negotiable if you want authenticity. They provide that essential cheesecake crust element that makes this taste like the real dessert, not just cherry-flavored cereal. I crush mine with a rolling pin, leaving some pieces bigger for crunch and some fine for dusting. They add texture, they add flavor, and they make every bite feel like you're eating cherry cheesecake with a fork but somehow it's more fun and portable. The crackers absorb just enough moisture to soften slightly while maintaining their identity.
Red food coloring is completely optional but adds that extra visual punch that makes people say "wow" before they even taste it. If you're using good quality cherry gelatin, you'll get a lovely blush color naturally, but a single drop of red food coloring takes it to that vibrant cherry pink that screams "eat me, I'm delicious!" Just remember — a little goes a long way. I've seen people get heavy-handed and end up with something that looks like it belongs in a hospital, not a dessert bowl.
Everything's prepped? Good. Let's get into the real action...

The Method — Step by Step
- Start by creating your cereal staging area — dump all nine cups of Rice Chex into the largest bowl you own. I'm talking the giant one you usually reserve for popcorn or salad, because you're about to do some serious mixing and you need room to work. Spread it out so you have a nice even layer, and take a moment to appreciate how these little squares are about to become vehicles for pure joy. This is also the time to pick out any broken pieces or weird shapes, because we're making something beautiful here and every piece deserves to be perfect.
- Now comes the part where you need to pay attention: grab a medium microwave-safe bowl and combine your white chocolate chips, butter, and cream cheese. The cream cheese needs to be genuinely softened — not straight from the fridge — or you'll end up with little white lumps that refuse to melt. Microwave this mixture in thirty-second bursts, stirring between each interval like your life depends on it. Watch this part closely because white chocolate goes from perfectly melted to seized disaster faster than you can say "puppy chow." When it's smooth and glossy like liquid silk, you're golden.
- Here's where the magic happens: stir in your cherry gelatin powder and vanilla extract. The mixture will immediately transform into this gorgeous pink color that looks like strawberry milk but smells like cherry cheesecake heaven. If you're using food coloring, add it now — just one tiny drop. Stir until everything is completely combined and smooth. The mixture should be pourable but thick enough to coat a spoon. If it's too thin, let it sit for a minute; if it's too thick, add a teaspoon of milk and stir again.
- Okay, ready for the game-changer? Pour this pink perfection over your waiting cereal. But don't just dump it in the center — drizzle it all around the edges first, then across the middle. This ensures every piece gets some love. Now grab your biggest spatula or wooden spoon and start folding. Not stirring — folding. You want to lift from the bottom and bring it up, turning the cereal gently to coat without crushing it. This is therapeutic, so take your time and enjoy watching everything turn that gorgeous blush color.
- Now comes the fun part where you channel your inner bartender: grab a large resealable bag — the gallon size works perfectly — and add your powdered sugar. I like to add half the cereal mixture first, then half the powdered sugar, then repeat. This creates layers that ensure every piece gets coated evenly. Seal the bag with some air inside, because you're about to shake it like you're making a martini. Shake, shake, shake. Turn it, flip it, dance with it. The goal is to get every piece wearing its sugar coat like a winter jacket.
- While your puppy chow is getting its sugar spa treatment, grab a small skillet and toast your crushed graham crackers. This step is optional but it makes a huge difference — just two minutes over medium heat, stirring constantly until they smell like you're baking a pie. The toasting intensifies the flavor and adds a nuttiness that makes the final product taste more authentic. Let them cool completely, then add them to your bag of coated cereal. Give it one final shake to distribute the graham cracker pieces throughout.
- Spread everything out on a baking sheet lined with parchment paper. This isn't just for presentation — it lets the coating set completely and prevents clumping. Let it sit for at least thirty minutes, though I won't judge if you start sneaking pieces after fifteen. Once it's set, break apart any clusters that have formed. Some people like the clusters, some don't. I'm personally team cluster because they're like little bonus bites of concentrated flavor.
- The final step is the hardest: walk away. Let it sit for at least an hour before serving. This is when the flavors meld together and the coating achieves that perfect snap. If you can wait overnight, even better. Store it in an airtight container and try not to eat it all before you planned to share it. I dare you to taste this and not go back for seconds. Actually, I double-dog dare you.
That's it — you did it. But hold on, I've got a few more tricks that'll take this to another level...
Insider Tricks for Flawless Results
The Temperature Rule Nobody Follows
Room temperature isn't just a suggestion — it's the difference between smooth coating success and lumpy disaster. Your cream cheese needs to be genuinely soft, not just "I microwaved it for ten seconds" soft. Leave it out for at least an hour before you start. Same goes for your butter. When everything is the same temperature, they melt together into one harmonious mixture instead of fighting each other like toddlers in a toy store. A friend tried skipping this step once — let's just say her puppy chow looked like it had cottage cheese mixed in, and not in a good way.
Why Your Nose Knows Best
Your sense of smell is your best kitchen timer for this recipe. When the white chocolate mixture is ready, it should smell like vanilla ice cream on a hot day — sweet and inviting, not sharp or burnt. If you catch even a whiff of something that smells like overheated dairy, pull it out immediately. That smell means you're seconds away from a seized mess that no amount of stirring will fix. Trust your nose — it's been protecting you from bad food since you were born, and it knows when white chocolate is about to betray you.
The 5-Minute Rest That Changes Everything
After you melt your white chocolate mixture, let it rest for exactly five minutes before pouring it over the cereal. This allows it to thicken slightly, which means it won't pool at the bottom of your bowl. The coating will be more even, and you'll get that perfect candy-shell finish instead of soggy cereal. I discovered this by accident when my phone rang mid-recipe, and those five minutes of waiting created the best batch I'd ever made. Now it's part of my permanent process.
The Double-Coat Secret
Want to know how bakery-style puppy chow gets that thick, even coating? They double-coat it. After your first round of powdered sugar, let everything rest for fifteen minutes, then do a second coat. The first layer creates a base, and the second adds that professional-looking finish that makes people ask if you bought it somewhere fancy. Just use half the powdered sugar for each coat, shaking well between applications. This also helps prevent that greasy film that can develop when there's too much oil in the coating.
The Humidity Hack
If you live somewhere humid, you know the struggle of sticky, weepy puppy chow that never quite sets right. The solution is simple: add a tablespoon of cornstarch to your powdered sugar. It absorbs excess moisture and keeps everything crisp and fresh. This is especially important in summer or if you're making this for an outdoor event. Nobody wants to serve sad, sticky puppy chow that clumps together like wet sand at the beach.
Creative Twists and Variations
This recipe is a playground. Here are some of my favorite ways to switch things up:
Strawberry Shortcake Puppy Chow
Swap the cherry gelatin for strawberry and add a tablespoon of freeze-dried strawberry powder to the coating. Replace half the graham crackers with crushed vanilla wafers. The result tastes like strawberry shortcake but in addictive snack form. Kids go absolutely bananas for this version, and it makes amazing Valentine's Day gifts in little mason jars with ribbons.
Blueberry Muffin Puppy Chow
Use blueberry gelatin powder and add a teaspoon of lemon zest to the white chocolate mixture. The lemon brightens everything and makes it taste like fresh blueberry muffins. I like to add a handful of dried blueberries along with the graham crackers for extra fruit flavor and chewy texture. This version is perfect for summer picnics and disappears faster than ice cream on a hot day.
Chocolate Cherry Cheesecake Puppy Chow
Use chocolate Chex instead of rice, and add two tablespoons of cocoa powder to your white chocolate mixture. The chocolate-cherry combination is sophisticated enough for adult palates but still fun enough for kids. I like to use chocolate graham crackers for the full chocolate experience. This version pairs beautifully with red wine for grown-up movie nights.
Lemon Raspberry Puppy Chow
Replace the cherry gelatin with raspberry and add a teaspoon of lemon extract. The tartness from both fruits creates this amazing flavor that's bright and refreshing. Use lemon sandwich cookies crushed up instead of graham crackers. This version tastes like summer in a bowl and makes incredible ice cream toppers for an extra-special dessert.
Salted Caramel Apple Puppy Chow
Use apple gelatin powder and add two tablespoons of caramel sauce to your white chocolate mixture. Replace half the butter with brown butter for nutty depth. Mix in some chopped dried apples and use pretzel pieces instead of graham crackers. The sweet-salty combination is absolutely addictive, and it tastes like fall harvest festivals and cozy sweater weather.
Peaches and Cream Puppy Chow
Use peach gelatin powder and add a tablespoon of honey to the coating. The honey enhances the peach flavor and adds floral notes that make this taste like fresh peach cobbler. Use vanilla wafer pieces instead of graham crackers. This version is incredible when the weather starts warming up and you want something that tastes like sunshine and happiness.
Storing and Bringing It Back to Life
Fridge Storage
Here's where most people go wrong — they think puppy chow needs to be refrigerated because of the cream cheese. Wrong move, friend. The refrigerator introduces moisture that turns your beautiful crunchy pieces into sad, soggy lumps. Store your cherry cheesecake puppy chow in an airtight container at room temperature for up to one week. The cream cheese is stabilized by the sugar and white chocolate, so it's perfectly safe. Choose a cool, dry spot away from direct sunlight, and your puppy chow will stay crisp and delicious.
Freezer Friendly
Okay, this might blow your mind, but you can absolutely freeze puppy chow. Portion it into freezer bags, squeeze out all the air, and freeze for up to three months. The key is to let it come back to room temperature slowly — don't microwave it or you'll have a melty mess. Just leave it on the counter for about thirty minutes. Frozen puppy chow actually makes an amazing ice cream topping, or you can eat it straight from the freezer for a crunchy, cold treat that tastes like cherry cheesecake ice cream but better.
Best Reheating Method
If your puppy chow has absorbed moisture and gone slightly soft, you can bring it back to life. Spread it on a baking sheet and bake at 200°F for about ten minutes, then let it cool completely. This drives off excess moisture and restores that perfect crunch. Add a tiny splash of water before reheating — it steams back to perfection. Just a teaspoon sprinkled over a large batch creates enough steam to redistribute the coating without making things soggy. It's like giving your puppy chow a spa day that leaves it refreshed and ready to party.