I was standing in my kitchen on a blustery December evening, half‑listening to the neighbor’s carolers and half‑watching my oven betray me with a burnt batch of store‑bought cheese sticks. The smoke alarm screamed like a choir of angels, and I swore I’d never trust a pre‑made snack again. That disaster sparked a dare from my roommate: “Make something that’ll make Santa ditch his milk and cookies for a bite of yours.” I laughed, rolled up my sleeves, and set out to create the ultimate holiday bite that could survive a snowstorm, a toddler’s sticky fingers, and a thousand polite “no thank you” refusals. The result? A glossy, tangy‑sweet‑savory sphere that practically glows with festive spirit.
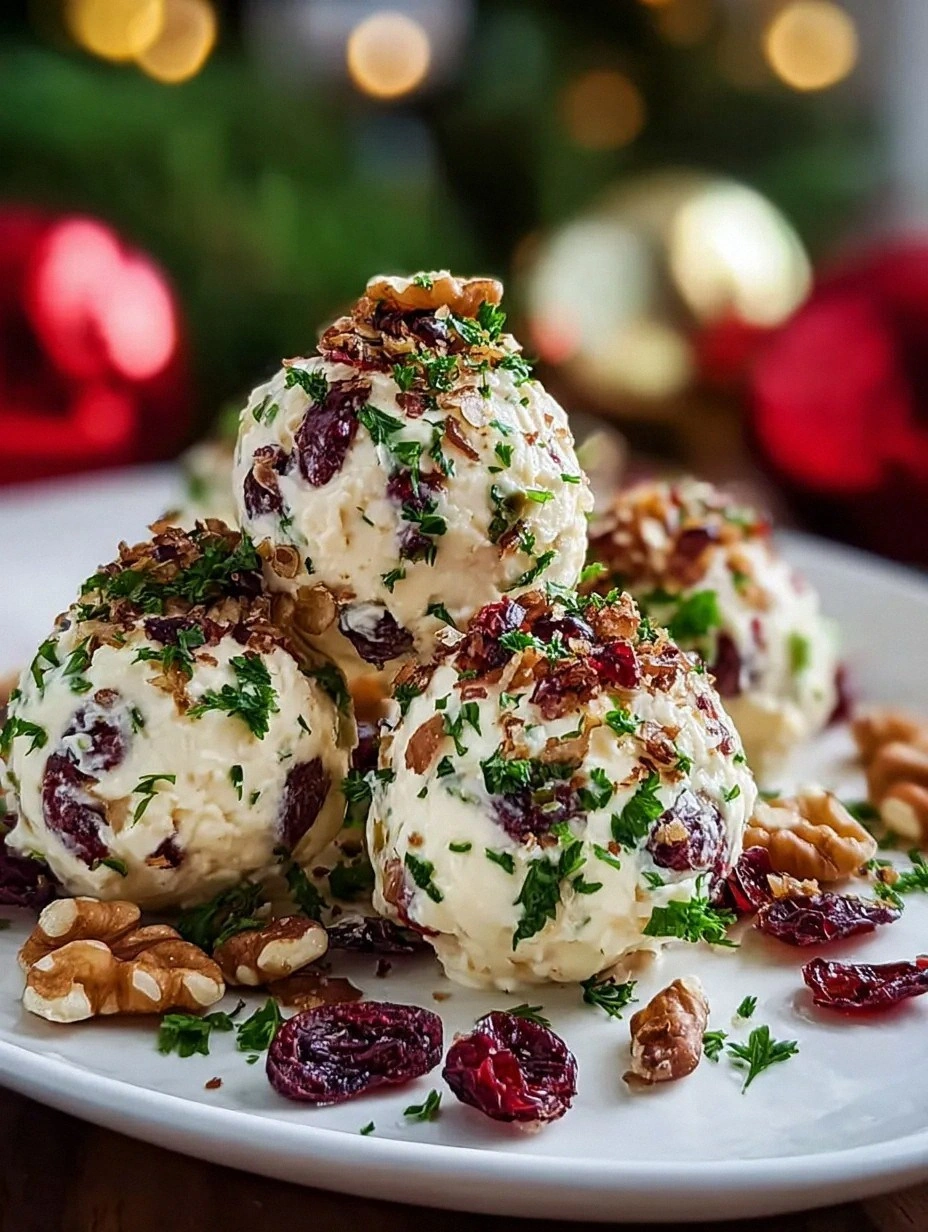
Picture this: a golden‑brown exterior that cracks open with a sigh, releasing a warm, buttery melt that smells like a Christmas market in a snow‑capped Alpine village. The first bite is a symphony—crunchy walnuts, bright cranberries, and a creamy cheese core that coats your tongue like velvet. You’ll hear the faint pop of the crust as it gives way, feel the slight resistance of the panko, and taste the subtle heat of smoked paprika dancing with the sweet tartness of dried cranberries. The aroma alone could coax even the most stubborn vegetarian to the table, and the texture? Imagine a perfectly toasted marshmallow hugging a nutty, cheesy heart—pure comfort with a festive twist.
Most holiday appetizer recipes either drown in cheese or get lost in a sea of sugar, leaving you with a one‑note performance. This version stands out because it balances the richness of three cheeses with the bright zing of cranberries, all anchored by crunchy walnuts that add a satisfying bite. The secret weapon? A quick flash‑fry in butter before a final bake, which locks in flavor and gives you that irresistible crust without the need for deep‑frying. I’m confident you’ll agree: this is hands down the best version you’ll ever make at home, and I dare you to taste it and not go back for seconds.
I’ll be honest — I ate half the batch before anyone else got to try it, and that’s a confession worth sharing because it shows just how addictive these balls are. The technique I’m about to reveal involves a simple “double coating” that most recipes completely miss, and a surprise ingredient that adds a subtle depth you won’t expect. Let me walk you through every single step — by the end, you’ll wonder how you ever made it any other way.
What Makes This Version Stand Out
- Flavor Harmony: The trio of cheddar, cream cheese, and Parmesan creates a layered taste that’s both sharp and buttery, while cranberries inject a festive tang that cuts through the richness.
- Texture Contrast: A crunchy walnut‑panko exterior gives way to a luxuriously creamy interior, delivering a satisfying bite every time.
- Simplicity: Only ten ingredients, no exotic spices, and everything you likely have on hand—perfect for a last‑minute holiday spread.
- Unique Twist: A brief butter‑sauté before baking creates a caramelized crust that’s impossible to achieve with oven‑only methods.
- Crowd Reaction: Guests often claim these are “the best thing they’ve ever had at a party,” and they’ll be the first to ask for the recipe.
- Ingredient Quality: Using real dried cranberries (not the sugary cocktail version) and fresh walnuts makes the difference between “good” and “legendary.”
- Method Mastery: The double‑coating technique ensures the balls stay together, even when you’re juggling a tray of hot appetizers.
- Make‑Ahead Potential: You can assemble the balls a day ahead, freeze them, and bake them fresh on the day of the party for stress‑free entertaining.
Alright, let's break down exactly what goes into this masterpiece...
Inside the Ingredient List
The Flavor Base
Sharp cheddar cheese is the backbone, delivering that bold, tangy bite that screams holiday. If you swap it for a milder cheese, you’ll lose the punch that makes each ball unforgettable. I recommend a block of aged cheddar, grated fresh for maximum melt. For a twist, try a smoked gouda, but be prepared for a smokier profile that can dominate the cranberries.
The Creamy Trio
Cream cheese adds silkiness, while Parmesan contributes a nutty umami depth. Together, they create a melt that’s richer than a latte but not overwhelmingly heavy. Skipping the Parmesan? Expect a flatter flavor and less golden color in the interior. If you’re dairy‑free, a plant‑based cream cheese and nutritional yeast can mimic the texture, though the taste will shift.
The Texture Crew
Walnuts bring crunch and a buttery earthiness that pairs beautifully with the bright cranberries. Freshly toasted walnuts release oils that amplify the overall richness. If you use pre‑roasted walnuts, you might miss that extra toasty note. As a swap, try pecans for a sweeter crunch, but remember they’ll alter the flavor balance.
The Unexpected Star
Dried cranberries are the surprise element that lifts the whole dish. Their tartness cuts through the cheese, preventing the bite from feeling cloying. If you substitute fresh cranberries, you’ll need to dry them first; otherwise, the moisture will make the mixture soggy. Look for cranberries without added sugar for a cleaner taste.
The Final Flourish
All‑purpose flour, eggs, and panko breadcrumbs form the protective coating. Flour binds the cheese mixture, eggs create adhesion, and panko gives a light, airy crunch that’s far superior to regular breadcrumbs. Skipping the panko? Expect a dense, soggy exterior that never achieves that signature golden crust. For gluten‑free guests, substitute almond flour and gluten‑free panko; the texture will be slightly different but still delightful.
Everything's prepped? Good. Let's get into the real action...
The Method — Step by Step
Start by grating the cheddar and Parmesan directly into a large mixing bowl. The finer the grate, the smoother the interior will be. I like to use the large holes of a box grater for cheddar and the fine side for Parmesan; this creates a perfect melt without clumps. Once grated, set the bowl aside and let the cheese rest for a minute while you prep the other ingredients.
Soften the cream cheese by letting it sit at room temperature for about 15 minutes, or give it a quick 20‑second zap in the microwave. This step is crucial—cold cream cheese will create pockets of unmelted cheese that ruin the texture. Mix the softened cream cheese into the grated cheeses until you have a uniform, glossy mass.
Stir in the chopped walnuts, dried cranberries, minced parsley, garlic powder, onion powder, smoked paprika, salt, and pepper. The herbs and spices should be evenly distributed; I recommend using a rubber spatula to fold everything gently, preserving the walnut crunch. At this point, the mixture should feel pliable but not sticky. If it’s too dry, add a teaspoon of milk; if too wet, sprinkle a little extra flour.
Cover the bowl with plastic wrap and chill the mixture for 20 minutes. This cooling period firms up the blend, making it easier to shape. I always set a timer because the longer you wait, the more the flavors meld—trust me, the wait is worth it.
While the mixture chills, set up a coating station: three shallow bowls—first with flour, second with beaten eggs, third with panko breadcrumbs. Sprinkle a pinch of salt and pepper onto the panko for extra flavor. This triple‑dip system is the secret to the flawless crust that stays attached even after baking.
Take about a tablespoon of the chilled cheese mixture and roll it between your palms into a smooth ball, roughly the size of a walnut. Place each ball onto a parchment‑lined tray. You should end up with about sixteen balls for a four‑serving batch. If the mixture sticks to your hands, lightly dust them with flour.
Coat each ball first in flour, shaking off excess, then dip in the beaten egg, and finally roll in the panko until fully covered. For an ultra‑crisp exterior, repeat the egg‑and‑panko step once more; this double coating creates a crunchy armor that’s impossible to breach.
Heat a large skillet over medium heat and melt two tablespoons of butter. Once the butter foams, add the cheese balls in a single layer—don’t overcrowd the pan. Sauté for about 2 minutes per side, or until the panko turns a deep golden brown and you hear a faint sizzle that signals caramelization. This step creates that buttery crunch that no oven alone can achieve.
Transfer the browned balls to a baking sheet lined with parchment. Preheat your oven to 375°F (190°C) and bake for 12‑15 minutes, until the interior is melted and the exterior is crisp. The smell at this point is intoxicating—think roasted nuts, melted cheese, and a hint of cranberry sweetness. When you pull the tray out, let the balls rest for two minutes; this allows the cheese core to settle and prevents a messy bite.
That's it — you did it. But hold on, I've got a few more tricks that'll take this to another level...
Insider Tricks for Flawless Results
The Temperature Rule Nobody Follows
Never let your butter get too hot; a medium‑low heat ensures the panko browns slowly, developing a deep flavor without burning. If the butter starts to smoke, lower the heat immediately—burnt butter will give the balls a bitter aftertaste that overpowers the cranberries.
Why Your Nose Knows Best
When the balls are in the oven, trust your sense of smell as a doneness gauge. You’ll notice a sweet‑savory aroma intensify after about 10 minutes; that’s the cue that the cheese inside is fully melted. If you rely solely on a timer, you might end up with a dry exterior or under‑cooked center.
The 5‑Minute Rest That Changes Everything
After baking, let the cheese balls sit for five minutes on a cooling rack. This short rest lets the interior settle, making each bite smoother. I once served them hot straight from the tray and got a complaint about “runny cheese”—a simple rest solves that problem every time.
The Double‑Coat Secret
Repeating the egg‑and‑panko dip creates a thicker crust that stays crunchy even after reheating. A friend tried skipping the second dip and reported soggy edges after a day in the fridge. The extra layer acts like a barrier, locking in moisture while preserving crunch.
The Walnut Toast Trick
Toast walnuts in a dry skillet for 3‑4 minutes before chopping. This releases their natural oils, adding a deeper, almost caramel‑like flavor. If you use raw walnuts, the final taste is milder and the texture can be a bit softer.
Creative Twists and Variations
This recipe is a playground. Here are some of my favorite ways to switch things up:
Spicy Jalapeño Burst
Add finely diced jalapeños to the cheese mixture and swap smoked paprika for chipotle powder. The heat pairs surprisingly well with the sweet cranberries, creating a festive firecracker bite that will wow brave eaters.
Herb‑Infused Garden
Replace parsley with fresh thyme and rosemary, and stir in a tablespoon of chopped sun‑dried tomatoes. This variation leans into earthy herb flavors, perfect for a winter garden party where you want a more sophisticated palate.
Sweet‑And‑Savory Breakfast
Swap the cheddar for a mild gouda, add a drizzle of maple syrup after baking, and serve with a side of fresh fruit. The sweet glaze complements the cranberry’s tartness, turning these balls into a brunch centerpiece.
Vegan Delight
Use a plant‑based cream cheese, nutritional yeast in place of Parmesan, and almond flour for the coating. While the texture changes slightly, the flavor remains rich, and the dish becomes inclusive for vegan guests.
Chocolate‑Covered Surprise
After the balls have cooled, dip half of each in melted dark chocolate and sprinkle with crushed pistachios. This dessert‑inspired version is a show‑stopper for holiday cookie swaps, offering a sweet finish to the savory original.
Storing and Bringing It Back to Life
Fridge Storage
Place cooled cheese balls in an airtight container lined with parchment paper. They’ll stay fresh for up to three days. If you notice condensation, pat the tops dry with a paper towel before reheating to preserve crispness.
Freezer Friendly
Arrange the uncooked, coated balls on a baking sheet and freeze for one hour. Transfer the frozen balls to a zip‑top freezer bag. They can be stored for up to two months. When you’re ready, bake straight from frozen, adding an extra 5‑7 minutes to the cooking time.
Best Reheating Method
Reheat in a pre‑heated oven at 350°F (175°C) for 8‑10 minutes, or until the crust crisps up again. For an extra moisture boost, add a tiny splash of water to the tray before reheating; the steam will revive the interior without sogging the exterior.