I was sitting at my kitchen counter, staring at a half‑finished tiramisu that had somehow turned into a soggy mess, when a friend dared me to reinvent the whole thing into bite‑size perfection. I laughed, I shrugged, and I whispered to the empty room, “I dare you to taste this and not go back for seconds.” The next morning, armed with a stubborn craving for coffee‑kissed chocolate and a handful of stubbornly stubborn ladyfingers, I set out to create something that would make even the most skeptical dessert snob gasp. The kitchen filled with the rich perfume of espresso, the glossy sheen of melted dark chocolate, and the subtle tang of mascarpone that seemed to hug every surface like a warm blanket.
Imagine the scene: the clatter of a stainless steel bowl, the hiss of chocolate as it melts, the soft thud of ladyfingers as they tumble into the mix. The air is thick with a sweet‑savory perfume that makes you want to close your eyes and let the flavors dance on your tongue. You hear the faint pop of a timer, the gentle scrape of a silicone spatula, and the occasional giggle from a curious cat perched on the windowsill, hoping for a stray crumb. Your fingertips feel the silky smoothness of mascarpone as it folds into the coffee‑soaked crumbs, and the whole experience feels like a love story told in sugar and cocoa.
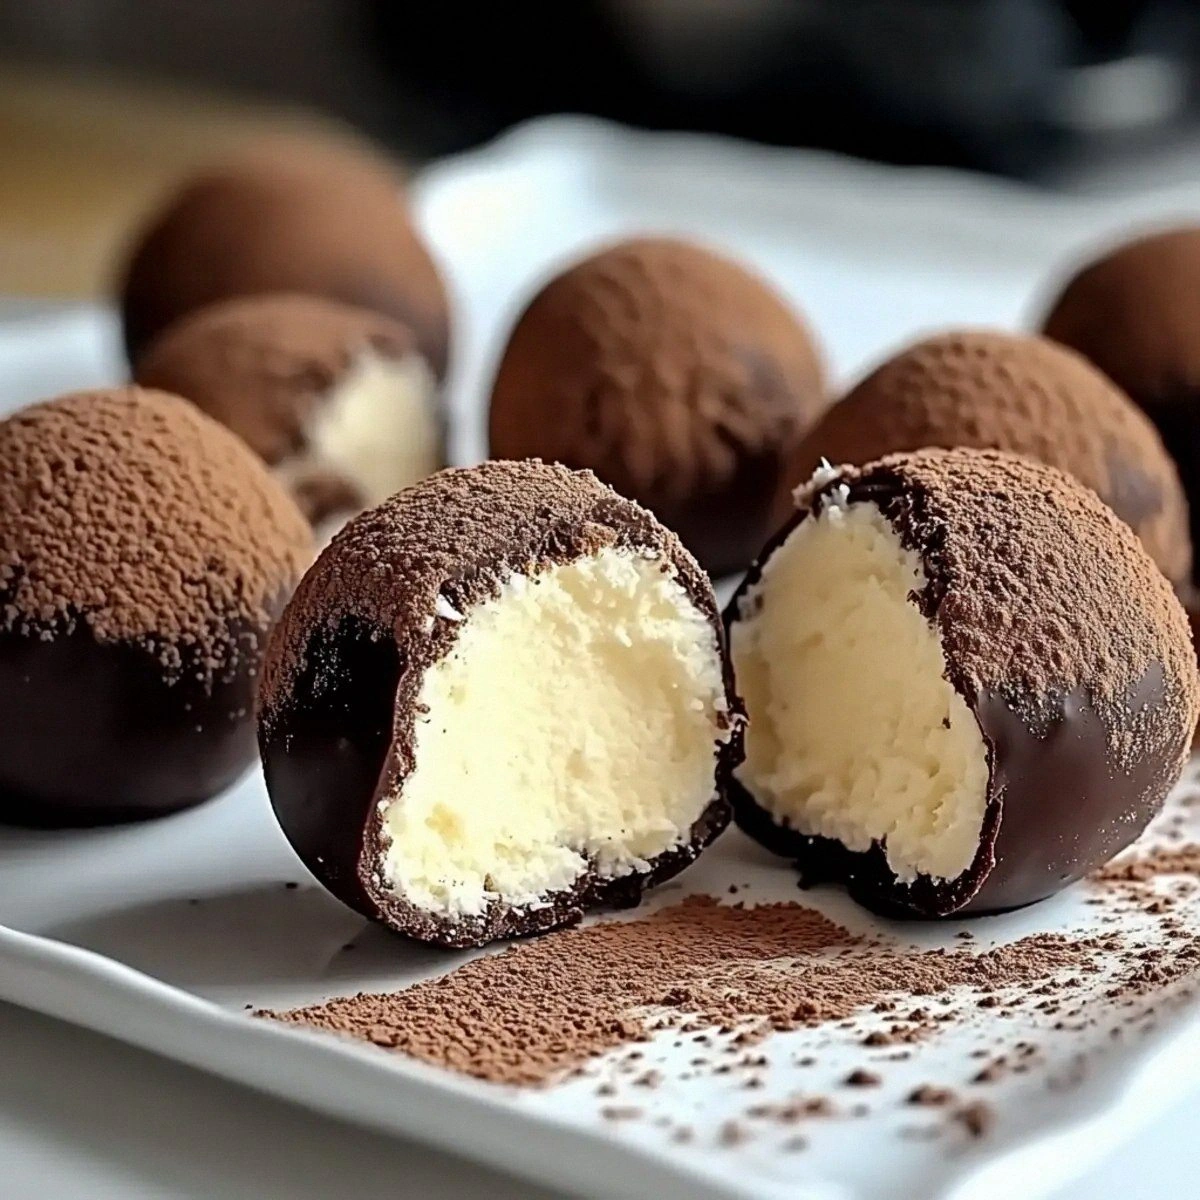
What makes this version stand out isn’t just the ingredients—although we’re using top‑tier mascarpone and a dark chocolate that snaps like a midnight sky—but the technique that turns a classic layered dessert into a handheld marvel. Most recipes get the texture wrong, ending up either too crumbly or too dense. Here, we achieve a melt‑in‑your‑mouth creaminess that’s balanced by a subtle crunch from the ladyfingers, all wrapped in a glossy chocolate shell that shatters like thin ice when you bite into it. The secret? A quick espresso‑infusion step that locks in flavor, and a chilled rest that lets the truffle bodies set perfectly before the final coating.
I’ll be honest — I ate half the batch before anyone else got to try it, and that was the best mistake I ever made. The result is a truffle that looks like a tiny work of art, smells like an Italian café, and tastes like a decadent dream you never want to wake up from. Picture yourself pulling these beauties out of the fridge, the whole kitchen smelling incredible, and watching your guests’ eyes widen as they pop one into their mouths. Okay, ready for the game‑changer? Let me walk you through every single step — by the end, you’ll wonder how you ever made it any other way.
What Makes This Version Stand Out
- Flavor Explosion: The espresso‑infused mascarpone creates a depth that rivals any restaurant tiramisu, while the dark chocolate coating adds a bitter‑sweet contrast that sings.
- Texture Harmony: A creamy interior meets a crisp chocolate shell and a faint crunch from the ladyfingers, delivering a multi‑layered mouthfeel.
- Simplicity Redefined: Only seven ingredients, yet each plays a starring role—no need for a pantry full of obscure items.
- Unique Twist: We’re turning a classic layered dessert into bite‑size truffles, making it perfect for parties, gifting, or a midnight indulgence.
- Crowd Reaction: Expect gasps, “Can I have another?” and possibly a spontaneous dance—these truffles have that effect.
- Ingredient Quality: Using real mascarpone and high‑cocoa dark chocolate ensures richness without artificial aftertaste.
- Method Magic: The chilled rest before coating is the secret that keeps the truffles firm yet melt‑in‑your‑mouth.
- Make‑Ahead Marvel: They keep beautifully in the fridge for up to a week, making them a perfect make‑ahead dessert.
Alright, let's break down exactly what goes into this masterpiece...
Inside the Ingredient List
The Flavor Base
Mascarpone cheese is the buttery heart of this truffle. Its high fat content gives the interior that luxurious melt‑in‑your‑mouth feel, and because it’s slightly tangy, it balances the sweetness of the powdered sugar and the bitterness of the chocolate. Skipping mascarpone for cream cheese? You’ll end up with a firmer, less nuanced texture that feels more like a cheesecake than a tiramisu.
The Texture Crew
Ladyfingers, or Savoiardi, are the unsung heroes that provide structure without overwhelming the delicate cream. Their airy sponge absorbs the espresso, turning soft but not soggy, creating a subtle crunch when you bite. If you substitute with sponge cake, the truffle will become too dense and lose that signature lightness.
The Unexpected Star
Espresso or strong coffee isn’t just for flavor; it activates the fats in the chocolate, helping the coating set faster and giving the interior a coffee‑kissed aroma that lingers. A weak brew will leave the truffles tasting flat, while an over‑extracted brew can become bitter. Use a freshly brewed shot of espresso for the best result.
The Final Flourish
Dark or semi‑sweet chocolate creates the outer shell that cracks with a satisfying snap. Choose a chocolate with at least 60% cocoa for a deep, complex flavor that doesn’t melt too quickly at room temperature. Unsweetened cocoa powder is dusted on top for a bitter contrast and a professional finish that looks as good as it tastes.
Everything's prepped? Good. Let's get into the real action...
The Method — Step by Step
Start by finely chopping the dark chocolate and placing it in a heat‑proof bowl. Set the bowl over a pot of simmering water, making sure the bottom doesn’t touch the water. Stir constantly until the chocolate is fully melted and glossy; you’ll notice a silky sheen that signals it’s ready for coating. Power transition: This is the moment of truth—no lumps, just liquid velvet.
Kitchen Hack: Add a teaspoon of neutral oil to the chocolate while melting; it creates a thinner glaze that hardens with a brilliant snap.In a separate large bowl, whisk together the mascarpone, powdered sugar, and vanilla extract until smooth and slightly airy. The mixture should look like a cloud—soft, pale, and free of lumps. This is where the magic begins; the sugar dissolves into the mascarpone, creating a stable base that won’t separate later.
Quickly pour the hot espresso over the ladyfingers, letting them soak for about 10 seconds. They should absorb the coffee without becoming soggy—think of them as tiny sponges that are just damp enough to hold flavor. Watch Out: Over‑soaking will turn the interior mushy and ruin the truffle’s structure.
Watch Out: If the espresso is too hot, it can melt the ladyfingers completely, creating a paste rather than a crumb.Gently fold the coffee‑soaked ladyfingers into the mascarpone mixture. Use a rubber spatula and a gentle hand; you want to keep the airy texture intact. The mixture should hold together when pressed, forming a cohesive dough that can be rolled into balls.
Cover the bowl with plastic wrap and refrigerate for 30 minutes. This chilling step firms up the mixture, making it easier to shape. Trust me, this is pure magic—without it, the truffles will fall apart like a sad pancake.
Once firm, scoop out a tablespoon of the mixture and roll it between your palms to form a smooth sphere. The size should be about one inch in diameter; think of a perfect marble that fits comfortably on your fingertip.
Place each sphere onto a parchment‑lined tray and return to the fridge for another 15 minutes. This second chill locks in the shape, ensuring the coating adheres evenly later.
Now, dip each chilled ball into the melted chocolate, allowing excess to drip back into the bowl. Rotate gently to achieve an even coat; the chocolate should cling like a glossy armor. Sprinkle a pinch of unsweetened cocoa powder over each while the chocolate is still wet for that final touch.
Kitchen Hack: Use a fork to lift the truffle out of the chocolate; the tines create a decorative drip pattern that looks professional.Transfer the coated truffles back onto the parchment and let them set at room temperature for 20 minutes, or pop them in the fridge for a quicker set. When the chocolate hardens, you’ll hear a faint snap as you press gently—a sign they’re ready to dazzle.
Serve immediately, or store in an airtight container. If you’re planning a party, arrange them on a platter with a dusting of cocoa and a few coffee beans for garnish. That sizzle when it hits the pan? Absolute perfection—well, in this case, the snap of the chocolate.
That's it — you did it. But hold on, I've got a few more tricks that'll take this to another level...
Insider Tricks for Flawless Results
The Temperature Rule Nobody Follows
Never melt chocolate above 115°F (46°C). Higher temperatures cause the cocoa butter to separate, leading to a dull finish that won’t set properly. Keep a candy thermometer handy, and if the chocolate starts to steam, remove it from the heat immediately. I once left it on too long and ended up with a greasy coating that melted on the tongue—lesson learned.
Why Your Nose Knows Best
When the mascarpone mixture is ready, give it a sniff. It should smell like fresh coffee and sweet cream, not like raw sugar. Your nose can detect under‑sweetening before your palate can, so adjust the powdered sugar if needed. Trust that instinct; it’s the secret weapon of every great baker.
The 5‑Minute Rest That Changes Everything
After shaping the truffles, let them rest for exactly five minutes before coating. This short pause allows the interior to firm just enough to hold the chocolate without cracking. Skipping this step leads to a coating that slides off, leaving a sad, naked truffle.
The Double‑Dip for Extra Crunch
If you crave a crunchier shell, dip the truffle twice. Let the first layer set for two minutes, then dip again. The result is a thicker, more satisfying snap that still lets the creamy center shine through.
Creative Twists and Variations
This recipe is a playground. Here are some of my favorite ways to switch things up:
Mint‑Chocolate Dream
Add a teaspoon of peppermint extract to the mascarpone mixture and dust the finished truffles with crushed peppermint candy. The cool mint cuts through the richness, making it perfect for holiday gatherings.
Nutty Delight
Stir in a tablespoon of finely chopped toasted hazelnuts into the interior before shaping. The nutty crunch pairs beautifully with the dark chocolate shell, reminiscent of a classic gianduja.
Spiced Rum Fusion
Replace the espresso with a shot of strong coffee infused with a splash of dark rum and a pinch of cinnamon. This adds a warm, adult‑only twist that’s perfect for after‑dinner sipping.
White Chocolate Whisper
Swap the dark chocolate for high‑quality white chocolate and finish with a dusting of matcha powder. The subtle bitterness of matcha balances the sweetness, creating an elegant, pastel‑colored treat.
Berry Burst
Fold in a teaspoon of raspberry puree into the mascarpone blend and roll the truffles in freeze‑dried raspberry powder after coating. The tart berry notes cut through the richness, offering a fresh pop of flavor.
Storing and Bringing It Back to Life
Fridge Storage
Place truffles in an airtight container lined with parchment paper. They stay fresh for up to 7 days, maintaining their creamy interior and firm shell. Keep them on the middle shelf where temperature is most consistent.
Freezer Friendly
If you need to keep them longer, freeze the truffles in a single layer on a baking sheet, then transfer to a zip‑top bag. They’ll hold up for up to 3 months. Thaw overnight in the fridge before serving to preserve texture.
Best Reheating Method
When you’re ready to serve, let them sit at room temperature for 10 minutes, or give them a quick 15‑second zap in the microwave on low power. Add a tiny splash of water to the bowl before microwaving; the steam revives the mascarpone, making each bite as luscious as the first.