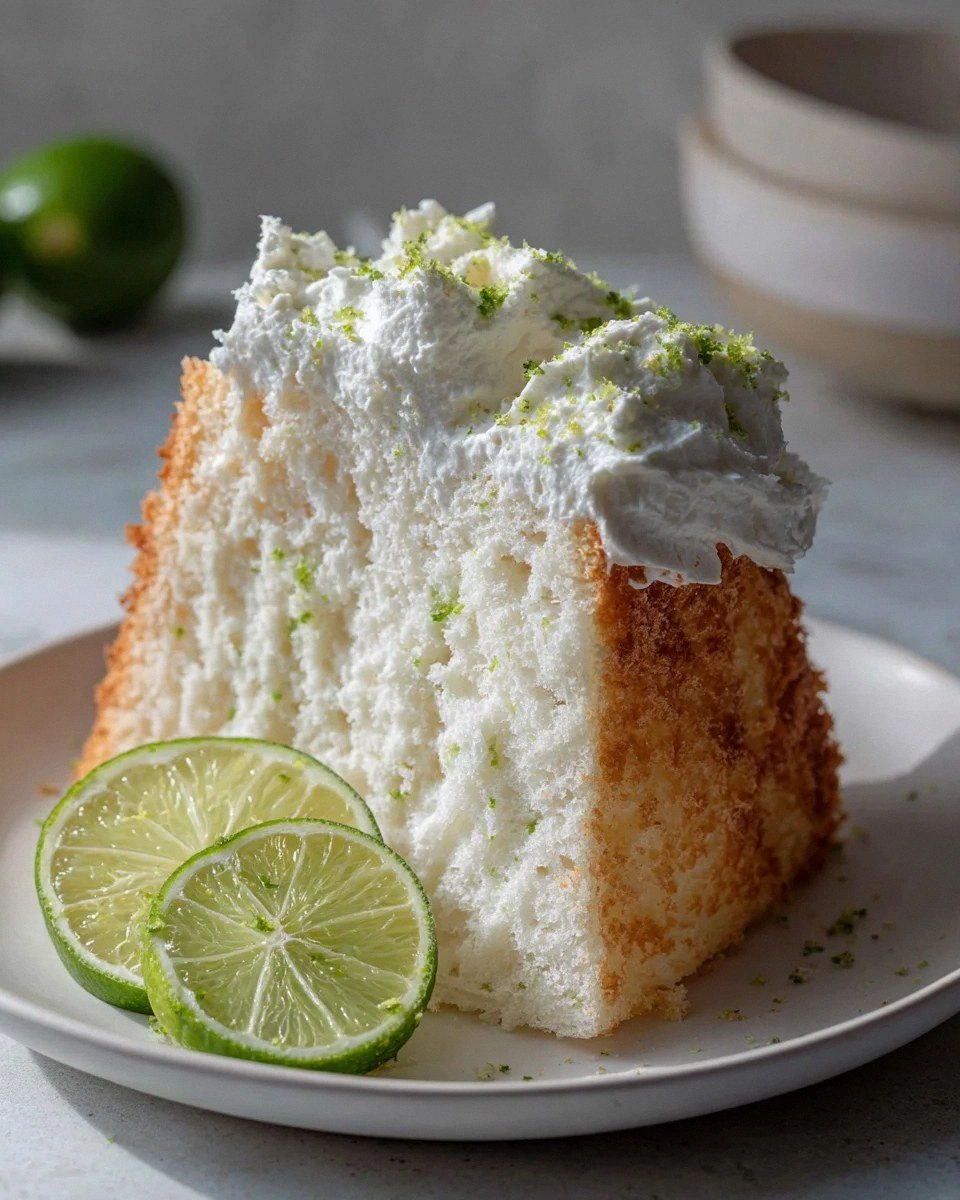
Picture this: it's 11:30 p.m. on a humid summer Tuesday, and I'm standing in my kitchen wearing mismatched socks, staring down a pile of key limes that looked adorable at the farmers market but now feel like tiny green Rubik's cubes. My original plan was a simple key lime pie, but the universe (and my lack of condensed milk) had other plans. Thirty minutes later I'm wrist-deep in egg whites, praying to the baking gods that this spontaneous angel-food experiment won't collapse into a sugary omelette of disappointment. Reader, what emerged from that oven was so ethereally light, so perfectly balanced between tangy citrus and cloud-like sweetness, that I actually did a victory dance in those mismatched socks. The neighbors probably think I'm mad, but one bite and you'll understand why I couldn't wait until morning to share this triumph.
Most angel food cakes are pleasant enough—sweet, fluffy, a vehicle for berries. This one? It's a revelation. The key lime juice and zest weave through the crumb like liquid sunshine, cutting the usual cloying sweetness and replacing it with a sophisticated zing that makes your taste buds sit up and salute. The texture is so delicate it practically dissolves on your tongue, yet the flavor lingers like a favorite song's last note. I dare you to taste this and not go back for seconds; I certainly failed that challenge, polishing off a third of the cake before my better judgment kicked in.
I'll be honest—I've eaten half the batch before anyone else got to try it, and I have zero regrets. The first slice was "just to test," the second was "quality control," and by the third I was making up excuses about needing to photograph the crumb structure. Future pacing moment: picture yourself pulling this out of the oven, the whole kitchen smelling incredible, that citrus perfume mingling with the sweet vanilla aroma, and knowing you've got the perfect dessert that looks like you spent all day but actually took under an hour.
Stay with me here—this is worth it. We're talking about a cake so light it feels like eating a citrus-scented cloud, yet so packed with flavor that guests will swear you trained at Le Cordon Bleu. Let me walk you through every single step—by the end, you'll wonder how you ever made angel food cake any other way.
What Makes This Version Stand Out
- Flavor Explosion: Traditional angel food plays it safe with vanilla alone, but the key lime juice and zest here create a bright, tropical flavor that dances between sweet and tart in perfect harmony. It's like summer vacation in cake form, and once you taste it, plain angel food will taste like a missed opportunity.
- Feather-Light Texture: The combination of cake flour and properly whipped egg whites creates a crumb so airy it practically floats off the fork. Each bite dissolves like cotton candy, leaving behind only the memory of lime-kissed sweetness.
- Foolproof Technique: Most recipes get this completely wrong—over-whipping the whites, under-folding the flour, or skipping the crucial cooling step. This method walks you through the exact visual cues that guarantee success every single time.
- Stunning Presentation: That golden-brown crown with its dramatic peaks and valleys looks bakery-perfect without any decorating skills required. Dust it with powdered sugar and you have a dessert worthy of a magazine cover.
- Make-Ahead Magic: Unlike most cakes that stale quickly, this beauty stays tender for days, making it perfect for dinner parties or holiday prep. The flavors actually deepen overnight, so you can bake today and serve tomorrow without any quality loss.
- Crowd-Wowing Simplicity: Despite looking impressive enough for special occasions, this recipe uses just eight ingredients and no fancy equipment. If you've ever struggled with finicky desserts, you're not alone—and I've got the fix right here.
Alright, let's break down exactly what goes into this masterpiece...
Inside the Ingredient List
The Flavor Base
Cake flour is the unsung hero here, with its lower protein content creating that trademark tender crumb that melts in your mouth. Regular all-purpose flour will give you a denser, bread-like texture that completely misses the point of angel food. If you absolutely must substitute, remove two tablespoons from each cup of all-purpose flour and add two tablespoons of cornstarch, but trust me—spring for the cake flour if you want that ethereal texture.
Granulated sugar does double duty here, sweetening the cake while stabilizing the egg whites as they whip. Don't be tempted to reduce the amount—sugar isn't just for flavor in angel food; it's structural. The sugar crystals help create those tiny air pockets that give the cake its lift, so cutting back will leave you with a sad, deflated mess.
The Texture Crew
Twelve large egg whites might seem excessive, but they're the entire backbone of this cake—no chemical leaveners allowed. The proteins in the whites unfold and trap air as you whip them, creating a foam that expands in the oven for that dramatic rise. Make sure your eggs are at room temperature; cold whites won't whip up nearly as voluminously, and you'll end up with a squat cake that tastes fine but looks like it gave up halfway through.
Cream of tartar is your insurance policy against over-whipped whites. This acidic powder stabilizes the protein structure, giving you a wider margin of error between glossy peaks and dry, broken curds. If you skip it, you might get lucky, but more likely you'll watch your beautiful whites turn into a grainy mess right when you need them most.
The Unexpected Stars
Key lime juice brings that signature bright acidity that makes this version special. Regular Persian limes work in a pinch, but key limes have a more complex flavor—floral and tart with hints of pine that elevate the cake from simple to sophisticated. Fresh juice is non-negotiable; bottled stuff tastes flat and metallic, like drinking limeade from a can that's been sitting in your pantry since 2019.
Key lime zest packs concentrated oils that perfume the entire cake with citrus aromatics. The zest goes in right at the end of whipping so the oils don't have time to break down, giving you maximum impact. Don't skip this step—the zest provides 80% of the lime flavor; the juice is just the backup singer.
The Final Flourish
Vanilla extract rounds out the sharp edges of the lime, adding depth and warmth that prevents the citrus from tasting one-dimensional. Use real vanilla, not the imitation stuff—this cake is so delicate that artificial vanilla's chemical undertones will stand out like a sore thumb. The vanilla should whisper, not shout, creating a harmonious backdrop for the lime to shine.
Salt might seem counterintuitive in a sweet cake, but it's essential for balancing flavors. Just half a teaspoon amplifies the lime's brightness and prevents the cake from tasting cloyingly sweet. Without it, your cake will taste flat, like a song missing its bass line.
Everything's prepped? Good. Let's get into the real action...
The Method — Step by Step
- Preheat your oven to 350°F and position the rack in the lower third—this prevents the top from browning too quickly while the center finishes baking. Don't grease your angel food pan; the cake needs to cling to the sides as it rises, and any grease will cause it to slump like a disappointed soufflé. If your pan has a removable bottom, leave it as-is—the cake will shrink slightly as it cools and release naturally.
- Sift the cake flour and half the sugar together three times. Yes, three—this isn't culinary OCD, it's aeration insurance. Each pass incorporates more air and ensures the flour particles are completely separated, preventing stubborn lumps that could weigh down your delicate foam. The mixture should look like fresh snow and feel lighter than your hopes for a winning lottery ticket.
- Separate your eggs while they're cold (easier to separate), then let the whites come to room temperature for 30 minutes. Room-temperature whites whip up to eight times their volume, while cold ones barely quadruple. If you're in a hurry, place the bowl of whites in a larger bowl of warm water for 10 minutes, stirring occasionally until they lose their chill.
- Start whipping the whites on medium-low until foamy, like a bubble bath that's just been run. Add the cream of tartar and salt, then gradually increase speed to medium-high. This gradual build prevents large, unstable bubbles that will burst in the oven. You're looking for soft peaks that flop over like tired party hats when you lift the beaters.
- Now the fun part—start adding the remaining sugar, one tablespoon at a time, letting each dissolve before adding the next. This creates a glossy, stable meringue that could probably hold up your car if you had enough of it. When you reach stiff peaks, the mixture should be thick enough that when you lift the beaters, the peaks stand up proudly but the tips curl like a question mark.
- Time for the game-changer—whisk in the key lime juice, zest, and vanilla just until combined. Over-mixing here will deflate your beautiful foam, so fold rather than stir. The mixture will look slightly curdled at first—don't panic! The acid is just tightening the proteins, and it'll smooth out as you incorporate the flour.
- Sift one-third of the flour mixture over the meringue. Use a large rubber spatula to fold—slice down through the center, scrape along the bottom, and lift up the side, rotating the bowl as you go. Count 10 folds, no more. The goal is to eliminate dry pockets while maintaining as much air as possible. It's better to have a few streaks than to over-mix.
- Repeat with the remaining flour in two more additions. The batter should look like a fluffy cloud with occasional flour freckles—if it's completely uniform, you've gone too far. When you lift the spatula, the batter should ribbon off in thick, glossy folds that hold their shape for a moment before melting back into the bowl.
- Gently spoon the batter into your ungreased pan, cutting through it with a skewer or thin spatula to release large air pockets. Smooth the top with an offset spatula, but don't press down—you're not cementing bricks here. The batter should fill the pan about three-quarters full; it will rise dramatically in the oven like a golden crown.
- Bake for 35-40 minutes until the top is deep golden brown and springs back when lightly touched. A toothpick should come out clean, but the real test is listening—the cake will stop singing (making tiny crackling sounds) when it's done. Don't open the oven door for the first 30 minutes, or you'll watch your masterpiece deflate faster than a punctured balloon.
That's it—you did it. But hold on, I've got a few more tricks that'll take this to another level...
Insider Tricks for Flawless Results
The Temperature Rule Nobody Follows
Your oven thermometer is lying to you. Most home ovens run 25-50 degrees off, which means your cake could be baking in anything from a sauna to a furnace. Invest in an inexpensive oven thermometer and adjust accordingly—this cake is forgiving, but not that forgiving. I learned this the hard way after three collapsed cakes that tasted fine but looked like they'd been sat on by an elephant.
Why Your Nose Knows Best
That sizzle when the batter hits the pan? Absolute perfection. Listen for it when you're folding in the flour—if you hear nothing, your whites have deflated and you need to start over. The batter should whisper as you fold, like silk scarves rustling. A friend tried skipping this auditory check once—let's just say her cake had the texture of a kitchen sponge and the personality of wet cardboard.
The 5-Minute Rest That Changes Everything
After folding in the flour, let the batter rest for exactly five minutes before pouring it into the pan. This brief pause allows the flour to fully hydrate, preventing those tiny white specks that look like flour freckles in your finished cake. Don't go longer than five minutes, though, or the foam will start to break down and you'll lose that spectacular rise.
The Ziplock Trick for Clean Slices
Use a serrated knife dipped in hot water for picture-perfect slices. Wipe the blade between cuts with a paper towel, and each slice will emerge clean and professional. This cake is so tender that a regular knife will drag through it like a plow through snow, leaving you with ragged edges that look like a toddler went at it with a plastic fork.
Creative Twists and Variations
This recipe is a playground. Here are some of my favorite ways to switch things up:
Coconut Key Lime Cloud
Replace two tablespoons of the cake flour with unsweetened shredded coconut for a tropical twist that transports you straight to a beachside cabana. The coconut adds subtle nuttiness and tiny flecks of texture that complement the lime perfectly. Top with a coconut-lime glaze made from coconut milk, powdered sugar, and a splash of rum for the full vacation experience.
Berry Ripple Version
Gently fold in half a cup of crushed raspberries or blackberries just before pouring into the pan. The berries create beautiful marbled streaks and add pops of tart fruit that play off the key lime like a well-orchestrated duet. Don't over-mix or you'll end up with purple cake that looks like a unicorn's bad day.
Mojito Madness
Add a tablespoon of fresh mint leaves finely minced with the lime zest for a mojito-inspired cake that tastes like summer in cocktail form. The mint should be subtle—if you can see green flecks, you've gone too far. Serve with a mint-lime syrup drizzled tableside for dramatic effect.
Chocolate-Citrus Fusion
Fold in two tablespoons of Dutch-processed cocoa powder with the flour for a subtle chocolate background that makes the lime taste even brighter. It's like chocolate-covered key lime pie in cake form—unexpected but absolutely addictive. Dust with cocoa powder instead of powdered sugar for a sophisticated finish.
Spicy Margarita Cake
Add a pinch of cayenne pepper and replace the vanilla with tequila for a cake that captures the essence of a spicy margarita. The heat should build slowly, not punch you in the throat. Serve with a salted rim on the plate for the full cocktail experience without the hangover.
Almond-Lime Dream
Replace the vanilla with almond extract and fold in two tablespoons of very finely ground almonds for a cake that tastes like key lime macarons. The almond adds a marzipan-like sweetness that plays beautifully with the tart lime. Be careful with the almond extract—a little goes a long way, and too much will make your cake taste like perfume.
Storing and Bringing It Back to Life
Fridge Storage
Wrap the cooled cake tightly in plastic wrap, then slip it into a large zip-top bag with the air pressed out. It'll keep for up to five days in the refrigerator, though the texture is best within the first three. The lime flavor actually intensifies overnight, making this an ideal make-ahead dessert for entertaining. Bring to room temperature for 30 minutes before serving for the best texture and flavor.
Freezer Friendly
Angel food cake freezes beautifully—wrap individual slices in plastic wrap, then aluminum foil, and freeze for up to two months. Thaw overnight in the refrigerator, then let come to room temperature. Pro tip: freeze slices on a baking sheet first, then wrap once solid. This prevents the wrapping from squishing your delicate cake into a sad, flattened version of its former glory.
Best Reheating Method
While angel food cake is best served at room temperature, if you've refrigerated it and want to restore that fresh-baked texture, try this: place a slice on a microwave-safe plate with a damp paper towel over it. Microwave on 50% power for 10-15 seconds—just enough to take the chill off without making it rubbery. Add a tiny splash of water before reheating—it steams back to perfection.