I was standing in my kitchen, half‑heartedly scrolling through endless snack ideas, when my roommate shouted, “Bet you can’t make something that actually makes people *stop* talking!” I laughed, grabbed the nearest sausage, and thought, “Challenge accepted.” Little did I know that a simple mishap—over‑cooking a bratwurst that turned into a charcoal brick—would lead me down the rabbit hole of discovering the ultimate mustard‑glazed, hasselback‑style kielbasa bite. The moment the first slice hit the hot pan, a crackle erupted, a scent of caramelized mustard and sweet honey swirled through the apartment, and I realized I was onto something legendary.
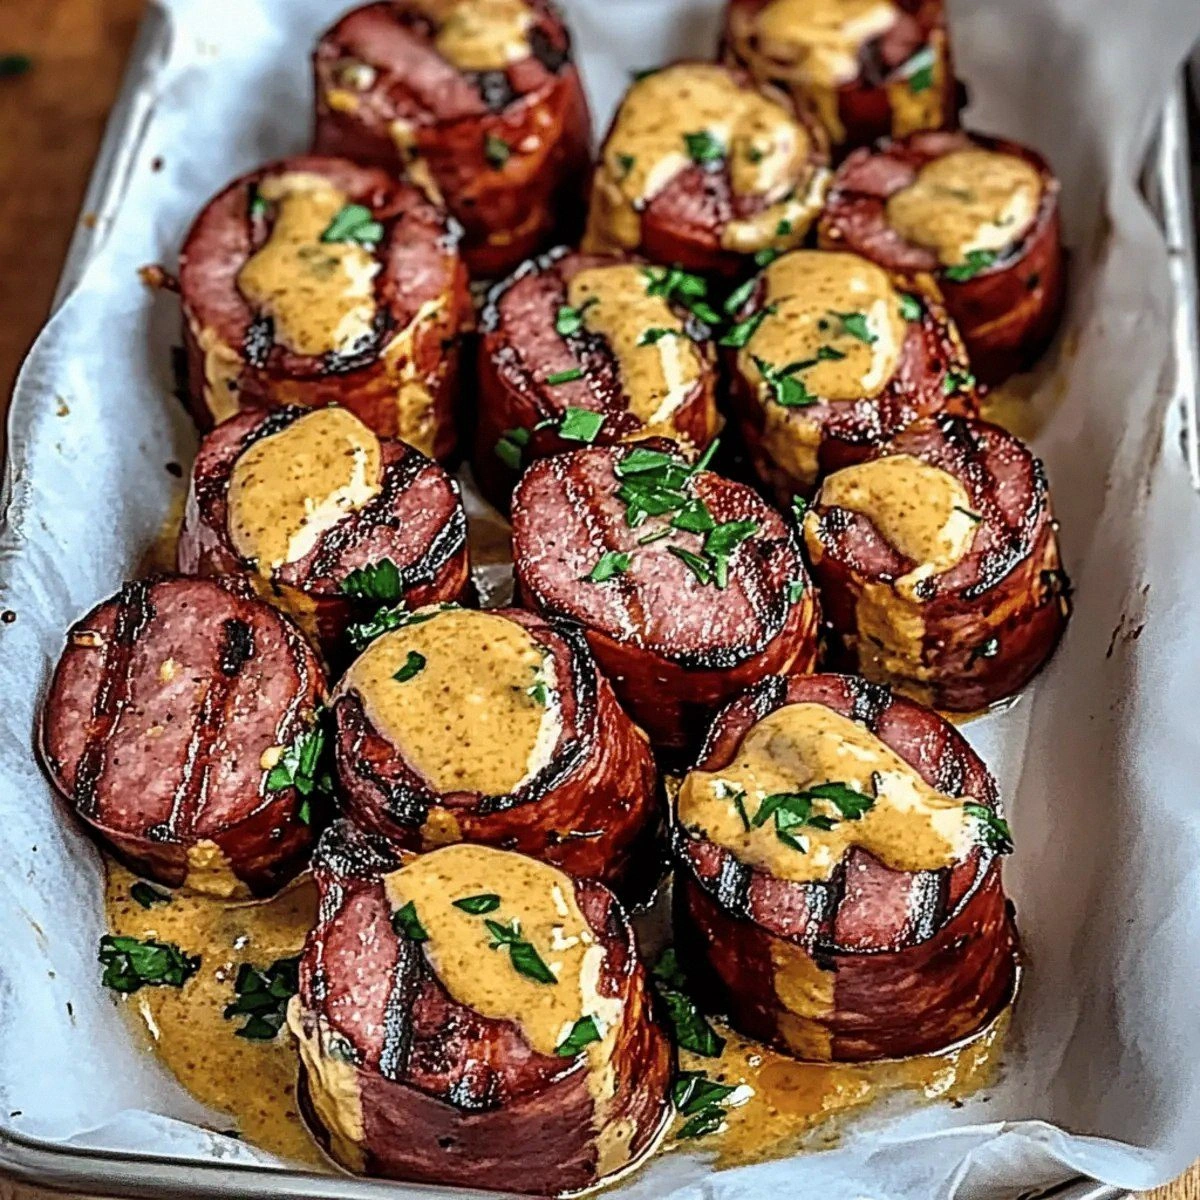
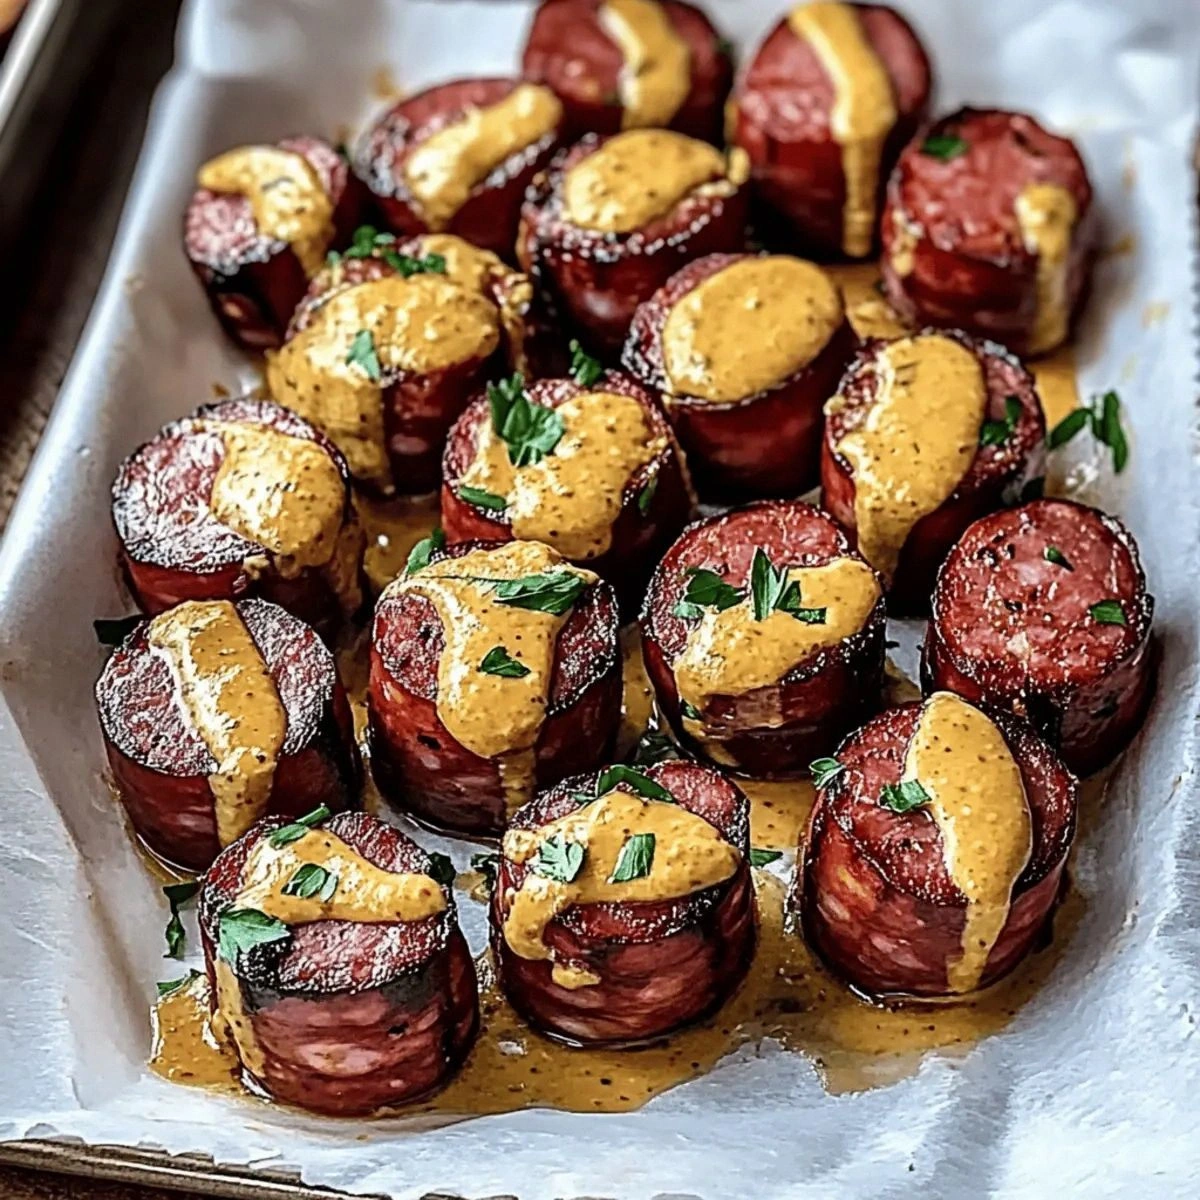
Picture this: a golden‑brown ring of kielbasa, each slice fanning out like a miniature accordion, its edges crisped to a buttery snap while the interior stays juicy, smoky, and just a touch sweet. The mustard glaze clings to the sausage like a glossy coat of armor, and a sprinkle of fresh parsley adds a pop of color that makes the whole thing look like a party on a plate. When you bite in, the first thing you notice is the crisp, almost crackling edge that shatters like thin ice, followed by a burst of savory‑sweet flavor that dances across your tongue. It’s the kind of snack that makes you forget you’re supposed to be watching a movie and instead have you reaching for another handful without even thinking about it.
Most recipes out there either drown the kielbasa in a soggy sauce or try to bake it flat, losing that glorious texture contrast. This version stands out because it embraces the Hasselback technique—those delicate, fan‑like cuts that expose more surface area to the glaze—while keeping the cooking time short enough to preserve the sausage’s natural snap. The secret? A mustard‑honey glaze that caramelizes just enough to create a glossy, slightly sticky coating without turning into a sugar‑crusted disaster. And the best part? You only need five pantry staples, so there’s no excuse not to try it tonight.
Let me walk you through every single step — by the end, you’ll wonder how you ever made it any other way. I dare you to taste this and not go back for seconds. Ready for the game‑changer? Okay, ready for the game‑changer?
What Makes This Version Stand Out
- Flavor Explosion: The mustard‑honey glaze hits the palate with a tangy‑sweet punch that amplifies the natural smokiness of the kielbasa, creating a balanced flavor profile you won’t find in ordinary sausage bites.
- Texture Contrast: The Hasselback cuts produce ultra‑crisp edges that shatter like thin ice, while the interior remains juicy and tender, offering a satisfying bite every time.
- Simplicity: Only five ingredients are required, meaning you can whip up a crowd‑pleasing snack in under an hour without rummaging through the spice cabinet.
- Unique Presentation: The fan‑like slices make each bite look like a miniature work of culinary art, perfect for Instagram and for impressing guests.
- Crowd Reaction: People who try these bites often proclaim them the best thing they’ve ever had at a party, and you’ll hear the same enthusiastic “more, please!” echo around the room.
- Ingredient Quality: Using a high‑quality, smoked kielbasa ensures a deep, authentic flavor that pairs perfectly with the bright mustard and subtle honey.
- Cooking Method: The combination of oven roasting and a quick broil locks in moisture while achieving that coveted caramelized crust.
- Make‑Ahead Potential: These bites can be pre‑pped and stored, then reheated in a flash, making them ideal for game days, potlucks, or a quick snack any time.
Inside the Ingredient List
The Flavor Base
Yellow Mustard (1/4 cup): This is the heart of the glaze. Its sharp, vinegary bite cuts through the richness of the sausage, while its natural emulsifiers help the honey cling to every crevice. If you skip it, you’ll lose that bright tang that keeps the flavor from becoming cloyingly sweet. A Dijon mustard can work in a pinch, but you’ll miss the classic yellow mustard’s mellow heat.
The Sweet Counterpoint
Honey (2 tablespoons): Honey adds a subtle floral sweetness that caramelizes beautifully under the broiler, creating that glossy, almost lacquered finish. Without it, the glaze would be too sharp and the edges would never achieve that coveted caramel crunch. If you’re allergic to honey, try maple syrup or agave nectar, but expect a slightly different flavor nuance.
The Spice Kick
Paprika (1 teaspoon): This smoky, mildly sweet spice deepens the overall flavor and adds a hint of earthiness that complements the smoked kielbasa. Leaving it out results in a glaze that feels flat and one‑dimensional. Smoked paprika can be swapped for regular paprika if you prefer a milder profile.
The Fresh Finish
Fresh Parsley (2 tablespoons, chopped): Parsley isn’t just a garnish; its bright, slightly peppery notes lift the richness of the sausage and add a pop of green that makes the dish look as good as it tastes. Skipping it makes the bites feel heavy and dull. If parsley isn’t your thing, cilantro or flat‑leaf dill can add a similar fresh punch.
The Star Ingredient
Kielbasa (1 pound): The quality of the sausage is everything. Look for a smoked, Polish‑style kielbasa with a firm texture and a deep, smoky aroma. A cheap, overly fatty version will render too much grease, making the glaze soggy and the edges limp. When buying, give the sausage a gentle squeeze; it should feel firm yet slightly springy.
Everything's prepped? Good. Let's get into the real action...
The Method — Step by Step
Preheat your oven to 375°F (190°C). While the oven warms up, line a large baking sheet with parchment paper and set a wire rack on top; this will allow the heat to circulate and keep the kielbasa from sitting in its own juices. The scent of a pre‑heated oven is already a promise of what’s to come—think of it as the kitchen’s way of saying “get ready.”
Kitchen Hack: Place a damp towel under the cutting board while you slice; this prevents the board from slipping and gives you a steady surface.Take the pound of kielbasa and lay it on the cutting board. Using a sharp serrated knife, make a series of shallow cuts about ¼ inch apart, cutting almost all the way through but leaving the base intact—think of a fan opening. The key is to keep the bottom uncut so the sausage holds together; this is the Hasselback magic that creates those crispy edges.
In a small saucepan, combine the yellow mustard, honey, and paprika. Warm over low heat, stirring constantly, until the mixture is smooth and glossy—about 2 minutes. This is the moment of truth: you’ll see the honey start to thin and the mustard become a silky river of flavor. Once blended, remove from heat and let it cool slightly so it won’t scorch the sausage.
Brush the glaze generously over the entire surface of the kielbasa, making sure it seeps into each cut. Use a pastry brush for precision, and don’t be shy—more glaze means more caramelized crunch. Let the sausage sit for 5 minutes; this short rest allows the flavors to penetrate the meat.
Watch Out: If you use a high‑sugar glaze, keep a close eye during the broil step—sugar can burn quickly, turning the edges bitter.Place the glazed kielbasa on the prepared wire rack. Roast in the preheated oven for 20‑25 minutes, turning once halfway through, until the sausage is heated through and the glaze starts to caramelize. You’ll notice the edges pulling away from the meat—that’s the crisp you’ve been waiting for.
Switch the oven to broil on high. Broil the kielbasa for 2‑3 minutes, watching closely. The glaze should bubble and turn a deep amber, giving the bites a glossy, restaurant‑quality finish. This step is pure magic; the rapid heat creates that irresistible snap on the edges while keeping the interior juicy.
Kitchen Hack: Keep a spray bottle of water nearby; a quick mist can prevent the glaze from over‑darkening if the broiler gets too aggressive.Remove the kielbasa from the oven and immediately sprinkle the chopped fresh parsley over the top. The heat will wilt the parsley just enough to release its aroma without losing its bright green color. This final flourish adds a fresh, herbaceous note that balances the sweet‑tangy glaze.
Allow the bites to rest for 3‑4 minutes before serving. This short rest lets the juices redistribute and the glaze set, ensuring each bite stays crisp rather than soggy. Serve on a platter with toothpicks, and watch as guests dive in without hesitation. That sizzle when it hits the pan? Absolute perfection.
And now the fun part—watch your friends go wild. I’ll be honest — I ate half the batch before anyone else got to try it, and the look on their faces when they realized there were still bites left was priceless. That’s it — you did it. But hold on, I’ve got a few more tricks that’ll take this to another level...
Insider Tricks for Flawless Results
The Temperature Rule Nobody Follows
Never underestimate the power of a pre‑heated oven. Starting at 375°F ensures the sausage heats evenly, while the final broil blast locks in the caramelization. If you skip the initial roast and go straight to broiling, the glaze will burn before the meat is warmed through, leaving you with a bitter bite.
Why Your Nose Knows Best
Your sense of smell is a reliable guide. When the glaze starts to smell nutty and slightly caramelized, you’re near the sweet spot. If you detect a burnt sugar scent, pull the pan out immediately—overcooked glaze turns bitter fast.
The 5‑Minute Rest That Changes Everything
After the broil, let the bites rest. This short pause lets the glaze firm up, preventing it from sliding off the cuts when you bite. Skipping this step results in a soggy mess that looks and feels disappointing.
Don’t Crowd the Pan
If you’re making a double batch, use two baking sheets. Overcrowding traps steam, which softens the crisp edges you worked so hard to create. A little extra space makes a world of difference.
The Secret of the Sweet‑Savory Balance
If your mustard is particularly sharp, add a splash more honey; if it’s milder, increase the paprika. Tasting the glaze before you brush it on lets you fine‑tune the balance, ensuring each bite hits the perfect sweet‑tangy note.
Creative Twists and Variations
This recipe is a playground. Here are some of my favorite ways to switch things up:
Maple‑Brown Sugar Glaze
Swap the honey for pure maple syrup and add a tablespoon of brown sugar. The result is a richer, deeper sweetness that pairs wonderfully with the smoky kielbasa, especially in the fall.
Spicy Sriracha Kick
Add a teaspoon of sriracha to the mustard‑honey mixture for a subtle heat that tingles the palate. This variation is perfect for game‑day crowds who love a little spice.
Herb‑Infused Parmesan
Mix freshly grated Parmesan with chopped thyme and sprinkle it over the bites after broiling. The cheese melts slightly, adding a salty, umami layer that elevates the snack to gourmet status.
Citrus‑Zest Finish
Add a teaspoon of lemon zest to the glaze before brushing. The citrus brightens the flavor profile, making the bites feel lighter and more refreshing.
Vegan Sausage Swap
Use a high‑quality plant‑based sausage that mimics the texture of kielbasa. The same glaze works beautifully, offering a cruelty‑free version without sacrificing the crisp‑to‑tender contrast.
Storing and Bringing It Back to Life
Fridge Storage
Place the cooled bites in an airtight container and store them in the refrigerator for up to three days. A paper towel at the bottom absorbs excess moisture, preserving the crisp edges.
Freezer Friendly
Lay the bites on a parchment‑lined tray and freeze them individually for an hour. Transfer to a zip‑top freezer bag; they’ll keep for up to two months. When you’re ready, bake at 350°F for 10 minutes, then broil for 2 minutes to revive the crunch.
Best Reheating Method
Reheat in a pre‑heated oven at 375°F for 8‑10 minutes, adding a tiny splash of water to the pan before covering with foil. The steam restores moisture, while the final minutes of uncovered baking re‑crisp the edges.