Last October, I found myself elbow-deep in melted chocolate at midnight, cursing the day I volunteered to bring "something cute" to my nephew's Halloween party. My first attempt at character-themed treats looked like sad, melted snowmen rather than the Pumpkin King himself. Jack Skellington deserved better than my lopsided chocolate blobs. Fast forward through three failed batches, a kitchen that resembled a Willy Wonka crime scene, and one very patient dog who sampled every reject, I finally cracked the code. These Jack Skellington Oreo Pops aren't just another Pinterest fail waiting to happen — they're the guaranteed showstopper that'll have both kids and adults fighting over the last one.
Picture this: creamy Oreo filling blended with tangy cream cheese, rolled into perfect balls, then dunked in silky white chocolate. But here's where the magic happens — instead of messy piping bags and shaky hands, we're using a simple toothpick technique that creates Jack's iconic stitched smile in under five seconds. The first time I nailed it, I actually gasped out loud. My neighbor heard me through the window and texted to ask if I was okay. I wasn't just okay — I was transformed into the Halloween hero I was always meant to be.
What makes these pops absolutely irresistible isn't just their adorable faces. It's the way the chocolate cracks ever so slightly when you bite in, revealing that cookies-and-cream center that's somehow both familiar and completely new. The contrast between the bitter cocoa of the Oreos and the sweet vanilla coating creates this perfect balance that keeps you reaching for "just one more." I've watched grown adults sneak thirds and fourths when they thought nobody was looking. Trust me, you'll do the same.
Let me walk you through every single step — by the end, you'll wonder how you ever made it any other way.
What Makes This Version Stand Out
Zero Artistic Skills Required: Unlike those intimidating tutorials requiring steady surgeon hands, this method uses a simple dragging technique that even the most craft-challenged among us can master. If you can draw a stick figure, you can create Jack's perfectly spooky face.
Make-Ahead Magic: These pops stay fresh in the freezer for up to two months, which means you can prep them weeks before your Halloween bash. Just pull them out ten minutes before guests arrive and watch their jaws drop.
Kid-Approved, Adult-Adored: I've served these at office parties where executives in thousand-dollar suits fought over the last pop like it was the last lifeboat on the Titanic. The universal appeal is absolutely bonkers.
Fail-Proof Chocolate Work: Most recipes tell you to use candy melts but skip the crucial tempering step. We're adding a teaspoon of coconut oil that keeps the coating smooth and prevents that annoying white bloom that ruins the aesthetic.
Texture Paradise: The combination of crunchy cookie bits suspended in creamy filling, all encased in a crisp chocolate shell? It's like someone took cookies-and-cream ice cream and made it socially acceptable to eat with your hands.
Instagram Gold: These pops photograph like absolute champions. The stark black and white contrast against orange Halloween decorations? Chef's kiss. Your social media will explode with likes faster than you can say "What's this?"
Customizable Crew: Once you master the technique, you can create entire casts of characters. Sally's patchwork dress becomes easy with colored candy melts, and Oogie Boogie's swirls are surprisingly simple with a toothpick drag.
Alright, let's break down exactly what goes into this masterpiece...
Inside the Ingredient List
The Foundation Crew
Oreo cookies aren't just cookies — they're the architectural backbone of our entire operation. Those dark cocoa wafers bring intense chocolate flavor and the perfect crumbly texture when blitzed in a food processor. I tested this recipe with generic sandwich cookies once, thinking I'd outsmart the system. Spoiler alert: I didn't. The filling ratio is crucial, and off-brand cookies either turn to sawdust or gluey paste. Stick with the real deal here; your taste buds will thank you later.
Cream cheese acts as the binding agent and flavor enhancer, transforming plain cookie crumbs into something magical. The tanginess cuts through all that chocolate sweetness, creating balance that prevents these from becoming sugar bombs. I've tried mascarpone and while it's luxurious, it lacks the necessary acidity. Full-fat Philadelphia is my ride-or-die here — low-fat versions make the filling too loose and watery.
The Coating Champions
White chocolate melts are where most people mess up spectacularly. They grab the cheapest almond bark from the grocery store, then wonder why their pops taste like wax candles splashed with artificial vanilla. Spend the extra two dollars on quality candy melts — Ghirardelli or Merckens if you can find them. The flavor difference is astronomical, and they melt smoother than a jazz saxophone solo.
Black chocolate melts for Jack's features need to be properly tempered or you'll end up with grayish streaks that make poor Jack look like he needs a good nap. I learned this the hard way when my first batch looked like Jack had been through a windstorm. The secret is working in small batches and keeping everything at the right temperature.
The Supporting Cast
Popsicle sticks might seem straightforward, but grab the paper ones over plastic. Paper grips the Oreo filling better and won't slide out when kids (or let's be honest, adults) wave them around like wands. Plus, they're biodegradable when someone inevitably leaves one in the garden.
Halloween-themed sprinkles aren't just decorative — they add crucial textural contrast. Those little sugar shapes provide tiny crunches that break up the creaminess. Go for mixed shapes rather than just round nonpareils; bats and pumpkins catch the light better and make each pop look professionally decorated.
Everything's prepped? Good. Let's get into the real action...
The Method — Step by Step
- Start by pulsing your Oreos in a food processor until they resemble fine coffee grounds. Don't overdo it here — you want some texture remaining, not Oreo flour. The mixture should clump together when you squeeze it, like perfect sandcastle sand. If it's too dry, your balls will crumble later. Too fine and you'll lose that satisfying cookie crunch in every bite.
- Add the cream cheese in tablespoon-sized chunks while the processor runs. Watch as the mixture transforms from crumbly chaos into a glossy, cohesive dough that looks almost like chocolate mousse. This magical moment happens when the cookie fat meets the cream cheese proteins, creating a binding network that'll hold everything together. Scrape down the sides once to ensure every cookie bit gets evenly distributed.
- Roll the mixture into ping-pong sized balls between your palms. Press firmly enough to compact them, but not so hard that the oils start weeping out. They should feel like stress balls — firm but with a slight give. Place them on a parchment-lined baking sheet and admire your handiwork. Twenty perfectly uniform spheres lined up like chocolate soldiers ready for battle.
- Insert the popsicle sticks about three-quarters deep, twisting gently as you push. This twisting motion creates threads in the filling that grip the stick like a screw in wood. If you just shove straight in, they'll spin like lazy susans when you try to dip them later. The stick should feel secure but not poking through the top.
- Freeze the naked pops for exactly twenty minutes — set a timer because timing matters here. While they chill, melt your white chocolate with the coconut oil in short microwave bursts. Stir between each 30-second interval until it's the consistency of warm honey. The coconut oil prevents the chocolate from seizing and gives it that professional glossy finish.
- Dip each frozen pop straight down into the chocolate, then lift out with a gentle twist. Let excess chocolate drip off for exactly five seconds before flipping upright. The chocolate sets almost instantly on the cold surface, creating a smooth shell. Work quickly here — if your chocolate starts thickening, give it a ten-second zap in the microwave.
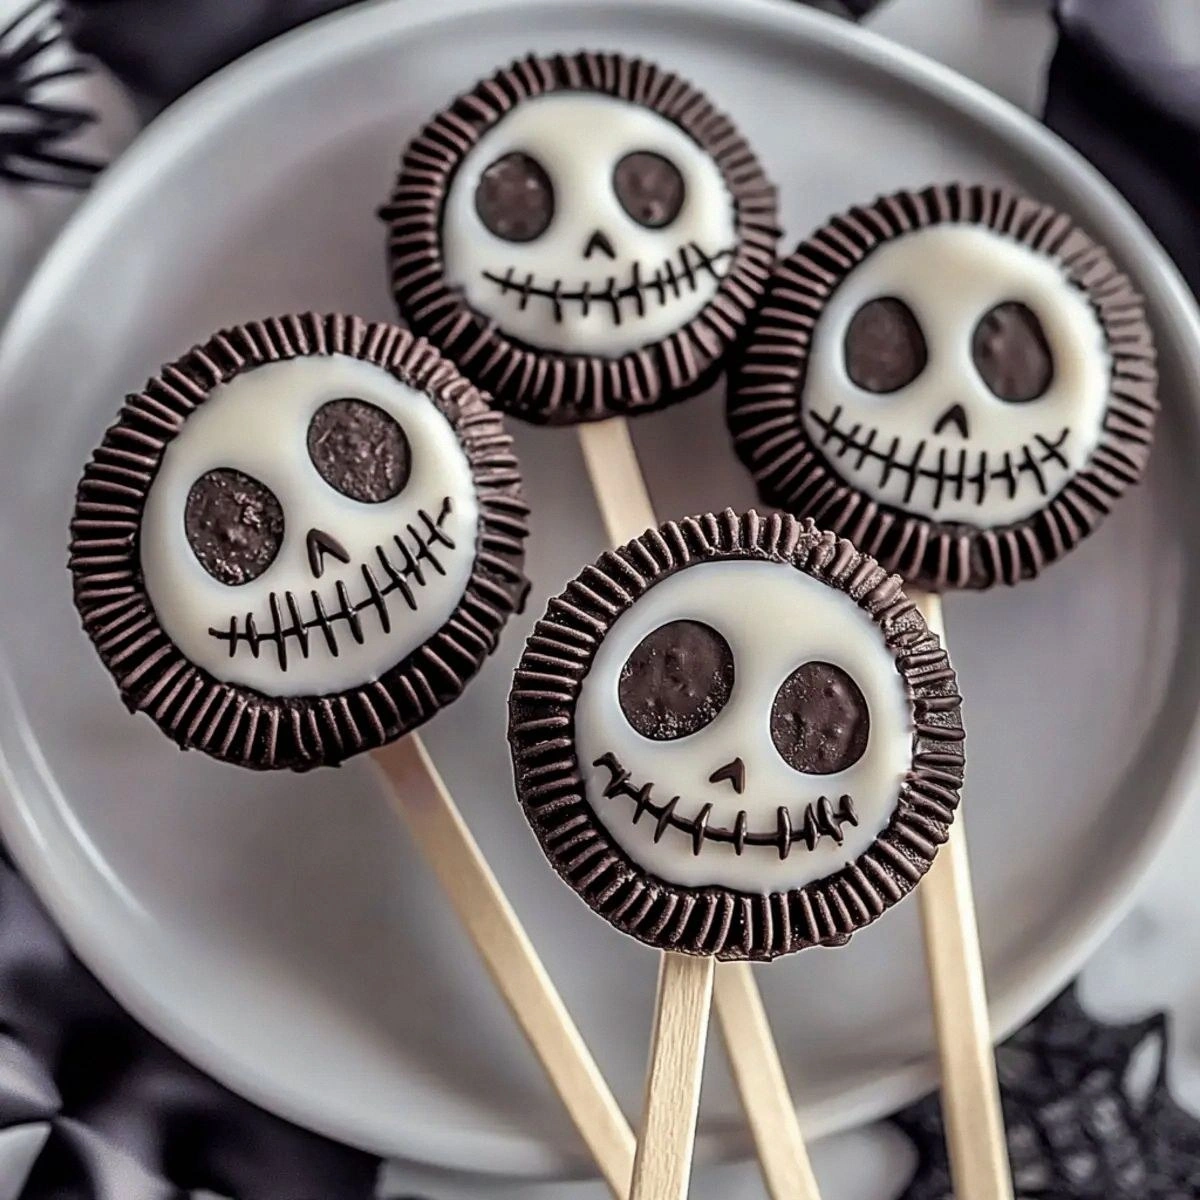
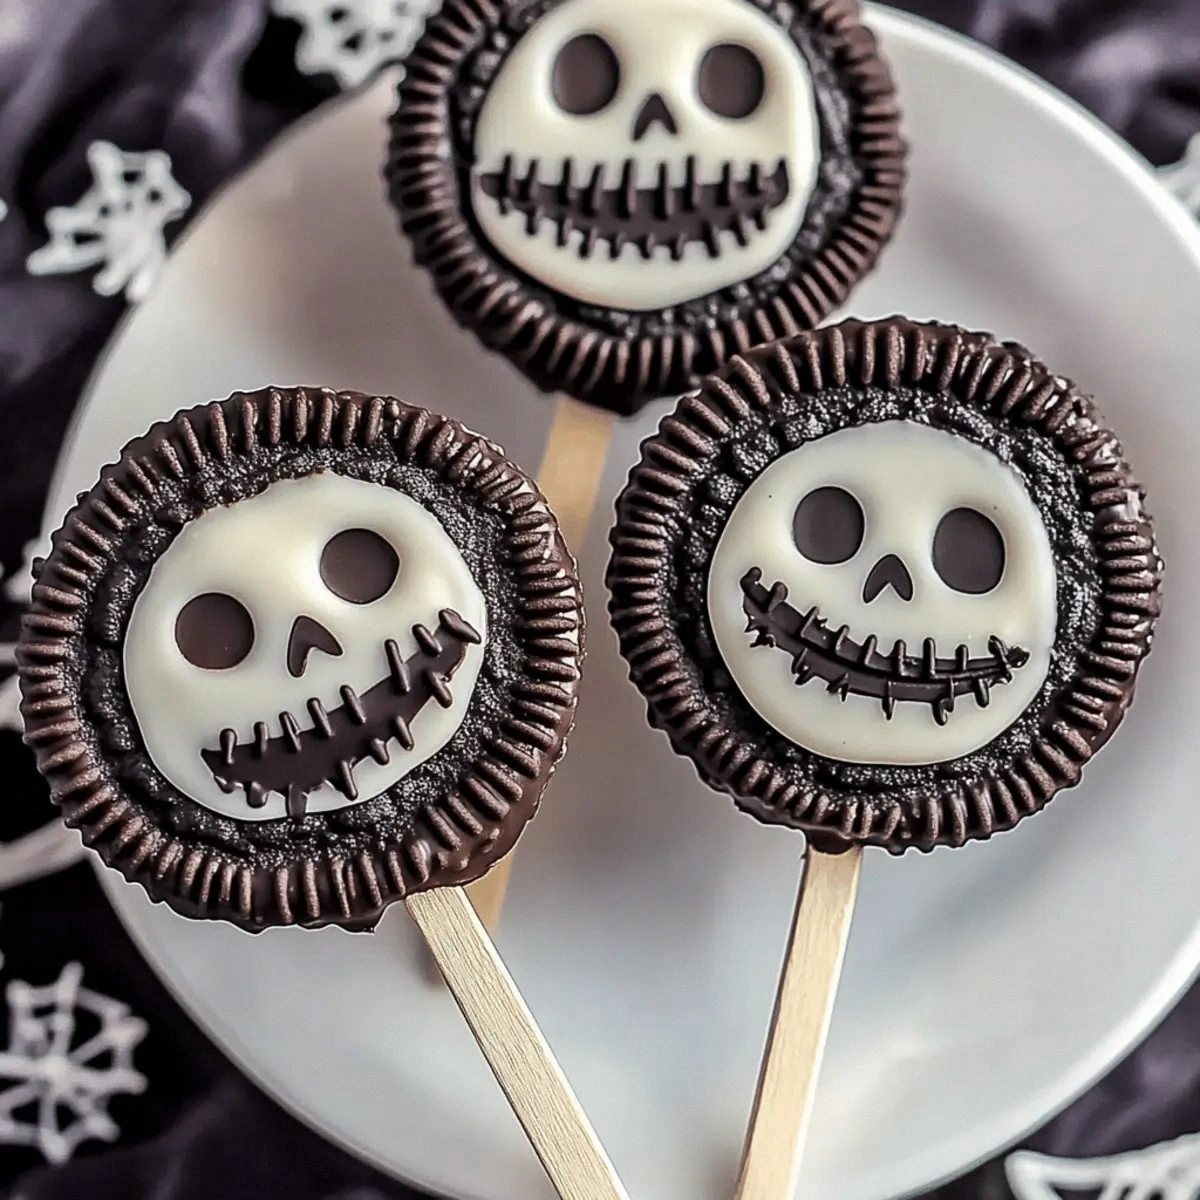
- Now for the magic moment: grab a toothpick and dip it in melted black chocolate. Draw two large ovals for eyes, then drag downward to create the stitched mouth effect. Don't overthink this — Jack's face is supposed to look hand-drawn and slightly imperfect. Actually, the wonkier the better. My most charming pops look like Jack after a long night in Halloween Town.
- While the chocolate is still tacky, sprinkle your Halloween decorations around the stick area. This covers any fingerprints or imperfections and makes each pop look intentionally festive. Kids love helping with this part — give them a small spoon and let them go wild. Some of my most creative pops came from sugar-crazed eight-year-olds with zero design inhibitions.
- Stand the pops upright in a tall glass or specialized pop stand while they fully set. Resist the urge to move them for at least fifteen minutes — premature handling causes fingerprints and smudges. The anticipation is torture, I know. Use this time to clean your chocolate-covered workspace before it hardens into a Jackson Pollock painting on your counters.
That's it — you did it. But hold on, I've got a few more tricks that'll take this to another level...
Insider Tricks for Flawless Results
The Temperature Rule Nobody Follows
Room temperature cream cheese blends like a dream, but cold Oreos crush more evenly. Keep your cookies in the fridge until the last second, then let the cream cheese sit out for exactly thirty minutes. This temperature differential creates the perfect texture balance — cold cookies shatter into uniform crumbs while soft cream cheese incorporates smoothly without overworking the mixture.
I learned this after my first batch turned into an oily mess from over-warmed cookies. The fat in the cream filling starts melting at room temperature, turning your beautiful mixture into something resembling chocolate toothpaste. Trust the temperature dance — it's worth the extra planning.
Why Your Nose Knows Best
That moment when you open the food processor and get hit with that cookies-and-cream aroma? That's your cue to stop processing. Over-mixing activates the gluten in the cookie flour, creating a tough, rubbery texture that no amount of chocolate can disguise. You want the mixture just combined enough to hold together when squeezed.
The smell test has saved me countless times. When it stops smelling like fresh Oreos and starts smelling like processed cookie dough, you've gone too far. Empty that processor immediately and thank your lucky stars for sensory cooking cues.
The 5-Minute Rest That Changes Everything
After dipping but before decorating, let your pops rest for exactly five minutes. This brief pause allows the chocolate to begin setting while remaining tacky enough for decorations to adhere. Skip this step and your sprinkles sink into the coating, creating weird craters. Wait too long and nothing sticks at all.
Use this golden window to prep your decorating station. Get your black chocolate melted and toothpicks ready. When that timer dings, you're in decoration mode until the last pop is finished. It's like a well-choreographed dance — timing is everything.
The Storage Secret
Here's what nobody tells you: these pops actually improve after a day in the fridge. The flavors meld together, the chocolate coating develops a satisfying snap, and the filling firms up to the perfect fudgy texture. I always make mine at least 24 hours ahead for maximum deliciousness.
Store them in an airtight container with parchment between layers. They'll keep for up to a week in the fridge, though they've never lasted more than three days in my house. The Halloween sprinkles might bleed slightly, but the taste more than compensates for any aesthetic changes.
Creative Twists and Variations
This recipe is a playground. Here are some of my favorite ways to switch things up:
Sally's Patchwork Pops
Swap the white chocolate for pastel candy melts in pale blue, mint green, and soft lavender. Create patchwork sections by dipping different areas in different colors. Use melted dark chocolate for the stitched details, mimicking Sally's iconic dress. These are perfect for fans who prefer the gentle patchwork girl over the skeletal Pumpkin King.
The flavor profile changes subtly with colored melts — they tend to be slightly fruitier than white chocolate. Kids go absolutely bonkers for the rainbow effect, and they photograph like absolute dreams against autumn leaves.
Zero's Ghostly Version
Use Golden Oreos instead of regular ones for a vanilla base that stays true to Zero's ghostly aesthetic. Dip in white chocolate, then add a tiny orange sprinkle for his glowing nose. Pipe on simple black eyes and a wagging tail with melted chocolate. These are milder in flavor and perfect for younger kids who find regular Oreos too intense.
The Golden Oreos create a lighter, more delicate pop that pairs beautifully with white chocolate. It's like eating vanilla clouds with cookie surprises hidden inside.
Oogie Boogie's Swamp Pops
Mix green food coloring into your white chocolate for that sickly swamp hue. Roll the Oreo balls in crushed graham crackers before dipping to create Oogie's textured bug-sack appearance. Use purple candy melts for his stitched details and add tiny candy bugs as decorations. These are surprisingly popular with kids who love the gross-out factor.
The graham cracker coating adds an earthy flavor that actually complements the Oreo base. It's like Halloween and summer camp had a delicious, weird baby.
Mayor's Dual-Face Delights
Split your white chocolate coating and tint half with yellow food coloring. Dip each pop halfway in white, halfway in yellow to represent the Mayor's two faces. Use black chocolate for his monocle and permanent smile on the white side, then add his worried frown on the yellow side. These require a steady hand but the visual payoff is incredible.
The dual flavors create an interesting experience — the yellow side tastes like vanilla custard while the white side stays true to classic white chocolate. It's like getting two desserts in one pop.
Christmas Town Twists
For a holiday crossover, add peppermint extract to your Oreo mixture and crushed candy canes to the coating. Dip in white chocolate, then immediately roll in red and green sprinkles. These bridge the gap between Halloween and Christmas, perfect for those who start celebrating the holidays way too early.
The peppermint brightens the whole experience, cutting through the chocolate richness like a winter breeze. They're surprisingly refreshing and perfect for holiday parties.
Lock, Shock, and Barrel's Mischief Mix
Create three different versions representing the trick-or-treating trio. Make one with crushed potato chips mixed into the Oreo base (Lock's salty chaos), one with sour gummy worms pressed into the coating (Shock's sweet-tart personality), and one with popping candy sprinkled on top (Barrel's explosive energy). Serve them together for maximum impact.
This trio showcases how versatile the basic recipe can be. Each variation has a completely different flavor profile while maintaining the same foolproof technique.
Storing and Bringing It Back to Life
Fridge Storage
These pops are fridge champs — they'll stay perfect for up to seven days when stored properly. Use an airtight container with parchment paper between layers to prevent them from sticking together. The chocolate coating might develop a slight bloom (those white streaks), but it's purely cosmetic and doesn't affect the taste one bit.
Position them upright if possible, like soldiers standing at attention. This prevents the sticks from creating indentations in neighboring pops. If you're stacking them, rotate the container daily so the weight distributes evenly. They actually taste better after a day as the flavors meld together into something transcendent.
Freezer Friendly
Flash freeze individual pops on a baking sheet for two hours, then transfer to freezer bags. They'll keep for up to two months without any quality loss. The key is that initial flash freeze — it prevents them from freezing into one solid block that requires an ice pick to separate.
Thaw them in the fridge for thirty minutes before serving, or let them sit at room temperature for ten. Don't microwave them unless you want chocolate soup with Oreo chunks. Freezer-burned pops taste like sadness and regret, so squeeze out as much air as possible from storage bags.
Best Reheating Method
Here's the thing — you don't actually reheat these pops. They're meant to be served cold or at cool room temperature. But if your chocolate coating has bloomed or cracked, you can give them a quick refresh. Melt a small amount of white chocolate with a drop of coconut oil, then lightly brush over imperfections.
For serving after storage, let them sit out for five to ten minutes. This takes the chill off and allows the flavors to bloom. Too cold and the chocolate shatters like thin ice. Too warm and the filling gets mushy. It's like Goldilocks' porridge — you want it just right.