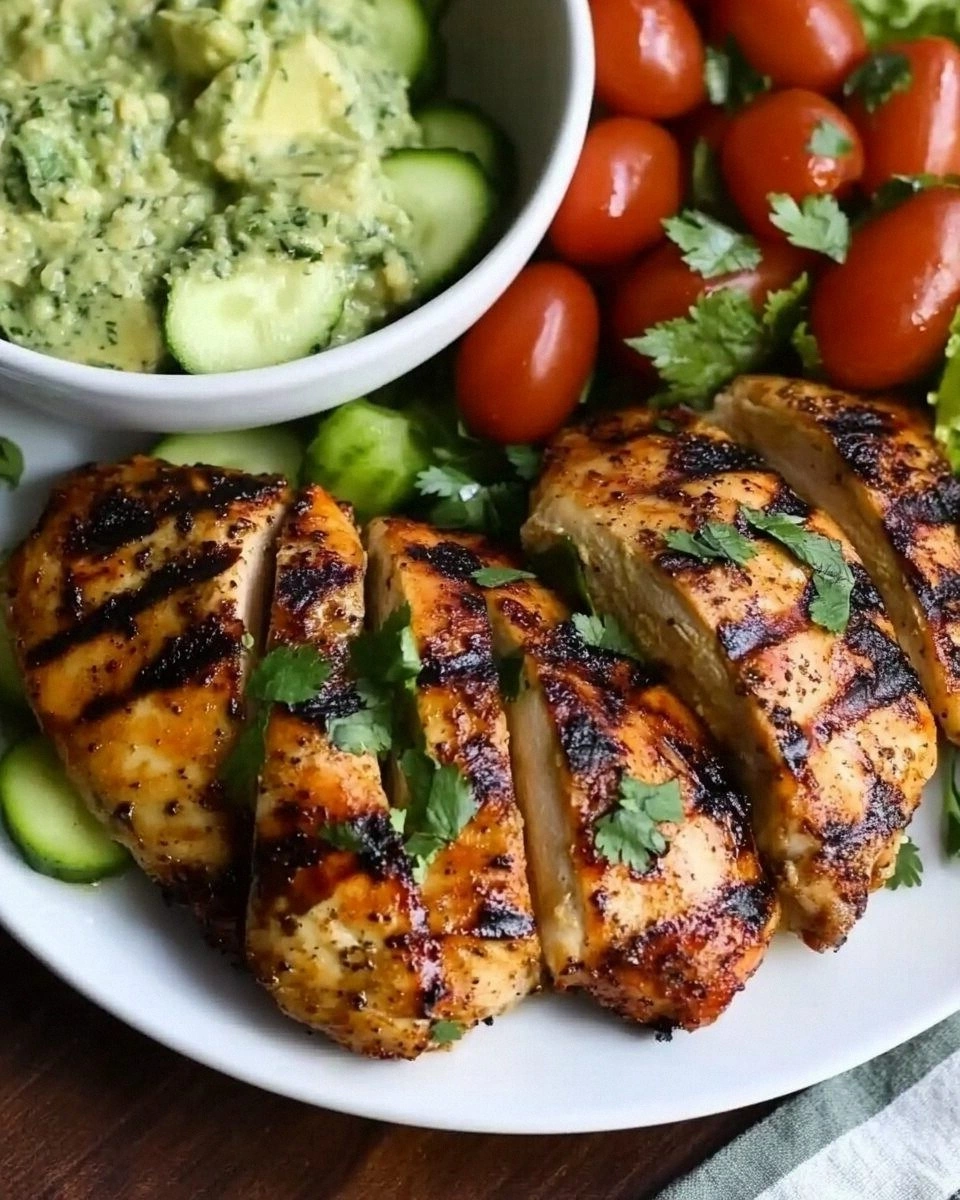
Grilled Peruvian Chicken
Picture this: the kitchen lights dim, a single burner crackles, and you’re staring at a rack of raw chicken thighs that look almost too pristine to touch. I was halfway through a dinner party, the guests were already laughing and the table was bare, when I remembered a recipe my grandmother swore by. That memory sparked a craving that could not be ignored, and I dared myself to try a Peruvian twist on a classic grilled chicken. The aroma that began to rise from the pan was a mix of citrus, smoky paprika, and the faintest whisper of cumin—an olfactory promise that something extraordinary was about to happen.
When the first bite landed, the skin was crisp, the meat juicy, and the sauce clung to the chicken like a velvet ribbon. The flavors danced: the bright acidity of lime cut through the richness of olive oil, while the oregano added a subtle herbal note that lifted the entire dish. I could hear my guests gasp, not just for the taste but for the sheer confidence I had in my own cooking. That moment of triumph was a reminder that a single, well‑chosen ingredient can transform an ordinary meal into an unforgettable experience.
This version of Grilled Peruvian Chicken stands apart because it marries a bold, smoky seasoning with a bright, citrus‑infused glaze that’s both simple and sophisticated. I’ve refined the technique to keep the meat tender and the skin irresistibly crisp, and I’ve added a secret step that elevates the flavor profile to a new level of depth. The result is a dish that feels like a celebration on a plate—perfect for a weekend dinner or an impressive family gathering. If you’ve ever struggled to get that perfect balance of savory and zesty, this recipe is your new go‑to.
Let me walk you through every single step—by the end, you’ll wonder how you ever made it any other way. I dare you to taste this and not go back for seconds. This is hands down the best version you’ll ever make at home.
What Makes This Version Stand Out
- Taste: The blend of lime, garlic, and Peruvian aji amarillo creates a bright, peppery profile that cuts through the richness of the chicken. The glaze caramelizes into a glossy finish that coats the meat like a silky coat of fire. It’s the kind of flavor that lingers on the palate long after the last bite.
- Texture: The chicken skin crisps to a golden, flaky perfection while the interior remains moist and tender. The quick sear locks in juices, preventing the meat from drying out. The result is a satisfying contrast between crunchy and succulent.
- Simplicity: With only a handful of pantry staples, you can create a restaurant‑quality dish in under an hour. No need for exotic spices or complicated equipment. Just a skillet, a grill pan, and a dash of confidence.
- Uniqueness: The use of aji amarillo—a staple in Peruvian cuisine—adds a subtle heat and a distinctive color that sets this dish apart from typical grilled chicken recipes. It’s a flavor that’s both familiar and adventurous.
- Crowd Reaction: Friends who have tasted this dish swear it’s the best grilled chicken they’ve ever had. It’s the kind of recipe that becomes a staple at gatherings because it’s easy to scale and always hits the mark.
- Ingredient Quality: Fresh, high‑quality chicken thighs are essential for the best results. Pairing them with fresh lime juice, real aji amarillo paste, and olive oil maximizes flavor and ensures a memorable meal.
- Cooking Method: A two‑step process—first marinate, then grill—ensures depth of flavor and optimal texture. This method is straightforward yet delivers professional results.
- Make‑ahead Potential: The marination can be done up to 24 hours ahead, making it a convenient option for busy weeknights or last‑minute dinner parties. The flavors only deepen, not fade.
Inside the Ingredient List
The Flavor Base
At the heart of this dish is a vibrant blend of lime juice, garlic, and aji amarillo paste. The lime juice provides a bright acidity that cuts through the richness of the olive oil, while the garlic adds depth and warmth. Aji amarillo, a staple in Peruvian cooking, introduces a gentle heat and a golden hue that makes the glaze visually stunning. If you can’t find aji amarillo paste, a mild yellow chili pepper or a pinch of paprika can be a suitable substitute, but be prepared for a slightly different flavor profile.
When marinating, the acidity of the lime begins to tenderize the chicken, breaking down proteins for a more succulent bite. The garlic’s natural enzymes help to further soften the meat, ensuring it stays juicy even after grilling. The aji amarillo paste’s subtle peppery undertone keeps the dish from becoming overly sweet or bland. A small tip: always use fresh lime juice rather than bottled for the best flavor and brighter color.
The Texture Crew
The texture of the chicken is determined by the choice of cut and the cooking technique. I use bone‑in, skin‑on chicken thighs because they stay moist and develop a crisp skin when grilled properly. The skin’s fat renders out during the sear, creating a crunchy, caramelized surface that’s both flavorful and satisfying to bite into. If you prefer a leaner option, thighs can be replaced with drumsticks, but the skin’s crispness will be slightly reduced.
To achieve the perfect crust, pat the chicken dry with paper towels before seasoning. Moisture on the surface prevents proper searing and can lead to steaming rather than grilling. I also recommend using a grill pan or a cast‑iron skillet set over medium‑high heat; the even, high heat is essential for a beautiful sear and a caramelized glaze.
The Unexpected Star
One of the secret weapons in this recipe is a splash of soy sauce. The umami from soy sauce enhances the overall depth of flavor without overpowering the bright citrus notes. It also helps to balance the heat from the aji amarillo, creating a more rounded taste. If you’re watching sodium, use a low‑sodium soy sauce or a dash of fish sauce for a different twist.
Another unexpected ingredient is a pinch of ground cumin. Cumin adds an earthy, warm undertone that complements the bright citrus and the subtle heat of the aji amarillo. If you’re allergic to cumin or simply want a different flavor, a pinch of smoked paprika can provide a similar depth while adding a smoky note.
The Final Flourish
Fresh cilantro is the final flourish that ties everything together. It adds a burst of freshness and a green contrast to the golden glaze. The herb’s bright, slightly citrusy flavor balances the richness of the chicken and the intensity of the aji amarillo. If you’re not a fan of cilantro, a handful of chopped parsley or mint can work as a suitable replacement.
For those who love a little extra crunch, sprinkle toasted sesame seeds on top just before serving. The seeds add a subtle nutty flavor and a pleasant textural contrast that elevates the dish from good to unforgettable.
Everything's prepped? Good. Let's get into the real action...
The Method — Step by Step
- Start by combining 4 chicken thighs, skin side up, with 2 cloves of minced garlic, 1 tablespoon of aji amarillo paste, 2 tablespoons of fresh lime juice, 1 tablespoon of soy sauce, 1 teaspoon of ground cumin, 1 teaspoon of smoked paprika, 1 teaspoon of salt, and ½ teaspoon of black pepper. Toss everything together in a large bowl until the chicken is evenly coated. Cover with plastic wrap and let it marinate in the refrigerator for at least 30 minutes, or up to 24 hours for deeper flavor. The acid from the lime begins to break down the proteins, ensuring the meat stays tender after grilling.
- Heat a grill pan or cast‑iron skillet over medium‑high heat. Add 2 tablespoons of olive oil and let it shimmer. Place the marinated chicken thighs skin side down in the pan. You should hear a satisfying sizzle that signals the pan is hot enough. Let the chicken cook undisturbed for 5 minutes, or until the skin turns golden and starts to crackle.
- Flip the thighs over and reduce the heat to medium. Continue to grill for another 4-5 minutes, brushing the tops with the remaining glaze from the pan. The glaze should thicken slightly, creating a shiny coating that clings to the meat. Watch for the edges to pull away from the pan—a sign that the chicken is nearly done.
- Remove the chicken from the pan and let it rest on a cutting board for 5 minutes. Resting allows the juices to redistribute, ensuring each bite is moist and flavorful. While resting, you can finish the glaze by simmering the remaining pan juices over medium heat until it reduces to a thick consistency.
- Slice the chicken into bite‑sized pieces, drizzle the reduced glaze over the top, and garnish with freshly chopped cilantro. The bright green herb provides a fresh contrast to the golden glaze and adds a layer of aroma that elevates the dish. If you’re serving with rice or quinoa, a sprinkle of toasted sesame seeds adds a delightful crunch.
- Serve immediately with a side of roasted vegetables or a crisp salad. The vibrant flavors of the chicken pair wonderfully with a simple cucumber and avocado salad dressed in lime vinaigrette. The contrast between the smoky chicken and the cool, refreshing salad creates a balanced meal.
- If you’re planning ahead, you can store leftovers in an airtight container in the refrigerator for up to 3 days. Reheat gently in a skillet over low heat, adding a splash of water to keep the chicken moist. The glaze will re‑thicken, maintaining that glossy finish.
- Enjoy the dish with a chilled glass of white wine or a light beer. The citrusy notes in the wine complement the lime in the glaze, while the beer’s carbonation helps cleanse the palate between bites.
- Remember to clean the grill pan promptly after use to prevent stubborn residue from sticking. A quick rinse with warm soapy water and a gentle scrub will keep your pan in top condition for future meals.
That's it — you did it. But hold on, I've got a few more tricks that'll take this to another level...
Insider Tricks for Flawless Results
The Temperature Rule Nobody Follows
Many home cooks think that a higher heat always yields better grill marks. In reality, the key to a crisp skin is a steady, medium‑high heat that allows the fat to render slowly. If the pan is too hot, the skin will burn before the meat cooks through. I recommend preheating the skillet for 5 minutes and then lowering the heat slightly after adding the chicken.
Why Your Nose Knows Best
Before you flip the chicken, pause and smell the sizzle. A pleasant, slightly sweet aroma indicates the Maillard reaction is underway, which is essential for flavor development. If the scent is more metallic or burnt, the heat is too high. Trust your nose as a reliable indicator of doneness.
The 5-Minute Rest That Changes Everything
Resting the chicken after cooking might seem like a minor step, but it’s critical for juice distribution. Without this pause, the juices would run out onto the pan, leaving the meat dry. I’ve seen people skip this step and end up with chicken that feels rubbery and unappealing.
Don’t Skip the Olive Oil
Olive oil is the secret to a glossy, caramelized glaze. If you’re using a non‑stick pan, you can reduce the amount of oil, but it will still help the glaze adhere to the chicken. A light coating also prevents the meat from sticking and ensures even cooking.
Use a Meat Thermometer
While the internal temperature of 165°F (74°C) is the safe threshold, using a thermometer allows you to pull the chicken at the exact moment it’s done. This eliminates guesswork and guarantees a juicy result every time. A digital instant-read thermometer is the most reliable tool.
Season Just Before Grilling
Adding salt to the marination is essential for flavor, but too much salt can draw moisture out of the meat. I recommend seasoning the chicken with a pinch of salt right before placing it in the pan. This balances flavor while preserving juiciness.
Creative Twists and Variations
This recipe is a playground. Here are some of my favorite ways to switch things up:
Peruvian Shrimp Skewers
Replace the chicken with shrimp for a lighter, quicker option. Marinate the shrimp in the same mixture for 15 minutes, then thread them onto skewers and grill for 2-3 minutes per side. The result is a bright, zesty seafood dish that pairs beautifully with a coconut rice.
Spicy Mango Salsa
Top the grilled chicken with a fresh mango salsa made from diced mango, red onion, jalapeño, cilantro, and lime juice. The sweet, tropical flavors contrast the smoky chicken and add a burst of color. This variation is perfect for summer gatherings.
Herb‑Infused Gravy
After grilling, deglaze the pan with a splash of chicken broth and whisk in a handful of fresh parsley and basil. Reduce until thick, then drizzle over the chicken. This herbaceous gravy adds depth and a velvety texture that complements the crispy skin.
Smoky Chipotle Glaze
Swap aji amarillo for chipotle powder or chipotle in adobo for a smoky, peppery twist. Combine with lime juice, honey, and a pinch of cumin. The result is a glaze that delivers a subtle heat with a sweet finish.
Roasted Sweet Potato Wedges
Serve the chicken alongside oven‑roasted sweet potato wedges tossed in olive oil, smoked paprika, and a touch of sea salt. The natural sweetness of the potatoes balances the savory chicken and creates a satisfying, hearty plate.
Peruvian Quinoa Pilaf
Cook quinoa with a splash of vegetable broth, diced tomatoes, and a pinch of cumin. Serve the grilled chicken on top of the pilaf for a complete, protein‑rich meal. The quinoa’s nutty flavor complements the bright glaze.
Storing and Bringing It Back to Life
Fridge Storage
Store leftover grilled chicken in an airtight container for up to 3 days. Keep the glaze separate to prevent the chicken from becoming soggy. When ready to reheat, gently warm the chicken in a skillet over low heat and drizzle the glaze back on.
Freezer Friendly
For longer storage, freeze the chicken in a freezer‑safe bag for up to 2 months. Thaw overnight in the refrigerator before reheating. The texture remains tender, and the glaze can be re‑thickened with a quick simmer.
Best Reheating Method
Reheat the chicken in a skillet over medium heat, adding a splash of water to create steam. This helps restore moisture without drying the meat. Finish with a light drizzle of the glaze and a sprinkle of fresh cilantro for an instant flavor boost.