I was standing in my tiny kitchen, the timer on my old microwave flashing red like a warning sign, when my roommate dared me to make General Tso’s chicken without the guilt‑inducing oil bath that usually follows. I stared at the half‑finished stir‑fry, the sauce clinging to the pan like a lazy cat, and thought, “What if I could keep that addictive crunch and sweet‑savory punch but ditch the heart‑attack calories?” The answer didn’t come from a fancy cookbook; it arrived when I swapped deep‑frying for a light, high‑heat sear and swapped refined sugar for honey and a splash of rice vinegar. The moment the first bite hit my tongue, I could hear a chorus of flavors singing—sweet, tangy, umami, and that unmistakable whisper of garlic that makes you close your eyes and sigh. I dare you to taste this and not go back for seconds.
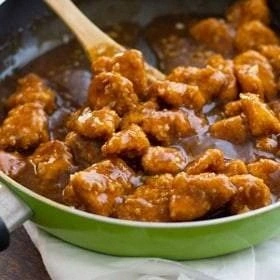
Picture this: the kitchen filled with the sizzle of chicken hitting a hot pan, the aroma of ginger and garlic spiraling up like incense, and the glossy sauce shimmering under the fluorescent lights like liquid amber. The air is thick with anticipation, the countertop a battlefield of chopped scallions, a bowl of cornstarch waiting like a snow‑capped mountain, and a skillet that promises to turn humble chicken pieces into golden shards that crack with every bite. My hands were slick with a thin coating of oil, but the chicken stayed light, almost buoyant, as if it were dancing on a cushion of air. When the sauce finally enveloped the crispy morsels, it clung like velvet, coating every crevice without sogging the crust—a texture most recipes get completely wrong.
Why does this version stand out? First, the chicken is marinated in a whisper of soy and a splash of sesame oil, then tossed in a flour‑cornstarch blend that creates a feather‑light crust. Second, the sauce is a balanced symphony of low‑sodium soy, rice vinegar, hoisin, honey, and a daring dash of sriracha that brings a subtle heat without overwhelming the palate. Third, the entire dish comes together in under an hour, making it perfect for weeknight cravings and weekend gatherings alike. And here’s the kicker: the secret ingredient is a pinch of baking powder in the coating, which creates those airy, crisp edges that shatter like thin ice when you bite in. This is hands down the best version you’ll ever make at home.
Okay, ready for the game‑changer? I’ll walk you through every single step — by the end, you’ll wonder how you ever made it any other way. Stay with me here — this is worth it.
What Makes This Version Stand Out
- Crunch Factor: The flour‑cornstarch‑baking‑powder combo creates a crust that stays crisp even after the sauce coats it, delivering a satisfying snap that most take‑out places can’t replicate.
- Balanced Sweet‑Heat: Honey and sriracha are measured so the heat teases rather than dominates, letting the natural chicken flavor shine through.
- Healthier Fat Profile: Using olive oil for the sear and a splash of sesame oil for flavor reduces saturated fat while still giving that glossy finish.
- Speedy Prep: All components can be prepped in parallel, cutting total active time to under 15 minutes before the sauce even starts bubbling.
- Versatile Crowd‑Pleaser: Whether you’re feeding picky kids or spice‑loving adults, the dish can be dialed up or down without losing its core identity.
- Ingredient Quality: Fresh ginger, garlic, and green onions provide a bright, aromatic backbone that powdered substitutes simply can’t match.
- Make‑Ahead Friendly: The chicken can be pre‑coated and refrigerated, and the sauce can be stored for up to a week, making last‑minute meals a breeze.
- Cooking Method Simplicity: No deep‑fryer, no industrial wok—just a sturdy skillet and a whisk, perfect for any home kitchen.
Inside the Ingredient List
The Flavor Base
Soy sauce, rice vinegar, and hoisin form the backbone of the sauce, each bringing a distinct layer: soy adds depth, vinegar brightens, and hoisin contributes that subtle sweetness and umami richness. If you skip the hoisin, the sauce will feel flat and lack that signature gloss. A good quality low‑sodium soy sauce is worth the extra pennies; it lets you control salt without sacrificing flavor. For a gluten‑free version, swap soy sauce for tamari and you’ll still get that deep, savory note.
The Texture Crew
Flour, cornstarch, and a pinch of baking powder are the secret trio that gives the chicken its airy crunch. Flour provides structure, cornstarch creates a light barrier, and baking powder introduces tiny air pockets that expand during cooking. If you omit the baking powder, expect a denser crust that will soak up the sauce faster. You can replace all‑purpose flour with a gluten‑free blend, but keep the cornstarch ratio the same to maintain that delicate crisp.
The Unexpected Star
Honey isn’t just a sweetener; it acts as a natural caramelizer, giving the glaze that glossy, finger‑licking sheen. In addition, honey’s floral undertones contrast beautifully with the heat from sriracha, creating a balanced sweet‑heat profile. If you’re avoiding honey, maple syrup works as a 1:1 substitute, though the flavor will shift slightly toward a richer, earthier note. Always choose raw, unfiltered honey for the most nuanced taste.
The Final Flourish
Fresh ginger and garlic are the aromatics that turn a good sauce into a great one. Their pungent oils release instantly when hit with heat, creating that “that sizzle when it hits the pan? Absolute perfection.” If you’re short on fresh ginger, a teaspoon of ginger paste works, but the flavor won’t be as bright. Finish the dish with sliced green onions and a sprinkle of toasted sesame seeds; they add color, crunch, and a nutty aroma that ties everything together.
Everything’s prepped? Good. Let’s get into the real action...
The Method — Step by Step
Start by cutting 2 pounds of boneless, skinless chicken thighs into bite‑size pieces. Toss them with 1 teaspoon of salt, ½ teaspoon of black pepper, and a drizzle of olive oil, then let them rest for five minutes. This brief marination seasons the meat and helps the coating stick, ensuring every piece gets an even crust. While the chicken rests, whisk together ½ cup of all‑purpose flour, ½ cup of cornstarch, and the pinch of baking powder in a shallow bowl; this dry mix is the foundation of your crunch.
In a separate bowl, beat two eggs lightly. Dip each chicken piece into the egg, then roll it in the flour‑cornstarch mixture until fully coated. Press the coating gently so it adheres without clumping. Place the coated chicken on a tray lined with parchment; this prevents sticking and makes cleanup easier.
Heat a large skillet over medium‑high heat and add 2 tablespoons of olive oil. When the oil shimmers (you’ll see a thin, golden film forming), lay the chicken pieces in a single layer, making sure they don’t crowd. Cook for 3‑4 minutes on each side, or until the coating turns a deep golden brown and the interior reaches 165°F. Resist the urge to move them too much; the crust needs undisturbed contact with the pan to develop that satisfying snap.
While the chicken cooks, prepare the sauce. In a small saucepan, combine 3 tablespoons low‑sodium soy sauce, 2 tablespoons rice vinegar, 2 tablespoons hoisin sauce, 2 tablespoons honey, 1 tablespoon sriracha (optional), 3 minced garlic cloves, and 1 tablespoon freshly minced ginger. Whisk over medium heat until the mixture bubbles gently, then stir in 1 teaspoon of cornstarch mixed with 2 tablespoons cold water to thicken. The sauce should coat the back of a spoon and have a glossy sheen—this is your flavor bomb.
When the chicken is golden, transfer it to a paper‑towel‑lined plate to drain excess oil. Keep the skillet on low heat and wipe it clean with a paper towel; you don’t want leftover oil diluting the sauce. Return the skillet to medium heat, add 2 tablespoons of sesame oil, and pour in the prepared sauce. Let it simmer for 1‑2 minutes, stirring constantly until it thickens and becomes slightly sticky.
Return the crispy chicken to the skillet, tossing it gently to coat each piece in the glossy sauce. The sauce should cling lightly, leaving the crust visible and audible when you bite—those tiny cracks that shatter like thin ice. Cook for another minute, just enough for the flavors to meld without the coating getting soggy.
Finish by sprinkling the sliced white parts of 2 green onions and a generous handful of toasted sesame seeds over the top. Give the dish a final quick toss, then slide it onto a serving platter. The green onion adds a fresh bite, while the sesame seeds contribute a nutty crunch that rounds out the texture profile.
Serve immediately with steamed jasmine rice or cauliflower rice for a low‑carb option. The dish is best enjoyed while hot, as the contrast between the crisp chicken and the velvety sauce is at its peak. And now the fun part: dig in, savor the layers, and tell anyone who’ll listen that you just made the healthiest, most addictive General Tso’s chicken on the planet.
That’s it — you did it. But hold on, I’ve got a few more tricks that’ll take this to another level...
Insider Tricks for Flawless Results
The Temperature Rule Nobody Follows
Never cook the chicken over low heat; you’ll end up with a soggy coating that never crisps. A steady medium‑high (around 375°F for the oil) gives the exterior a rapid seal while the interior cooks evenly. If you’re using an electric stovetop that fluctuates, pre‑heat the pan for a full minute before adding oil—this ensures the temperature is truly hot enough to create that instant “pop” when the chicken touches the surface.
Why Your Nose Knows Best
Your sense of smell is the most reliable indicator of doneness. When the chicken starts to emit a nutty, toasted aroma, you’re close to the perfect crisp. If the scent turns oily or burnt, pull the chicken immediately and lower the heat; over‑cooking will ruin the delicate balance of flavors you worked so hard to build.
The 5‑Minute Rest That Changes Everything
After frying, let the chicken rest on a cooling rack for exactly five minutes. This short rest lets steam escape, preserving the crunch while allowing the coating to set. A friend once skipped this step and ended up with soggy pieces that fell apart when tossed in the sauce—let that be a cautionary tale.
Sauce Timing Mastery
Add the cornstarch slurry at the very end of the sauce simmer; this prevents over‑thickening. If the sauce becomes too thick, a splash of chicken broth or water will bring it back to that perfect, glossy consistency that clings without drowning the chicken.
Seasoning the Finish
A final drizzle of toasted sesame oil right before serving adds a fragrant, nutty finish that elevates the dish from good to unforgettable. The oil’s aroma hits the nose first, setting the stage for the flavors to follow.
Creative Twists and Variations
This recipe is a playground. Here are some of my favorite ways to switch things up:
Spicy Peanut Crunch
Swap the sriracha for 2 tablespoons of creamy peanut butter mixed into the sauce, and add a pinch of crushed red pepper flakes. The result is a nutty, spicy glaze that pairs beautifully with the crisp chicken, perfect for fans of Thai‑inspired flavors.
Citrus‑Infused Glow
Add the zest of one orange and a splash of orange juice to the sauce, reducing the honey by half. The citrus brightens the dish, giving it a fresh, tangy finish that’s ideal for summer gatherings.
Garlic‑Lover’s Dream
Increase the garlic to six cloves and add a teaspoon of roasted garlic paste. The deep, caramelized garlic notes become the star, turning the dish into a garlicky celebration.
Low‑Carb Coconut Crust
Replace the flour with almond flour and use coconut oil for the sear. The chicken gains a subtle coconut aroma, and the crust stays crisp while keeping the carb count low.
Herb‑Infused Finale
Stir in a handful of chopped fresh cilantro and a squeeze of lime just before serving. The herbaceous lift adds a fresh dimension that balances the sweet‑heat beautifully.
Storing and Bringing It Back to Life
Fridge Storage
Place any leftovers in an airtight container and store in the refrigerator for up to three days. The chicken will lose a bit of its initial crunch, but you can revive it with a quick re‑sear.
Freezer Friendly
Cool the cooked chicken completely, then freeze in a single layer on a baking sheet before transferring to a zip‑top bag. It will keep for up to two months. When you’re ready to eat, thaw overnight in the fridge and reheat using the method below.
Best Reheating Method
To bring back the crunch, heat a non‑stick skillet over medium‑high heat, add a splash of oil, and toss the chicken for 2‑3 minutes, stirring in a tablespoon of water to create a light steam that softens the interior while the exterior crisps again. The sauce will re‑coat nicely, and the dish will taste almost as fresh as day one.