I remember that night like it was yesterday: the kitchen was a battlefield, the oven was a reluctant accomplice, and my friends were staring at me like I’d just dared them to taste the impossible. I had promised a dessert that would make the whole house swoon, and I was determined to deliver a version that would make every other recipe feel like a pale imitation. The air was thick with the scent of toasted graham crackers and the faint hum of the fridge as it tried to keep my ingredients from turning into a soggy mess. I was halfway through the prep when the timer dinged, and my eyes widened at the sight of the golden crust that looked like a sunlit peanut butter sunrise. I didn’t want to let the moment slip away; I wanted to share every sizzling detail with you, my fellow culinary adventurers.
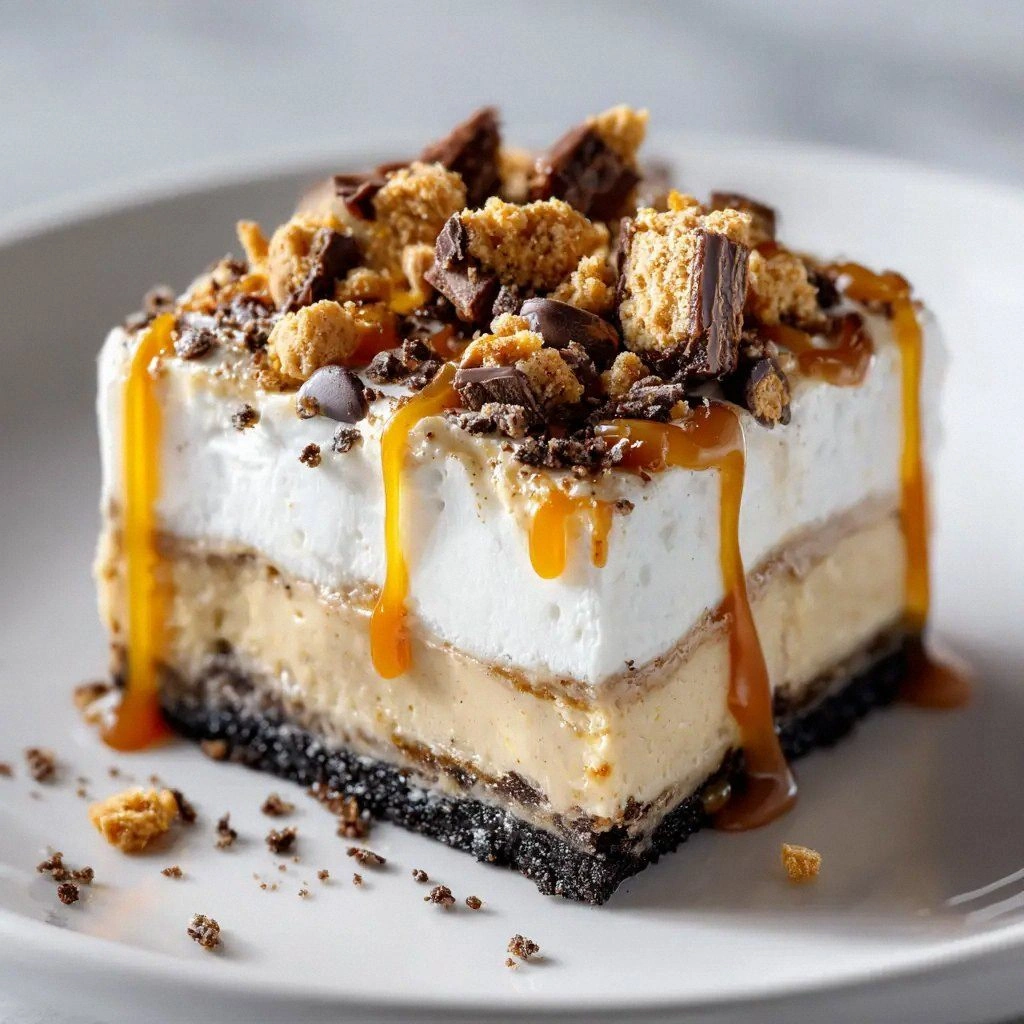
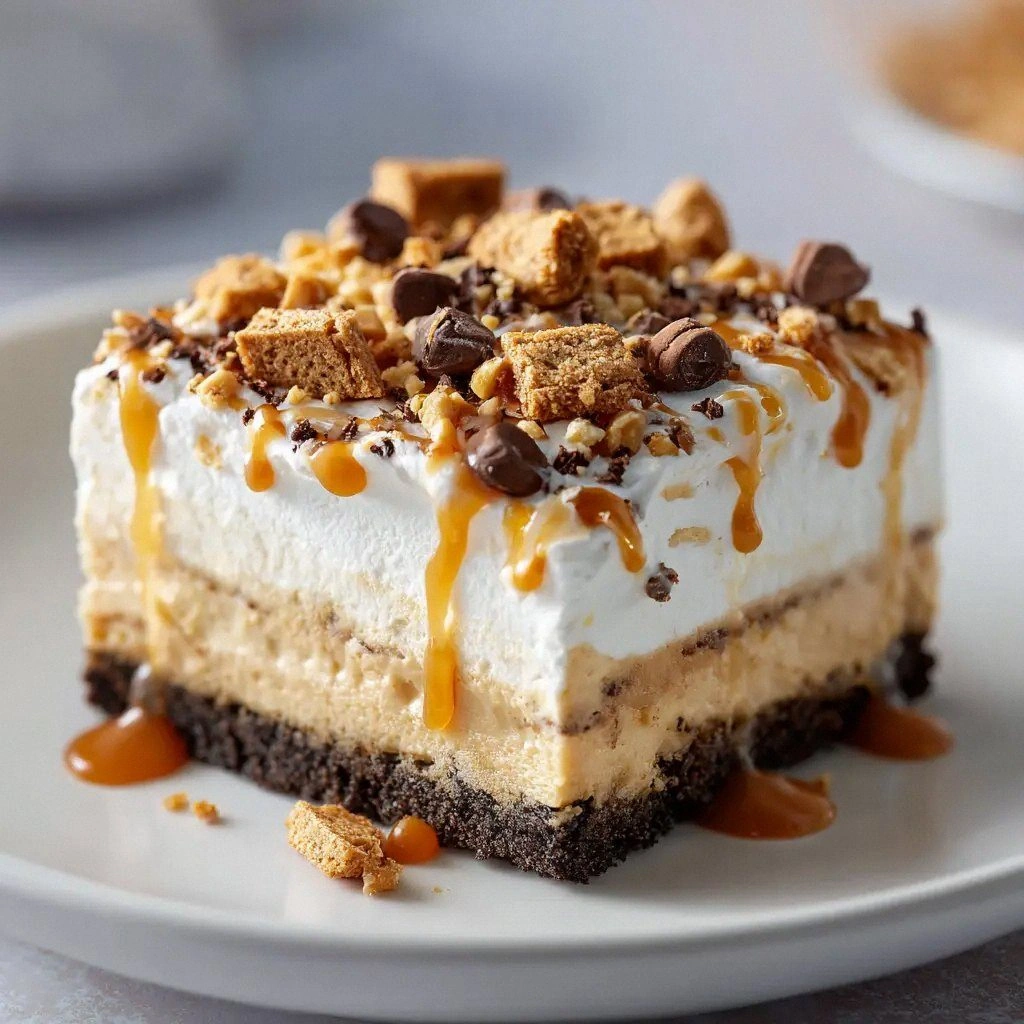
This isn’t just another no‑bake dessert; it’s a revelation. Picture a silky peanut butter base that coats your taste buds like velvet, the crunch of graham crackers that snaps like crisp autumn leaves, and a creamy finish that melts in your mouth like a warm hug. The texture is a dance between smoothness and subtle crunch, a contrast that keeps your palate guessing. I dare you to taste this and not go back for seconds, because the first bite will feel like a revelation, the second like a confession, and the third… well, you’ll be back for more. Every component in this recipe is meticulously chosen to create a harmony that feels both comforting and luxurious.
Why does this version stand out from every other recipe out there? The answer is simple: I eliminated the need for an oven, I introduced a buttery graham cracker crust that adds a buttery crunch, and I used a creamy peanut butter that’s both rich and silky. The result is a dessert that can be assembled in under forty minutes, yet feels like it took hours to perfect. The combination of peanut butter, cream cheese, and whipped topping creates a mousse-like texture that’s airy and decadent. Most recipes get this completely wrong by over‑mixing or using too much sugar; here, everything balances like a well‑orchestrated symphony.
And here’s a teaser about a technique that will change how you think about no‑bake desserts: I’ll show you how to toast the graham cracker crumbs just enough to bring out their nutty aroma without burning them, giving the base a depth of flavor that’s often missing. You’ll learn how to fold the whipped topping into the peanut butter mixture in a way that keeps it fluffy, so each spoonful feels like a cloud. Picture yourself pulling this out of the fridge, the whole kitchen smelling incredible, and knowing that you’ve just created a dessert that’s both simple and unforgettable. Let me walk you through every single step — by the end, you’ll wonder how you ever made it any other way.
What Makes This Version Stand Out
- Flavor: The combination of peanut butter, cream cheese, and a splash of vanilla creates a layered taste that’s both sweet and savory. The graham cracker crumbs add a subtle nuttiness that balances the richness.
- Texture: The crust is buttery and slightly crisp, while the filling is airy and mousse‑like. This contrast keeps every bite interesting and satisfying.
- Speed: No oven time means you can whip this up in under an hour, making it perfect for last‑minute gatherings.
- Make‑ahead: The dessert can be prepared up to two days in advance and stored in the fridge, making it an excellent choice for busy hosts.
- Ingredient Quality: Using high‑quality peanut butter and cream cheese elevates the flavor profile, turning a simple dessert into a gourmet experience.
- Versatility: The base can be adapted with different nuts, chocolate, or fruit, allowing you to customize it for any occasion.
- Crowd Reaction: Friends and family are stunned by the smoothness and the subtle crunch, making it a conversation starter at every table.
- Simplicity: With just eight ingredients and a single pan, you’re less likely to mess up and more likely to impress.
Alright, let's break down exactly what goes into this masterpiece...
Inside the Ingredient List
The Flavor Base
The graham cracker crumbs are the unsung hero of this dessert. They provide a subtle sweetness and a crunchy texture that contrasts beautifully with the creamy filling. If you skip them, the dessert loses its structural integrity and becomes a mushy mess. A good swap for graham crackers is crushed digestive biscuits or vanilla wafer crumbs, but the flavor profile will shift slightly toward a more buttery or citrusy note.
The unsalted butter melts into the crumbs, binding them together and adding a rich, buttery undertone. Butter is essential for achieving a cohesive crust that holds its shape. If you’re looking for a dairy‑free alternative, try coconut oil; it will give a subtle coconut aroma that pairs surprisingly well with peanut butter.
Granulated sugar is the sweetener that balances the savory notes of the crust. It also helps the crumbs caramelize during the toasting process. If you prefer a lower glycemic index, replace half the sugar with a natural sweetener like maple syrup or agave nectar, but be aware that the texture may become slightly denser.
The Texture Crew
Cream cheese is the backbone of the filling. It provides a silky, tangy base that prevents the peanut butter from becoming too thick. A high‑fat cream cheese gives the dessert a lush mouthfeel, while a low‑fat version can feel a bit chalky. If you’re experimenting, try a mixture of cream cheese and Greek yogurt for a lighter, tangier option.
Peanut butter is the star of the show. It adds depth, nuttiness, and a creamy texture that’s essential for a smooth mousse. Opt for natural, no‑added‑sugar peanut butter to keep the flavor pure. A small amount of salt can enhance the nutty profile and balance the sweetness.
Powdered sugar is used to sweeten the filling without adding grainy texture. It dissolves quickly, ensuring a smooth consistency. If you’re avoiding refined sugars, you can use coconut sugar or a sugar substitute that’s fine‑grained.
The Unexpected Star
Frozen whipped topping brings a light, airy quality that turns the dense peanut butter mixture into a cloud‑like mousse. It also adds a subtle sweetness and a pleasant coldness that contrasts with the warm crust. If you’re lactose intolerant or vegan, use a dairy‑free whipped topping made from coconut cream or a plant‑based alternative.
Vanilla extract is the finishing touch that rounds out the flavor. It adds a warm, aromatic note that balances the nutty and sweet elements. A few drops of almond extract can give a subtle nutty twist, while a splash of espresso enhances the chocolate undertones.
Everything's prepped? Good. Let's get into the real action...
The Method — Step by Step
- First, place 1.5 cups of graham cracker crumbs into a medium bowl. Add 6 tablespoons of unsalted butter and ¼ cup of granulated sugar. Toss the mixture with a fork until the crumbs are evenly coated. Heat a dry skillet over medium heat, then add the crumb mixture. Toast for 2–3 minutes, stirring constantly, until the crumbs turn a light golden brown and emit a nutty aroma. This step is crucial; it’s the foundation of flavor for the entire dessert.
- While the crumbs are toasting, melt the butter in the skillet, allowing it to mingle with the crumbs. Once the mixture has cooled to a warm temperature, press it firmly into the bottom of a 9‑inch springform pan. Use the back of a spoon to create an even layer. Chill the crust in the refrigerator for 10 minutes so it sets properly.
- In a separate bowl, combine 8 ounces of cream cheese and 1 cup of creamy peanut butter. Beat them together with an electric mixer on medium speed until the mixture is completely smooth and creamy. The goal is to eliminate any lumps; this will prevent a gritty texture in the final product.
- Add 1 cup of powdered sugar to the peanut butter mixture, then continue beating until the sugar is fully incorporated and the mixture is glossy. This step ensures the dessert remains sweet without becoming overly sugary.
- Fold in 8 ounces of frozen whipped topping. Use a spatula and gentle, folding motions to keep the mixture airy. The whipped topping should be at room temperature or slightly softened so it can blend smoothly. If you fold too aggressively, the air escapes and the mousse loses its lightness.
- Stir in 1 teaspoon of vanilla extract, which will give the dessert a warm, fragrant finish. Taste the mixture; if you’d like a slightly saltier profile, add a pinch of sea salt. This subtle addition will bring out the nutty flavors even more.
- Pour the filling over the chilled crust, smoothing the top with a spatula. Tap the pan gently on the counter to remove any air pockets and ensure the filling is evenly distributed. The filling should be glossy and thick enough to hold its shape.
- Refrigerate the dessert for at least 3 hours, or until the filling has set completely. If you’re short on time, a 2‑hour chill will still give you a firm texture, but the flavors will develop more fully with a longer rest.
That’s it — you did it. But hold on, I've got a few more tricks that'll take this to another level...
Insider Tricks for Flawless Results
The Temperature Rule Nobody Follows
The key to a smooth mousse is keeping the whipped topping just at the right temperature. If it’s too cold, it won’t fold properly; if it’s too warm, it will deflate. I keep it in the fridge for 15 minutes before folding and then let it sit at room temperature for 5 minutes. This small adjustment makes the difference between a dense, heavy dessert and a cloud‑like treat.
Why Your Nose Knows Best
Before you start mixing, give the graham cracker crumbs a quick sniff. If they smell faintly sweet and buttery, you’re ready. If they have a raw, doughy scent, you need to toast them longer. Your nose is a reliable quality control tool; a good aroma means a better flavor.
The 5‑Minute Rest That Changes Everything
After pouring the filling, let the dessert sit at room temperature for 5 minutes before refrigerating. This brief rest allows the mixture to settle and ensures that no air pockets remain. Those little pockets can cause the dessert to crack or become uneven, so this simple step is a game‑changer.
Use a Springform Pan for Easy Release
A springform pan is essential because it lets you release the dessert without tearing the crust. If you’re using a regular pan, you risk breaking the crust when you try to lift it. A springform pan also helps the dessert hold its shape during chilling.
Add a Splash of Water Before Reheating
If you need to warm the dessert for a quick serving, add a teaspoon of water to the top before microwaving. This creates steam that re‑softens the mousse without drying it out. It’s a small trick that keeps the dessert silky and luscious.
Creative Twists and Variations
This recipe is a playground. Here are some of my favorite ways to switch things up:
Chocolate Peanut Butter Swirl
Swirl in 2 tablespoons of melted dark chocolate into the filling before chilling. The chocolate adds depth and a slightly bitter contrast that pairs beautifully with the sweet peanut butter.
Almond Crunch Upgrade
Add ¼ cup of toasted sliced almonds to the crust for an extra crunch. The almond flavor complements the peanut butter while adding a nutty aroma that’s irresistible.
Maple Syrup Sweetener
Replace the powdered sugar with maple syrup for a natural sweetener that introduces a subtle caramel note. This variation is perfect for a fall-inspired dessert.
Coconut Cream Variation
Swap the whipped topping with coconut cream whipped to airy peaks. This gives the dessert a tropical twist and a hint of coconut flavor that pairs well with the peanut butter.
Fruit‑Topped Finish
Top the final dessert with fresh berries or a drizzle of raspberry coulis. The acidity cuts through the richness and adds a burst of color.
Storing and Bringing It Back to Life
Fridge Storage
Store the dessert in an airtight container in the refrigerator for up to 4 days. The chill keeps the mousse firm and the crust crisp. When you’re ready to serve, let it sit at room temperature for 10 minutes to soften slightly.
Freezer Friendly
The dessert can be frozen for up to 2 weeks. Wrap it tightly in plastic wrap and place it in a freezer bag. When you’re ready to enjoy, thaw in the refrigerator overnight. The texture may be slightly firmer, but the flavor remains intact.
Best Reheating Method
If you need to warm the dessert for a quick serving, place it in a microwave-safe dish and heat on medium for 20–30 seconds. Add a splash of water to create steam, then let it sit for 1 minute. This technique re‑softens the mousse while keeping the crust intact.