I was halfway through a frantic weekday dinner when the fire alarm decided to join the party, and that was the exact moment I swore I would never trust a shortcut again. The kitchen smelled like burnt onion and regret, but the craving for something creamy, spiced, and utterly comforting was still gnawing at me like a mischievous squirrel. I stared at the lone block of paneer on the counter and thought, “What if I could turn this humble cheese into a royal feast without setting off the smoke detector?” That thought sparked a culinary experiment that has since become my go‑to comfort dish, and trust me, it’s a game‑changer.
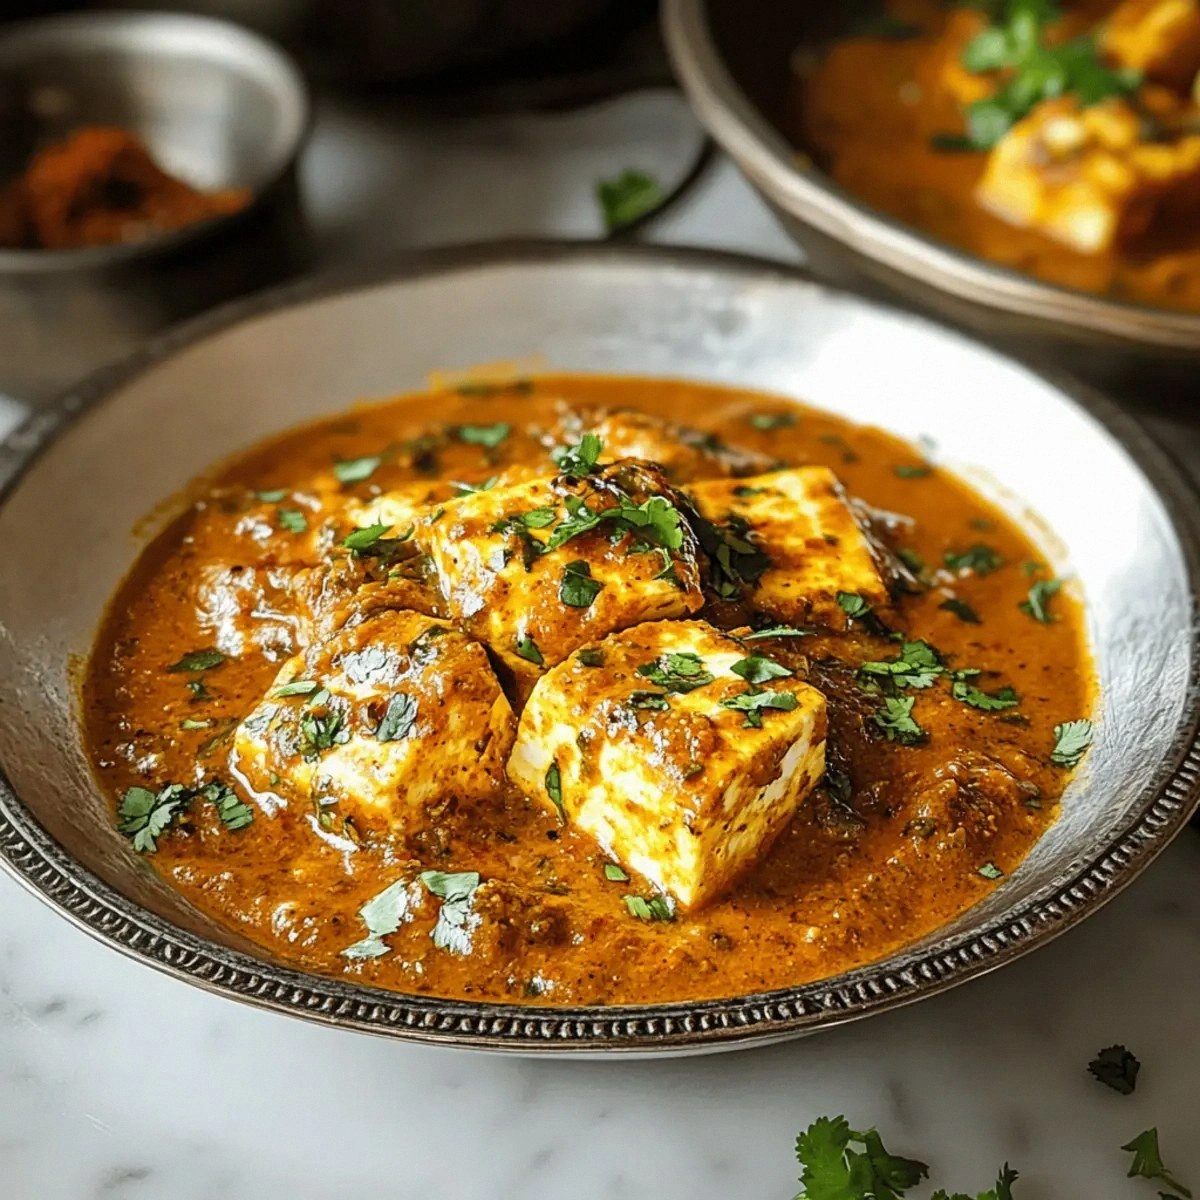
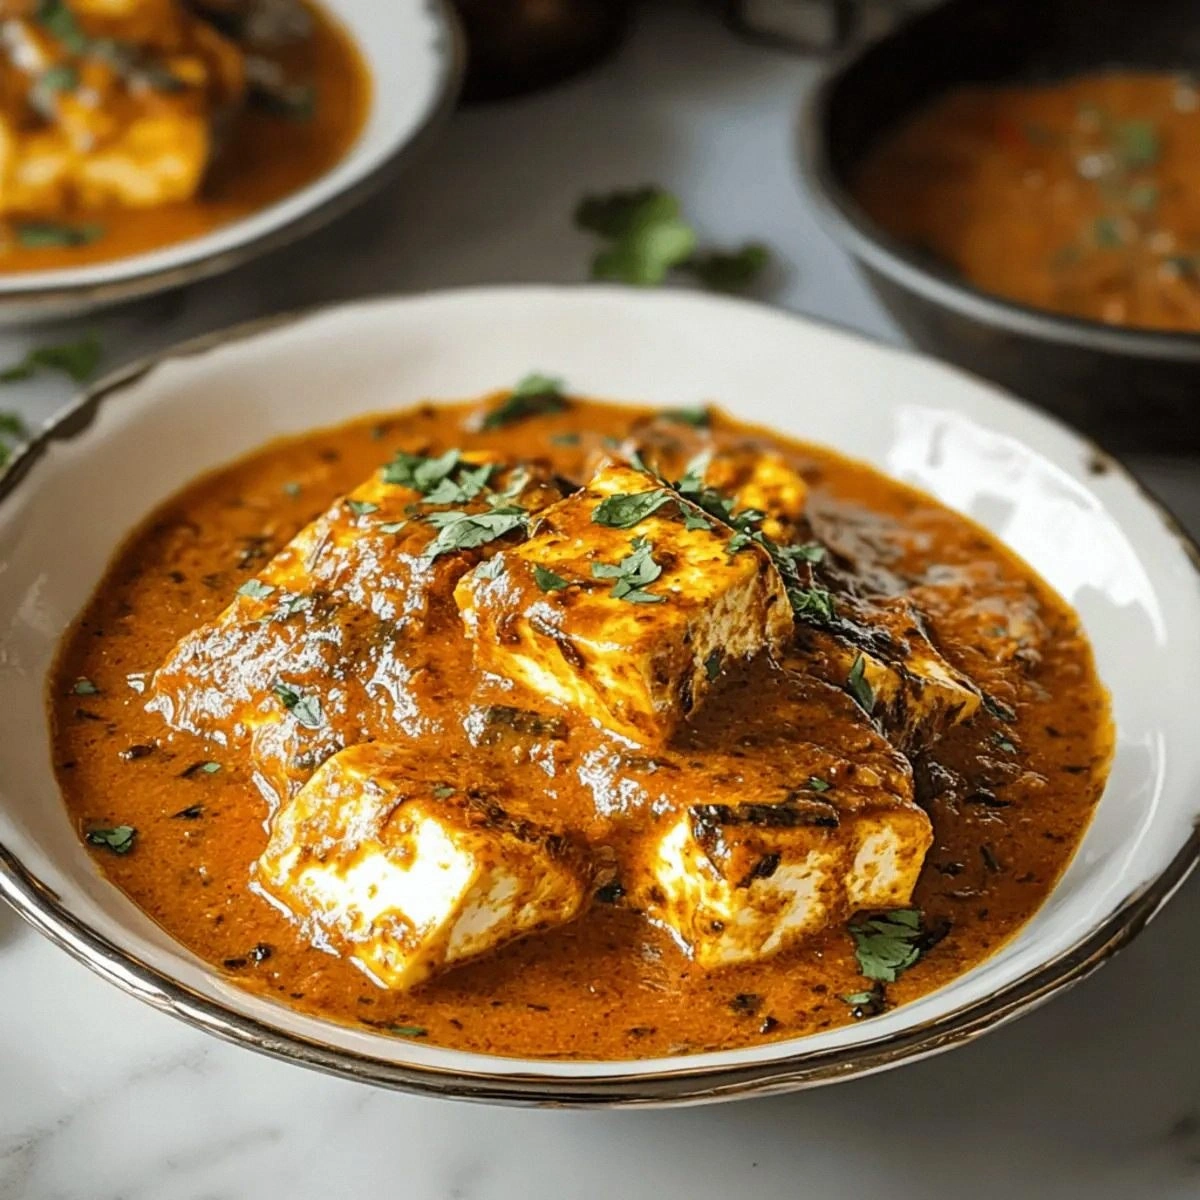
Picture this: a glossy, ruby‑red tomato gravy that clings to each paneer cube like a lover’s embrace, speckled with toasted cumin seeds and a whisper of garam masala that makes your nose tingle in anticipation. The sauce is thick enough to coat a spoon but still fluid enough to swirl around the plate, releasing aromatic steam that fills the entire kitchen. When you bite into the paneer, it’s soft on the inside, with a faintly caramelized crust that gives a satisfying “snap” before melting into the sauce. The fresh cilantro garnish adds a burst of green that looks like a painter’s final brushstroke, and the whole dish feels like a warm hug on a rainy evening.
Most paneer musallam recipes I’ve tried either drown the cheese in a watery tomato soup or smother it under a mountain of spices that mask its delicate flavor. This version respects the paneer’s natural creaminess while building layers of taste that crescendo with each bite. I’m daring you to taste this and not go back for seconds – that’s a promise I’m willing to back with a full‑blown kitchen dance. I’ll be honest — I ate half the batch before anyone else got a chance to try it, and I still have leftovers that taste just as glorious the next day.
The secret weapon? A quick flash‑fry that creates a light crust on the paneer before it swims in the sauce, plus a splash of water at the end that revives the gravy’s silkiness. Okay, ready for the game‑changer? Let me walk you through every single step — by the end, you’ll wonder how you ever made it any other way.
What Makes This Version Stand Out
- Flavor Explosion: The combination of fresh tomatoes, ginger‑garlic paste, and a balanced spice mix creates a depth that feels like a festival in your mouth.
- Texture Harmony: Lightly fried paneer develops a crisp edge that shatters like thin ice, while the interior remains buttery smooth.
- Simplicity Meets Luxury: Only a handful of pantry staples are needed, yet the result feels restaurant‑grade without the pretentious price tag.
- Ingredient Quality: Using a firm, fresh block of paneer ensures the cubes hold their shape and absorb the gravy without falling apart.
- Crowd Reaction: Even the most skeptical meat‑eaters confess they’d gladly swap their chicken for this dish after the first bite.
- Make‑Ahead Magic: The sauce actually improves after a few hours as the spices meld, making it perfect for meal‑prepping.
- Cooking Method: A two‑stage cooking process – flash‑fry then simmer – guarantees both flavor and texture are maximized.
- Versatile Base: The tomato‑onion gravy can be repurposed for other veg dishes, extending its value beyond a single meal.
Inside the Ingredient List
The Flavor Base
Onions are the aromatic foundation; they release natural sugars when sautéed, creating a subtle sweetness that balances the acidity of tomatoes. If you skip the onion, the sauce will feel flat, like a song missing its bass line. A medium yellow onion, finely diced, works best because its layers melt uniformly. For a deeper flavor, you can caramelize them a minute longer, but watch out for burning – that’s where the “Watch Out” box will save you later.
Tomatoes provide the bright, tangy canvas that carries the spices. Using 2‑3 cups of ripe, crushed tomatoes ensures a thick gravy that clings to the paneer. If you’re out of fresh tomatoes, a high‑quality canned crushed variety will do, but avoid those with added sugars. The acidity of tomatoes also helps cut through the richness of the paneer, keeping each bite balanced.
Ginger‑garlic paste is the aromatic punch that wakes up the palate. The 1‑2 tablespoons we use give just enough zing without overpowering the delicate cheese. Freshly made paste (equal parts ginger and garlic, blended with a pinch of salt) yields a brighter flavor than store‑bought versions, which can be overly salty.
The Spice Ensemble
Cumin seeds, when toasted, release a nutty, earthy aroma that forms the backbone of the gravy. One teaspoon is enough to make the sauce sing, but if you love a deeper earthiness, increase to 1½ teaspoons – just remember to adjust the other spices accordingly.
Coriander powder adds a citrusy brightness that lifts the heaviness of the creaminess. It’s the secret behind the “fresh” feeling you get when you taste the dish. Skipping it will make the gravy taste one‑dimensional, like a painting missing its highlights.
Turmeric brings not only its signature golden hue but also a subtle peppery warmth. A single teaspoon is sufficient; more can make the flavor bitter, so resist the urge to overdo it.
Garam masala is the final aromatic flourish, a blend of cardamom, cinnamon, cloves, and more. Adding it at the end of cooking preserves its volatile oils, ensuring the fragrance hits you like a warm breeze.
Red chili powder provides the heat that makes you sit up straight and say, “Whoa, that’s got kick!” Adjust the amount based on your tolerance – ½ teaspoon for mild, up to 1½ teaspoons for fire‑breather status.
The Texture Crew
Paneer is the star, and the quality of the block determines the entire dish’s success. Look for paneer that is firm, slightly crumbly, and doesn’t melt when heated. If it’s too soft, it will disintegrate in the sauce, turning the gravy into a curdled mess.
Oil is the silent partner that facilitates the initial fry and prevents the paneer from sticking. Use a neutral oil with a high smoke point – canola, sunflower, or refined peanut work great. Too much oil will make the dish greasy; too little and the paneer won’t develop that coveted crust.
The Final Flourish
Fresh cilantro adds a herbaceous pop right before serving, cutting through the richness and adding a burst of green color. A quarter‑cup, roughly chopped, is enough; you can always sprinkle extra on top for garnish.
A cup of water helps adjust the gravy’s consistency, ensuring it’s neither too thick nor too thin. Adding it gradually while the sauce simmers gives you control over the final texture.
Salt, of course, is the universal enhancer. Since the exact amount can vary based on the saltiness of your paneer and tomato product, add it to taste at the end of cooking. Too much early on can mask the delicate spice layers.
Everything's prepped? Good. Let's get into the real action…
The Method — Step by Step
Start by cutting the paneer into generous 1‑inch cubes. Pat each piece dry with a paper towel – moisture is the enemy of a good crust. In a large skillet, heat 2‑3 tablespoons of oil over medium‑high heat until it shimmers. Add the paneer cubes in a single layer, letting them sizzle without crowding; you’ll hear a satisfying “pop” that signals the crust forming. Fry for about 2‑3 minutes per side until golden brown, then transfer the cubes to a plate lined with paper towels.
In the same skillet, reduce the heat to medium and add a splash more oil if the pan looks dry. Toss in the diced onion and let it sweat for 4‑5 minutes, stirring occasionally. You’re listening for that sweet, caramelizing scent – that’s the flavor base building. Once the onion turns translucent, add the cumin seeds and let them toast for 30 seconds; the kitchen will fill with a nutty perfume that makes your stomach rumble.
Now comes the ginger‑garlic paste. Stir it in and watch the pan come alive with sizzling bubbles. Cook for another minute, making sure the raw bite disappears. Then, dump in the crushed tomatoes, stirring to combine. The mixture should sizzle and thicken within two minutes; if it looks watery, let it reduce a bit longer – this is the moment where the sauce gains its velvety body.
Season the sauce with coriander powder, turmeric, red chili powder, and a generous pinch of salt. Stir vigorously, letting the spices bloom – you’ll notice the sauce darkening slightly and a fragrant cloud rising. Let the mixture simmer for 5‑7 minutes, uncovered, so the flavors meld and the oil separates on top, indicating readiness. Taste and adjust salt or chili at this stage; remember, you can always add more, but you can’t take it out.
Add the fried paneer cubes back into the skillet, gently coating each piece with the thickened gravy. Reduce the heat to low, cover, and let it simmer for another 8‑10 minutes. This gentle simmer allows the paneer to absorb the spiced tomato goodness without breaking apart. The sauce should cling to the cubes like a glossy veil, and the aroma will be intoxicating – you’ll feel a warm wave of anticipation.
Just before turning off the heat, stir in the garam masala and fresh cilantro. The garam masala should be added at the very end to preserve its volatile oils; you’ll notice a final burst of fragrance that feels like a culinary fireworks display. If the gravy looks a tad thick, splash in the cup of water and give it a quick stir – the sauce will loosen to a silky consistency.
Turn off the burner, cover the pan, and let the dish rest for 5 minutes. This resting period is crucial; it lets the flavors settle and the paneer finish soaking up the sauce. While you wait, set the table, pour a glass of chilled lassi, and picture yourself pulling this out of the pan, the whole kitchen smelling incredible. When you finally serve, garnish with a few extra cilantro leaves for color and a dash of love.
That's it — you did it. But hold on, I've got a few more tricks that'll take this to another level…
Insider Tricks for Flawless Results
The Temperature Rule Nobody Follows
Never fry paneer over roaring high heat; a medium‑high flame gives you a controlled browning without scorching. I once cranked the heat to max, and the paneer turned black on the outside while staying raw inside – a disaster that taught me the value of patience. Keep the oil shimmering, not smoking, and you’ll get that perfect caramelized crust that shatters like thin ice when you bite.
Why Your Nose Knows Best
Your sense of smell is a more reliable indicator than a timer when it comes to spices. When the cumin seeds start to pop, you’ll hear a faint crackle and smell a nutty aroma – that’s your cue to add the tomatoes. If you miss that moment, the spices can turn bitter, and the whole dish suffers.
The 5‑Minute Rest That Changes Everything
After the final simmer, turn off the heat and let the paneer sit covered for five minutes. During this brief pause, the gravy thickens just enough to cling, and the paneer absorbs the final layers of flavor. Skipping this step is like serving a song without the final chord – it feels unfinished.
Pan Size Matters
A heavy‑bottomed skillet distributes heat evenly, preventing hot spots that can scorch the sauce. I once used a thin non‑stick pan and ended up with a burnt layer at the bottom, which gave the whole batch a smoky aftertaste. Invest in a good cast‑iron or stainless steel pan; it’s worth the upgrade.
Freshness is Non‑Negotiable
Fresh cilantro and freshly ground spices make a world of difference. Dried cilantro loses its bright flavor, and pre‑ground spices lose potency after a few months. If you can, grind whole spices in a mortar and pestle just before cooking – the aroma will make your kitchen feel like a spice market in Delhi.
Creative Twists and Variations
This recipe is a playground. Here are some of my favorite ways to switch things up:
Smoky Charcoal Paneer
Before frying, coat the paneer cubes in a light dusting of smoked paprika and a pinch of charcoal powder (available in specialty stores). The result is a deep, smoky undertone that pairs beautifully with the bright tomato base, perfect for a winter night.
Coconut Cream Curry
Swap half the water for coconut milk and add a tablespoon of grated coconut at the end. This creates a richer, slightly sweet sauce that feels like a tropical vacation in a bowl.
Spinach‑Infused Musallam
Stir in a cup of blanched, chopped spinach during the last five minutes of simmering. The green adds a nutritional boost and a subtle earthiness that complements the spices.
Cheesy Garlic Overload
Mix in ¼ cup of grated mozzarella or cheddar just before serving and let it melt into the hot gravy. The cheesy pull adds a comforting, gooey texture that kids adore.
North Indian Butter Twist
Finish the dish with a tablespoon of clarified butter (ghee) and a dash of kasuri methi (dried fenugreek leaves). The buttery richness and herbaceous note elevate the dish to a festive level.
Storing and Bringing It Back to Life
Fridge Storage
Allow the paneer musallam to cool to room temperature, then transfer it to an airtight container. It will keep beautifully for up to 3 days in the refrigerator. When reheating, add a splash of water or a drizzle of cream to revive the sauce’s silkiness.
Freezer Friendly
Portion the cooked dish into freezer‑safe bags, removing as much air as possible. It freezes well for up to 2 months. To thaw, move it to the fridge overnight, then reheat gently on the stovetop, stirring occasionally and adding a bit of water if the gravy looks thick.
Best Reheating Method
The stovetop method over low heat is the gold standard. Place the leftovers in a saucepan, add ¼ cup of water, and cover. Heat for 5‑7 minutes, stirring occasionally, until the sauce is glossy again. Microwaving works in a pinch but can make the paneer rubbery if overcooked.