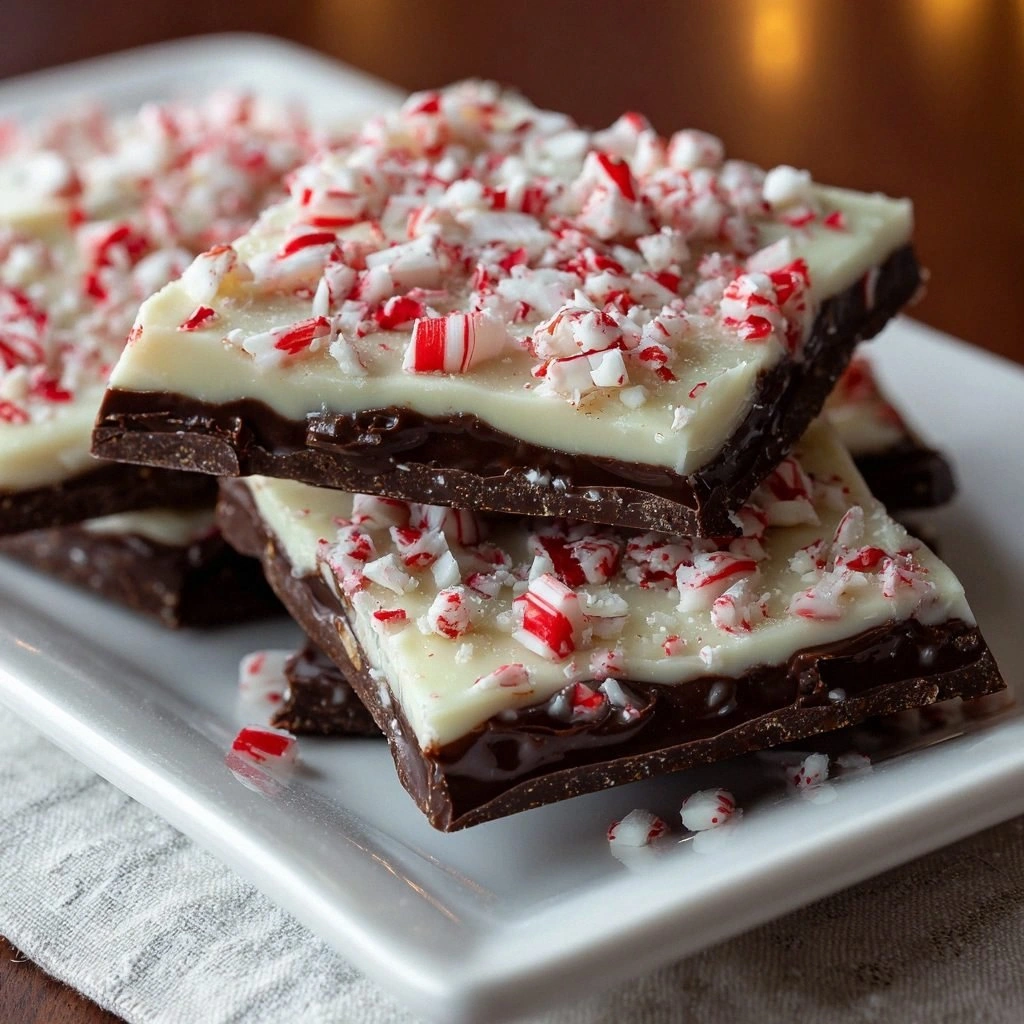
Picture this: I was halfway through a holiday baking marathon, and the kitchen smelled like burnt sugar and burnt chocolate. My friends were staring at the mess, and I, in a moment of culinary desperation, declared, “I’ll make something that actually works.” The result? Peppermint Bark that melts on the tongue, shatters like thin ice, and leaves a minty trail that lingers longer than a holiday carol. If you’re still stuck on the same old chocolate bar, you’re about to discover a version that will make your taste buds do a happy dance.
I’ve spent years chasing the perfect combination of chocolate and mint, but nothing has come close to this. The first bite is a silky dark chocolate base, followed by a velvety white chocolate layer that balances the bitterness, and finally a crunchy peppered candy that gives that signature snap. The aroma is an intoxicating blend of cocoa and peppermint, and the texture transitions from smooth to crisp in a single bite. My kitchen has never smelled so festive, and my friends swear they can’t resist the urge to grab a piece right off the counter.
What sets this version apart from the countless variations on Pinterest is the meticulous layering technique and the choice of high‑grade chocolate that brings out the full flavor profile. I’ve perfected the melt‑pour‑set method to avoid any chocolate bloom or dull finish. The peppermint candies are crushed to the perfect consistency, ensuring they embed into the white chocolate without sinking or floating. If you’ve ever made a batch that looked like a sad, uneven slab, this recipe will transform that experience into a flawless masterpiece.
And there’s a little secret I’ll reveal in the method: I use a double boiler to keep the temperature steady, preventing scorching and preserving the chocolate’s glossy sheen. The trick is to stir constantly, allowing the chocolate to melt evenly and create a silky finish. You’ll notice that the chocolate doesn’t just melt—it practically sings, releasing a subtle nutty aroma that signals it’s ready for the next step. This subtle cue will become your personal chocolate thermometer.
So buckle up, because I’m about to walk you through every single step. By the end of this guide, you’ll wonder how you ever made peppermint bark any other way. Let’s dive in and create a treat that’s as stunning to look at as it is to devour.
What Makes This Version Stand Out
- Flavor: The deep, robust dark chocolate base is paired with the creamy sweetness of white chocolate, creating a layered taste that’s both bold and comforting.
- Texture: The crushed peppermint candies add a satisfying crunch that contrasts beautifully with the smooth chocolate, preventing the classic “melted and sticky” issue.
- Visual Appeal: The stark black and white layers give a festive, holiday‑ready look that’s perfect for gift‑wrapping or a centerpiece.
- Ingredient Quality: Using premium chocolate ensures a glossy finish and a richer flavor, while the candies add authentic mint flavor.
- Ease of Preparation: The method requires only a double boiler and a simple set‑up, making it accessible for beginners and pros alike.
- Make‑Ahead Potential: Once set, the bark can be stored in an airtight container for up to two weeks, making it a convenient treat for parties.
- Scalability: The recipe scales up or down effortlessly—use the serving adjuster in the recipe card to fit any crowd.
- Healthier Twist: By choosing dark chocolate with at least 70% cacao, you get antioxidants without compromising flavor.
Alright, let’s break down exactly what goes into this masterpiece…
Inside the Ingredient List
The Flavor Base
Dark chocolate is the cornerstone of this bark. Its bitterness balances the sweetness of the white chocolate and the sharpness of the peppermint. If you skip this layer, the bark loses depth and feels like a plain candy bar. I recommend a chocolate with at least 70% cacao for a richer, more complex taste. If you prefer a milder flavor, use a 60% cacao chocolate, but be prepared for a slightly sweeter finish.
The Sweet Layer
White chocolate adds a creamy, buttery contrast to the dark base. It also serves as a carrier for the crushed peppermint, allowing the mint flavor to infuse evenly. A high‑quality white chocolate will melt smoothly and set with a glossy sheen. If you can’t find white chocolate, a milk chocolate with a high cocoa butter content can be a decent substitute, though the flavor will be different.
The Crunch
Crushed peppermint candies are the star that gives this bark its signature snap. They also add a subtle citrus note that brightens the chocolate. Use candy canes or store‑bought peppermint candies; just crush them finely so they spread evenly. If you prefer a more intense mint flavor, add a few drops of peppermint extract to the white chocolate before pouring.
Everything’s prepped? Good. Let’s get into the real action…
The Method — Step by Step
- Start by chopping the dark chocolate into small, even pieces. Place them in a heat‑proof bowl. I dare you to taste this and not go back for seconds—once you’ve tasted the melt, you’ll know the difference. The chocolate should be smooth and free of lumps; if you see any, stir gently until it’s fully melted.
- Place the bowl over a pot of gently simmering water, making sure the bottom of the bowl does not touch the water. Stir constantly for about 3–4 minutes until the chocolate is glossy and fully melted. If you notice a film forming on top, it means the chocolate is too hot; lower the heat immediately. The chocolate should emit a subtle cocoa aroma—this is your cue that it’s ready.
- Transfer the melted dark chocolate onto a parchment‑lined baking sheet, spreading it into an even layer about ½ inch thick. Use a spatula to smooth the surface, creating a clean border that will help the white chocolate adhere. Let it set for 5 minutes; it should start to firm up but still be pliable.
- While the dark layer is setting, chop the white chocolate into small chunks and place them in a separate heat‑proof bowl. Melt the white chocolate using the same double‑boiler method, stirring until it’s silky. This white chocolate will be poured over the dark base, so make sure it’s perfectly smooth.
- Once the dark chocolate has set slightly, pour the melted white chocolate over it, creating a second, distinct layer. Use a spatula to spread the white chocolate evenly, ensuring it covers the entire dark layer. The white chocolate should still be liquid; if it starts to thicken, add a tiny splash of cold water to loosen it.
- While the white layer is still wet, sprinkle the crushed peppermint candies evenly across the surface. Gently press them into the chocolate to ensure they stick. The candies should be distributed in a single, even layer; avoid clumping, or you’ll end up with uneven bites.
- Place the baking sheet in a cool, dry place and let the bark set completely for about 30 minutes. If you’re in a hurry, a few minutes in the refrigerator will do the trick, but be careful not to over‑cool, as this can cause the chocolate to seize. Once set, cut the bark into bars using a sharp knife, wiping the blade between cuts for clean edges.
- Wrap each bar individually in parchment or wax paper for storage, or place them in an airtight container. If you’re gifting, consider a decorative tin with a ribbon. The result is a gorgeous, minty treat that’s perfect for any occasion. And remember, the first bite should feel like a cool breeze on a winter day—refreshing, sweet, and utterly satisfying.
That's it — you did it. But hold on, I've got a few more tricks that'll take this to another level…
Insider Tricks for Flawless Results
The Temperature Rule Nobody Follows
Chocolate is temperamental; the key is to keep it between 86°F and 90°F for dark and 84°F to 88°F for white. I’ve found that a kitchen thermometer is a game‑changer, especially if you’re new to chocolate work. If you’re using a double boiler, let the water simmer gently—any more, and you risk overheating.
Why Your Nose Knows Best
Before pouring the white chocolate, give it a quick sniff. A faint nutty aroma indicates it’s ready. If it smells too strong or burnt, give it a minute to cool. This simple sensory check saves you from a bitter batch and keeps the bark’s flavor profile balanced.
The 5‑Minute Rest That Changes Everything
After pouring the white chocolate, let it sit for 5 minutes before adding the peppermint. This pause allows the chocolate to thicken just enough to hold the candies in place, preventing them from sliding off. I’ve seen people skip this step and end up with a wobbly bark—don’t make that mistake.
The “No‑Stain” Technique
If you’re worried about chocolate stains on your hands, keep a bowl of cold water nearby. Dip your fingers in the water before handling the chocolate; the cold temperature prevents the oils from sticking. It’s a small step that keeps your kitchen clean and your hands fresh.
The “Snap” Check
Once the bark is set, snap a small piece in half. If it fractures cleanly, the texture is perfect. If it crumbles, you probably set it too long. I’ve learned that the right snap is a sign of a well‑tempered, crisp bark that will hold up to transport or storage.
Creative Twists and Variations
This recipe is a playground. Here are some of my favorite ways to switch things up:
Nutty Peppermint
Add a handful of toasted almonds or hazelnuts into the white chocolate layer before pouring. The nuts add a crunchy texture and a buttery flavor that complements the mint. This version is perfect for a holiday gift basket.
Cocoa‑Infused Crunch
Sprinkle a light dusting of cocoa powder over the peppermint layer before it sets. The cocoa adds a subtle bitterness that balances the sweetness, giving the bark an extra depth of flavor. It also gives a darker, more decadent look.
Orange‑Mint Fusion
Replace half of the peppermint candies with candied orange peel. The citrus note pairs wonderfully with the chocolate, creating a festive flavor that’s reminiscent of a holiday cocktail. This twist is ideal for a brunch or dessert table.
Spiced Peppermint
Add a pinch of ground cinnamon or nutmeg to the white chocolate before pouring. The warm spices add complexity and make the bark feel cozy. It’s a great option for a winter gathering.
Dark Chocolate Swirl
Instead of a single dark layer, swirl a thin ribbon of dark chocolate into the white chocolate before pouring. The swirl creates a marbled effect that’s visually stunning and adds a richer chocolate bite.
Storing and Bringing It Back to Life
Fridge Storage
Place the bark in an airtight container and store it in the refrigerator for up to 2 weeks. The cool temperature keeps the chocolate firm and prevents the peppermint from melting. When you’re ready to enjoy, let the bark sit at room temperature for 10 minutes to soften slightly.
Freezer Friendly
Wrap the bark tightly in plastic wrap and then in aluminum foil before freezing. It will stay fresh for up to 3 months. Thaw it in the refrigerator overnight, then let it rest at room temperature for 15 minutes before serving. This method preserves the crispness of the peppermint.
Best Reheating Method
If the bark has become too hard, gently warm it in a double boiler or microwave on low power for 10–15 seconds. Add a tiny splash of water before reheating; it steams back to perfection and keeps the chocolate from seizing. This quick fix is perfect for a last‑minute dessert.