Picture this: I’m standing in my kitchen, the timer on my oven buzzing like a frantic bee, and a half‑finished batch of cookies sitting smugly on the counter. I had just attempted a classic Oreo truffle, but something was missing—an element of summer, a burst of fruit that would cut through the chocolatey heaviness. In a moment of desperation (and a dare from my roommate who claimed “nothing can beat a strawberry shortcake”), I grabbed a bag of freeze‑dried strawberries, a block of cream cheese, and a tub of white chocolate chips. The result? A dessert that turned my ordinary night into a confetti‑filled celebration of flavor.
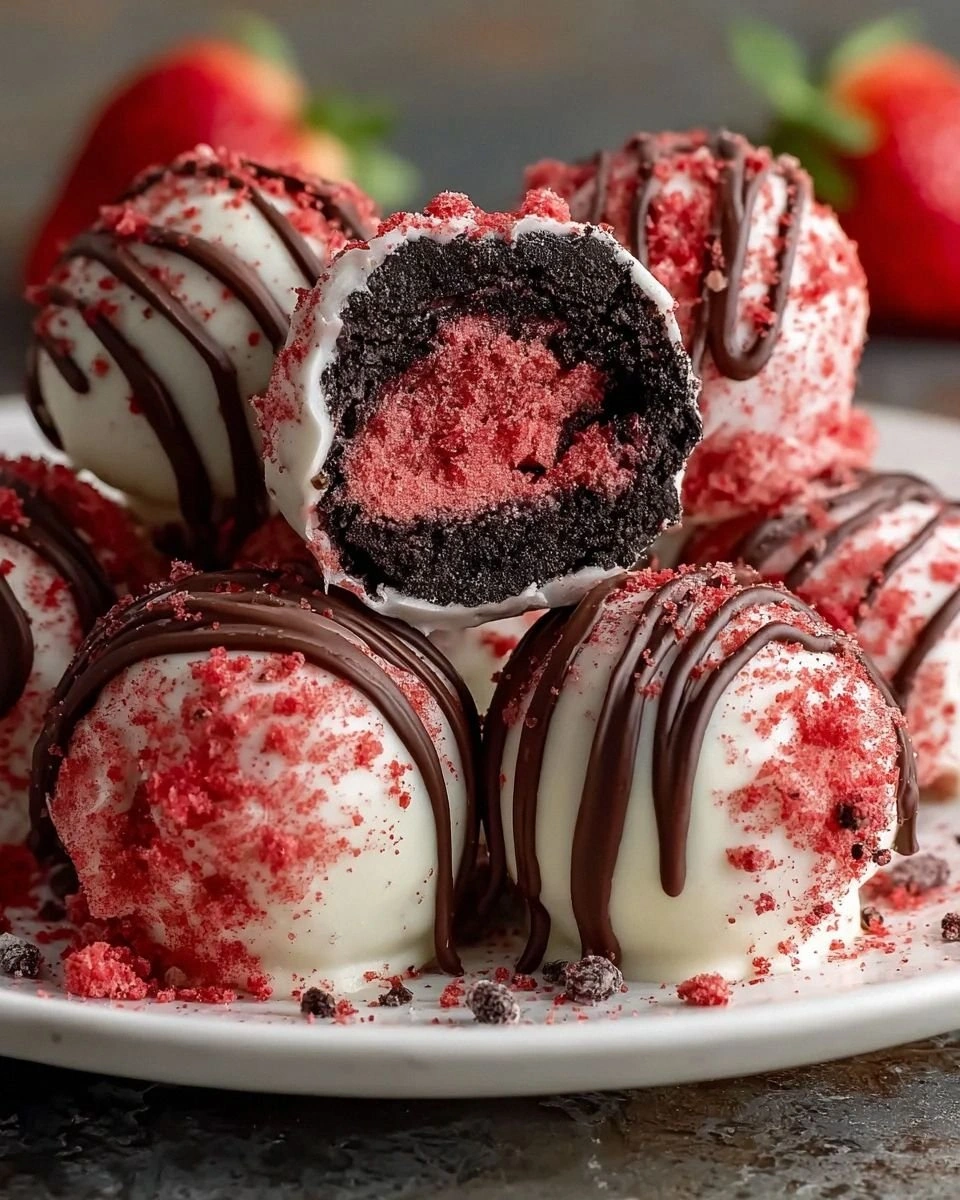
The moment those crushed Oreo crumbs met the silky cream cheese, the kitchen filled with a sweet, buttery aroma that made my nose do a little happy dance. I could hear the faint crackle of the chocolate melting in the saucepan, a sound that reminded me of fireworks on a summer night. My fingertips tingled as I rolled the mixture into bite‑size spheres, each one feeling like a promise of decadence. When the white chocolate coating finally set, it glistened like a fresh snowfall on a strawberry field, and the crushed freeze‑dried strawberries on top added a pop of ruby‑red that was simply irresistible.
Most recipes for Oreo balls either drown them in chocolate or forget the strawberry element altogether, leaving you with a one‑dimensional treat. This version, however, balances the rich, chocolatey base with a light, airy strawberry shortcake vibe, creating a texture that’s creamy on the inside and crisp on the outside—think of it as a cloud that shatters like thin ice when you bite into it. The secret? Using freeze‑dried strawberries instead of fresh ones, so you get an intense strawberry punch without any extra moisture that would sog the coating.
I’m daring you to taste this and not go back for seconds. This is hands down the best version you’ll ever make at home, and I’ll be honest—I ate half the batch before anyone else got a chance to try. Let me walk you through every single step — by the end, you’ll wonder how you ever made it any other way.
What Makes This Version Stand Out
- Flavor Harmony: The sweet, creamy cream cheese pairs perfectly with the tangy freeze‑dried strawberries, while the white chocolate adds a buttery finish that doesn’t overpower.
- Texture Contrast: You get a crunchy Oreo crust, a velvety interior, and a glossy chocolate shell that cracks delightfully with each bite.
- Simplicity: Only six ingredients, no fancy equipment, and a total time under an hour—perfect for a last‑minute party.
- Unique Twist: Freeze‑dried strawberries give an intense fruit flavor without watering down the mixture, something most recipes miss.
- Crowd Reaction: Guests often claim they’ve never tasted anything like this, and the bright pink garnish makes them Instagram‑ready.
- Ingredient Quality: Using premium white chocolate chips and real Oreo cookies ensures each bite feels luxurious.
- Make‑Ahead Potential: You can prep the balls and freeze them, then dip in chocolate when you’re ready to serve—ideal for busy hosts.
- Versatility: Swap the strawberries for other freeze‑dried fruits or even a drizzle of caramel for a whole new experience.
Inside the Ingredient List
The Flavor Base
Oreo cookies: These chocolatey gems provide the perfect base for our dessert. Their creamy filling adds a subtle vanilla note that rounds out the flavor profile. If you skip them, you lose the signature crunch and the nostalgic “cookie‑cream” combo that makes these balls unforgettable. For a twist, try double‑stuf Oreos for an extra creamy center.
The Texture Crew
Cream cheese: This creamy delight adds richness and helps bind everything together. Make sure it’s softened for easy mixing; a cold block will leave you fighting lumps like you’re in a kitchen warzone. Skipping cream cheese results in a dry crumb that won’t hold its shape, turning your balls into sad little sand piles. If you’re dairy‑free, substitute with a plant‑based cream cheese that melts similarly.
The Unexpected Star
Powdered sugar: A touch of sweetness! This soft sugar dissolves easily, giving our treat that perfect melt‑in‑your‑mouth texture. It also helps stabilize the mixture, preventing it from becoming too runny. Using granulated sugar would create a grainy texture that ruins the silky interior. You can replace half of it with coconut sugar for a caramel‑like nuance.
The Final Flourish
Crushed freeze‑dried strawberries: These little gems add vibrant flavor and a hint of tartness. Because they’re dehydrated, they bring intense strawberry punch without extra moisture that would make the chocolate coating slide off. If you omit them, you lose that bright, fruity contrast that makes the dessert feel like a summer picnic. Fresh strawberries can work, but pat them dry thoroughly to avoid soggy shells.
White chocolate chips: For that dreamy coating you won’t want to skip! This creamy chocolate adds sweetness and a lovely elegance to each ball. It melts smoothly, especially when paired with coconut oil, creating a glossy finish that catches the light. Using dark chocolate would make the flavor too bitter, while milk chocolate could become overly sweet and sticky.
Coconut oil: A splash of coconut oil ensures our melted chocolate has just the right consistency for coating without being too thick. It also adds a faint tropical note that complements the strawberry without stealing the show. Skipping it results in a thick, clumpy glaze that cracks and falls off. If you’re allergic, substitute with a neutral oil like grapeseed.
Everything's prepped? Good. Let's get into the real action...
The Method — Step by Step
First, line a large mixing bowl with parchment paper and set it aside. Then, place 24 Oreo cookies (about two cups when crushed) into a food processor and pulse for exactly ten seconds—no more, no less. The goal is to achieve fine crumbs with just a hint of the creamy filling still visible; you’ll know it’s right when the texture feels like wet sand. Transfer the crumbs to the bowl, and if you don’t have a processor, you can place the cookies in a zip‑top bag and smash them with a rolling pin. Power tip: let the crumbs cool for a minute before adding the next ingredient, so the cream cheese doesn’t melt prematurely.
Now, add the softened 8 oz of cream cheese to the Oreo crumbs. Using a hand mixer on low speed, blend until the mixture becomes a uniform, glossy paste. This is where the magic starts—watch as the creamy cheese transforms the gritty crumbs into a cohesive dough that holds together when pressed. Scrape the sides of the bowl to ensure every crumb is coated. Micro‑challenge: try to roll a small portion between your fingers; it should stick without crumbling.
Stir in ½ cup of powdered sugar, sprinkling it evenly over the mixture. As you fold it in, you’ll notice the dough becoming smoother and slightly sweeter—this is the sweet spot where the sugar dissolves completely. Watch Out: adding too much sugar will make the mixture too sticky, making it hard to roll into balls later. Taste a tiny piece; it should be sweet but not cloying, because the white chocolate coating will add more sweetness.
Next, fold in ¼ cup of crushed freeze‑dried strawberries. The bright pink specks should distribute like confetti throughout the dough, giving each bite a burst of strawberry flavor. This is the moment of truth: the dough should feel firm enough to hold its shape, yet pliable enough to roll. If it feels too dry, add a teaspoon of milk or a dab of extra cream cheese; if too wet, sprinkle a tablespoon of additional crushed Oreos.
With a tablespoon or small ice‑cream scoop, portion out the mixture and roll each piece between your palms to form smooth, uniform balls about the size of a walnut. Place the formed balls onto a parchment‑lined tray and pop them into the freezer for at least 20 minutes. This chilling step is crucial—it firms up the interior so the chocolate coating won’t melt the dough when you dip.
While the balls are chilling, combine 1 cup of white chocolate chips with 2 tablespoons of coconut oil in a heat‑proof bowl. Set the bowl over a pot of simmering water (a double boiler) and stir gently until the chocolate is completely melted and glossy. The coconut oil should give the mixture a silky sheen and a pourable consistency—if it looks grainy, keep the heat low and stir a bit longer. Once melted, remove from heat and let it cool for a minute; you want it warm, not hot, to avoid melting the frozen balls.
Retrieve the frozen balls and, using a fork or a candy dipper, dip each one into the white chocolate, allowing excess to drip back into the bowl. Immediately roll the chocolate‑coated ball in the remaining crushed freeze‑dried strawberries for that final pop of color and flavor. Place the finished balls back onto the parchment sheet and refrigerate for another 10 minutes to set the coating. Power transition: this is the final flourish—watch the chocolate harden into a glossy shell that catches the light like a tiny jewel.
That's it — you did it. But hold on, I've got a few more tricks that'll take this to another level...
Insider Tricks for Flawless Results
The Temperature Rule Nobody Follows
Never let your chocolate get hotter than 115°F (46°C). Once it crosses that threshold, the cocoa butter can separate, leaving you with a dull, streaky glaze. Keep a candy thermometer handy, and if the chocolate starts to look too thin, remove it from the heat and stir vigorously. I once left the bowl on the stove for an extra minute and ended up with a chocolate shell that cracked like dry earth—lesson learned.
Why Your Nose Knows Best
Before you dip the first ball, take a deep sniff of the melting chocolate. If you catch a faint buttery aroma, you’re in the sweet spot. If it smells burnt or overly oily, it’s past its prime. Trust that nose—your taste buds will thank you later. I’ve saved batches by stopping the melt early, and the difference is night and day.
The 5‑Minute Rest That Changes Everything
After you roll the balls and before you freeze them, let them sit at room temperature for five minutes. This short rest allows the moisture in the cream cheese to redistribute, preventing the balls from cracking when you later dunk them. Skipping this step can lead to a crumbly interior that falls apart under the weight of the chocolate.
Chocolate‑Streak Prevention
When coating, use a silicone spatula to gently tap the ball against the side of the bowl. This removes excess chocolate and prevents streaks. If you notice a thin line of chocolate on the surface after it sets, it’s usually because the ball wasn’t fully spun before setting. A quick roll in the crushed strawberries after the dip also helps hide any stray streaks.
Final Chill for Maximum Crunch
Once all balls are coated, give them a final 10‑minute chill in the freezer before serving. This extra chill locks in the texture, making the outer shell crisp while the interior stays luxuriously creamy. If you serve them straight from the fridge, the coating can be a little soft, and you’ll miss that satisfying snap.
Creative Twists and Variations
This recipe is a playground. Here are some of my favorite ways to switch things up:
Matcha Madness
Swap the white chocolate for matcha‑infused white chocolate and replace the freeze‑dried strawberries with crushed matcha powder. The earthy green flavor pairs surprisingly well with the creamy Oreo base, and the visual contrast is stunning.
Chocolate‑Covered Cherry
Use freeze‑dried cherries instead of strawberries, and drizzle the finished balls with dark chocolate. The tartness of cherries cuts through the sweet base, creating a sophisticated flavor profile perfect for adult gatherings.
Nutty Crunch
Mix in ¼ cup finely chopped toasted almonds into the Oreo mixture before forming the balls. After coating, roll the balls in crushed pistachios for an extra layer of crunch and a pop of color.
Vegan Delight
Replace cream cheese with a vegan cream cheese alternative, use dairy‑free white chocolate chips, and swap coconut oil for a neutral vegan oil. The result is a plant‑based version that still delivers that creamy‑core experience.
Holiday Spice
Add a pinch of ground cinnamon and nutmeg to the mixture, then coat the finished balls in white chocolate tinted with a few drops of red food coloring. Sprinkle with festive red sugar crystals for a holiday‑ready treat.
Storing and Bringing It Back to Life
Fridge Storage
Place the finished balls in an airtight container lined with parchment paper. They’ll stay fresh for up to five days, maintaining their creamy interior and firm coating. If you notice the chocolate getting a little dull, a quick flash in the microwave for 5 seconds can restore its shine.
Freezer Friendly
For longer keeping, store the uncoated balls (the ones you froze before dipping) in a zip‑top freezer bag. They’ll keep for up to three months. When you’re ready to serve, simply melt the white chocolate, dip, and give them a brief 10‑minute chill before plating.
Best Reheating Method
When you want to serve chilled balls that have become a bit firm, place them on a plate and microwave for 8‑10 seconds, then add a tiny splash (about ½ teaspoon) of water to the plate and cover with a damp paper towel. The steam revives the interior without melting the coating, leaving you with a perfectly soft center and crisp shell.