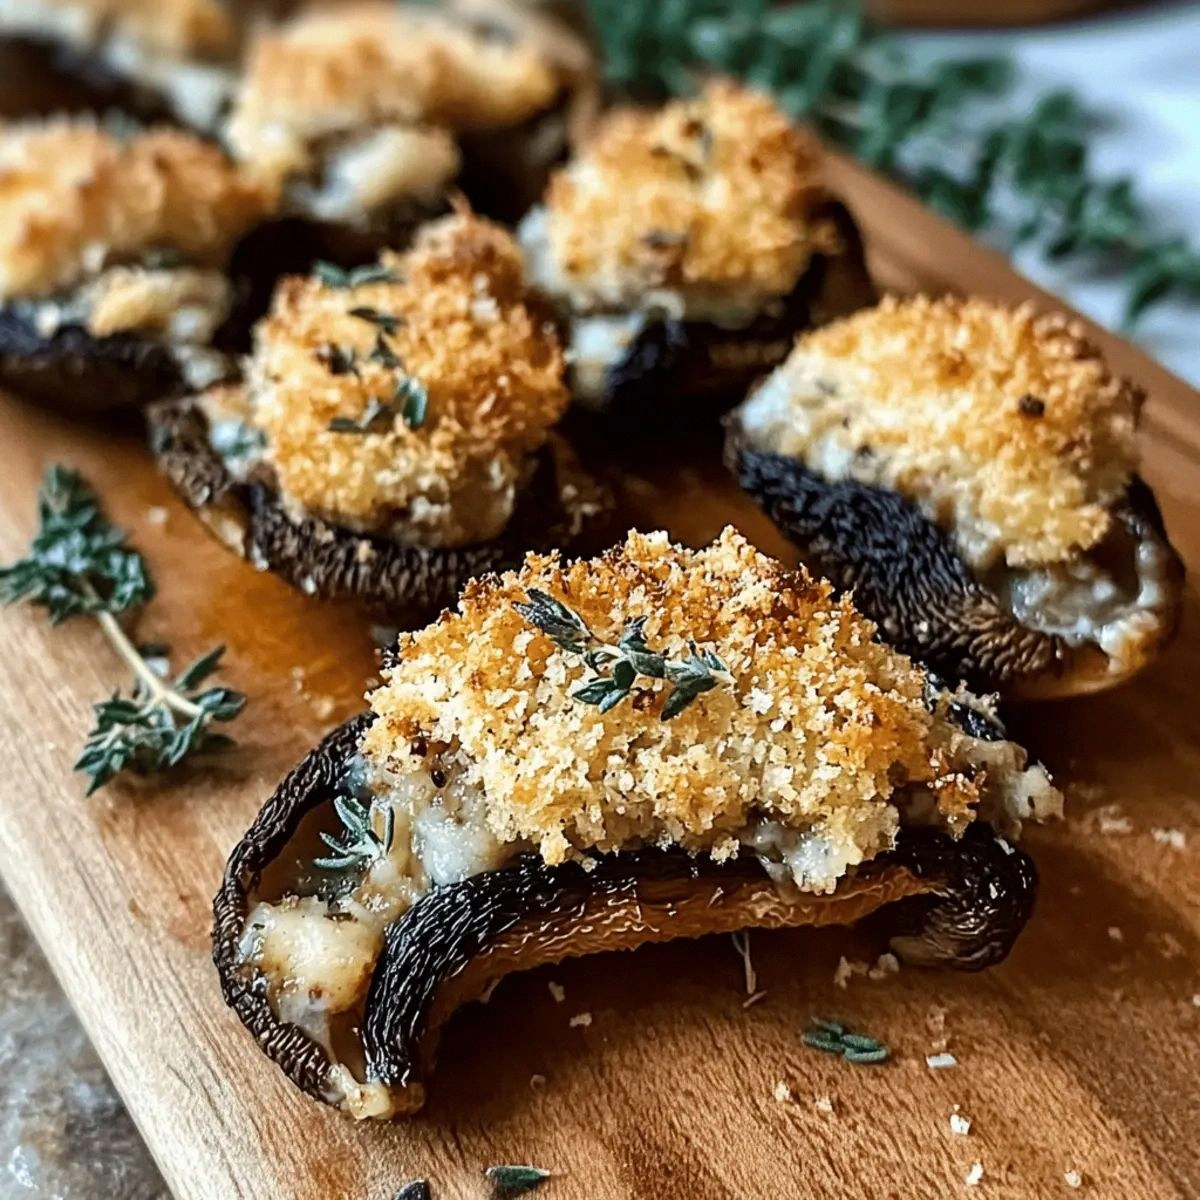
I still remember the first time I tried to impress someone with morel mushrooms. Picture this: me, a self-proclaimed kitchen wizard, standing over a pan of what looked like tiny alien brains, completely clueless about how to coax flavor out of these woodland treasures. The date? Disastrous. The mushrooms? Tough and tasteless. But that failure sparked an obsession that led me to create what I now call the holy grail of stuffed mushroom recipes. These stuffed morels aren't just another appetizer—they're tiny flavor bombs that'll make you rethink everything you thought you knew about mushrooms.
Fast forward through three years of experimentation, countless dinner parties, and one memorable incident where I served these to a Michelin-starred chef who actually asked for the recipe. The secret? It's not just about stuffing mushrooms. It's about creating a symphony where earthy morels dance with creamy herbed filling, where each bite delivers a punch of umami so intense it'll make your taste buds do backflips. I've tested this recipe on mushroom haters who now request it by name, on kids who claim they "don't eat vegetables," and on that one friend who thinks everything needs bacon (spoiler: these don't).
Here's what makes these stuffed morels absolutely legendary: the contrast between the meaty, honeycomb-textured mushroom exterior and the silky, herb-flecked cream cheese filling. The way the panko breadcrumbs create a golden crown that shatters delicately under your teeth, revealing the molten center. The subtle tang from lemon juice that cuts through richness like a bright spotlight on a dark stage. Most recipes get this completely wrong—they either drown the morels in heavy cream or skimp on seasoning, leaving you with expensive mushrooms that taste like, well, expensive mushrooms.
But before we dive in, let me warn you: these disappear faster than free wine at a gallery opening. I dare you to taste one and not go back for seconds. Actually, I double-dog dare you. The last time I made these for a party, I caught my neighbor sneaking them into napkins for later. That's the kind of recipe we're dealing with here—one that creates mushroom monsters out of the most disciplined eaters. Ready for the game-changer? Let me walk you through every single step—by the end, you'll wonder how you ever made it any other way.
What Makes This Version Stand Out
Flavor Explosion: Most stuffed mushroom recipes taste like someone dumped breadcrumbs on cream cheese and called it a day. This version layers flavors like a French chef building a sauce—each ingredient has a job, from the umami seasoning that amplifies the morel's natural savoriness to the Worcestershire that adds mysterious depth. The result? A mushroom that tastes more like itself, only better.
Texture Paradise: We're talking about a textural journey here—crispy panko giving way to tender mushroom flesh, then hitting that creamy center that's been infused with fresh thyme. It's like eating a perfectly constructed dessert, except it's vegetables and you don't have to feel guilty about eating twelve.
Foolproof Technique: I've seen grown adults cry over stuffed mushrooms that leaked everywhere or came out soggy as wet socks. This method uses a two-stage cooking process that locks in the filling while achieving that golden crunch on top. Even if you've never stuffed a mushroom in your life, you'll nail this on the first try.
Springtime Showstopper: Morels have a season, and when they're available, they deserve to be celebrated like the rockstars they are. This recipe transforms them into conversation pieces that'll have your dinner guests Instagramming before they even take a bite. Plus, they look way more complicated than they actually are—my favorite kind of kitchen magic.
Ingredient Integrity: Here's what drives me crazy about most recipes—they bury the morel flavor under a mountain of cheese and garlic. This version lets the mushroom be the star while giving it a supporting cast that actually enhances rather than masks. The cream cheese provides richness without overwhelming, the thyme adds brightness without stealing focus.
Make-Ahead Magic: You can prep these up to the final baking step, cover them, and refrigerate for up to 24 hours. When guests arrive, just pop them in the oven. It's like having a personal chef, except the chef is you and you're already three steps ahead of everyone else.
Crowd Psychology: There's something about stuffed mushrooms that makes people lose their minds. Maybe it's the finger-food factor, maybe it's the surprise center, or maybe it's just that mushrooms are having a moment. Whatever it is, these disappear faster than you can say "morel season," and I've literally watched vegetarians and carnivores arm-wrestle over the last one.
Alright, let's break down exactly what goes into this masterpiece...
Inside the Ingredient List
The Flavor Base
Morel mushrooms are the Beyoncé of the fungi world—rare, expensive, and absolutely worth the hype. When you bite into a properly cooked morel, you get this incredible combination of earthiness and nuttiness that makes truffles jealous. The honeycomb structure isn't just for looks—it creates little pockets that catch and hold our creamy filling like nature's own edible bowl. If you can't find fresh morels, dried ones work too, but you'll need to rehydrate them in warm water for about 20 minutes and squeeze them dry. Trust me, though, fresh morels are worth hunting down—they're available for such a short window that using them feels like participating in a delicious secret society.
Cream cheese is our canvas, but not just any cream cheese will do. You want the full-fat version because this isn't the time for dietary virtue—this is the time for maximum silkiness and flavor-carrying capacity. Let it come to room temperature before mixing; cold cream cheese fights back like a toddler at bedtime, refusing to blend smoothly with our other ingredients. I've tried this with low-fat cream cheese exactly once, and the filling turned grainy and sad, like it knew it was being punished.
The Texture Crew
Fresh thyme brings the party—its lemony, slightly minty flavor profile plays beautifully with the earthy morels in ways that dried thyme can only dream about. Strip those tiny leaves off the stems (save the stems for stock) and chop them roughly; you want to taste little bursts of herb, not have them disappear into the mix. The volatile oils in fresh thyme are delicate, so we're adding it at the very end to preserve that bright, green flavor that makes the whole dish sing.
Italian seasoned panko breadcrumbs are our secret weapon for achieving that restaurant-quality crunch without deep-frying. Regular breadcrumbs work in a pinch, but panko's larger, flakier structure creates these incredible crispy bits that contrast perfectly with the creamy filling. The Italian seasoning adds another layer of flavor without requiring you to measure out individual herbs like some kind of spice librarian.
The Unexpected Star
Umami seasoning is where we separate the amateurs from the professionals. Most people don't realize that morels are naturally high in glutamates—the compounds that make your brain light up with savory satisfaction. By adding umami seasoning, we're essentially turning the flavor dial up to eleven without adding more salt. If you can't find umami seasoning, a tiny bit of mushroom powder mixed with a pinch of MSG works wonders—don't let the MSG haters get you down, it's just another form of salt that happens to make everything taste more like itself.
Lemon juice might seem out of place here, but it's the difference between a rich, heavy appetizer and one that makes you want to keep eating. The acid brightens everything up, cutting through the cream cheese like a ray of sunshine through fog. Use fresh lemon—bottled juice tastes like cleaning products and will ruin all your hard work. One tablespoon is just enough to make your tongue tingle without turning the filling into lemon cheesecake.
The Final Flourish
Worcestershire sauce is the mysterious ingredient that makes people say "I can't quite place what's in these, but they're incredible." It's got anchovy, tamarind, vinegar, and molasses—all working together to add depth and complexity that you can't achieve with salt alone. Just one tablespoon transforms our filling from simple to sophisticated, like adding the perfect accessory to an already great outfit. If you're vegetarian, you can substitute with mushroom soy sauce, but honestly, the anchovy flavor is so subtle that most people never notice it.
Salted butter isn't just for greasing the pan—it's for brushing the tops of our stuffed morels before they go into the oven. As it melts, it helps the panko brown evenly while adding a rich, nutty flavor that makes the whole kitchen smell like you've been cooking all day. Use European-style butter if you can find it; the higher fat content means more flavor and better browning.
Everything's prepped? Good. Let's get into the real action...

The Method — Step by Step
- Start by preparing your morels like you're handling precious jewels—because you are. Slice each mushroom in half lengthwise, taking care not to crush the delicate honeycomb structure. If you find any tiny bugs hiding in the crevices (totally normal with wild mushrooms), just rinse quickly under cold water and pat dry immediately. The key here is speed—morels are like sponges and will absorb water faster than a Kardashian gains Instagram followers. Lay them cut-side up on paper towels while you prepare the filling, and resist the urge to snack on them raw—raw morels can cause stomach upset, and nobody wants to meet their dinner guests while clutching their stomach.
- Now for the fun part: creating our creamy herb filling that'll make angels weep. In a medium bowl, beat the cream cheese until it's smoother than a jazz saxophone solo—about 30 seconds with a hand mixer or 2 minutes by hand with a sturdy spatula. Add the Worcestershire sauce, lemon juice, salt, and pepper, mixing until everything's incorporated but not overmixed. We're not trying to whip air into this; we want it dense and rich, like a good cheesecake batter. Fold in the fresh thyme last, using a gentle motion that preserves those precious leaves while distributing them evenly throughout the filling.
- Here's where most people mess up—they try to pipe cold filling into room-temperature mushrooms. Don't be that person. Let your filling sit for 5 minutes to lose the chill from the cream cheese. While you wait, preheat your oven to 375°F and position the rack in the center. Cold filling plus hot oven equals cracked mushrooms and leaky filling that looks like it lost a fight. Room-temperature filling slides in smoothly and bakes evenly, creating that perfect contrast between hot mushroom and warm, creamy center.
- Time to stuff these beauties, and this is where technique matters more than speed. Using a small spoon (a demitasse spoon works perfectly), gently fill each morel half with the cream cheese mixture. Don't overpack them—the filling should mound slightly above the mushroom but not volcano out the sides. Think of it like filling a tiny bowl with the most expensive dip ever created. If you have any filling left over, congratulations—you've got tomorrow's bagel topping that'll make you the envy of your office break room.
- Now for the magic that transforms these from good to legendary. In a small skillet, melt the butter over medium heat until it stops foaming and just starts to smell nutty—about 2 minutes. Add the panko breadcrumbs and stir constantly for 3-4 minutes until they're golden brown and fragrant. This isn't just about color; we're developing flavor through the Maillard reaction, creating hundreds of new taste compounds that'll make your kitchen smell like a French bistro. Remove from heat immediately—these babies go from perfect to burnt faster than you can say "morel season."
- Brush the tops of your stuffed morels with the remaining melted butter from the breadcrumb pan, then sprinkle each one generously with the toasted panko. Press down gently so the crumbs adhere, but don't smash the filling. The panko should create a little hat that'll turn golden and crunchy in the oven while protecting the creamy filling from drying out. It's like giving each mushroom its own edible umbrella.
- Slide your masterpiece into the oven and bake for 12-15 minutes, watching closely after the 10-minute mark. You're looking for the panko to turn deep golden brown and the filling to be just set—it should jiggle slightly when you shake the pan but not look liquid. The mushrooms themselves will darken slightly and release some of their incredible aroma. If your oven runs hot (and many home ovens do), you might need to tent with foil for the last few minutes to prevent over-browning.
- Remove from the oven and let them rest for exactly 5 minutes—no more, no less. This brief pause allows the filling to set up slightly so it doesn't run everywhere when you bite in, but keeps that molten center that makes people close their eyes in appreciation. Serve them on a platter with a little pile of microgreens or fresh thyme leaves scattered artistically around. Watch as your guests hesitate for just a second (because they look too pretty to eat), then devour them like they've been stranded on a desert island.
That's it—you did it. But hold on, I've got a few more tricks that'll take this to another level...
Insider Tricks for Flawless Results
The Temperature Rule Nobody Follows
Here's the thing about stuffed mushrooms that cookbook authors never mention: temperature matters more than timing. Your oven might say 375°F, but the actual temperature could vary by 25-50 degrees depending on how old your oven is, whether you have a pizza stone in there, or if you live in a high-altitude area. Invest in an oven thermometer (they cost less than your morning coffee) and you'll never have to guess again. The difference between perfect and disappointing mushrooms often comes down to whether your oven is lying to you.
Also, let your cream cheese come to room temperature before mixing. Cold cream cheese doesn't just make mixing harder—it creates tiny pockets that don't incorporate properly, leading to an uneven filling that can separate during baking. Set it out the night before, or if you're impatient (like me), cube it and let it sit for 30 minutes. Your future self will thank you when you're not fighting with lumpy filling.
Why Your Nose Knows Best
Your nose is the most underutilized kitchen tool, and with morels, it's your secret weapon. When the panko is perfectly toasted, it'll smell like butter and bread had a beautiful baby. When the mushrooms are done, you'll get this incredible aroma that's earthy and rich with just a hint of nuttiness. If your kitchen doesn't smell like you want to bottle the air and sell it, keep going. A friend tried skipping this step once—let's just say her mushrooms looked perfect but tasted like disappointment.
Don't just rely on timers. Set them as a guideline, but trust your senses. The panko should be deep golden, the filling should be set but not dry, and the mushrooms should have shrunk slightly while maintaining their honeycomb structure. If you wait for everything to look perfect in the oven, it'll be overcooked by the time it hits the table.
The 5-Minute Rest That Changes Everything
I know you're going to want to pop one of these babies in your mouth the second they come out of the oven. Resist. That 5-minute rest isn't just for show—it allows the filling to set up just enough that it doesn't run down your chin when you bite in, but stays molten and creamy inside. It's like the difference between a lava cake that oozes perfectly and one that either explodes everywhere or turns into a sad, solid mass.
During this rest, the flavors also have a chance to meld and harmonize. The thyme releases its oils, the cream cheese settles into its final texture, and the whole thing becomes greater than the sum of its parts. Use this time to pour yourself a glass of wine, plate some extras for photos (because Instagram is going to love these), or just bask in the glory of what you've created.
Creative Twists and Variations
This recipe is a playground. Here are some of my favorite ways to switch things up:
The French Connection
Swap the cream cheese for goat cheese and add a tablespoon of herbes de Provence instead of fresh thyme. The tanginess of goat cheese pairs beautifully with morels, and the lavender in herbes de Provence adds an unexpected floral note that'll have people asking for your secret. Top with crushed hazelnuts instead of panko for a Provencal twist that'll transport you to a sunny terrace in Provence.
The Truffle Shuffle
Add a teaspoon of truffle oil to the cream cheese filling and substitute truffle salt for regular salt. It's over-the-top luxurious in the best possible way—like wearing silk pajamas to bed instead of your usual t-shirt. Just be careful with truffle oil—a little goes a long way, and too much will overpower the delicate morel flavor. This version is perfect for when you want to impress the in-laws or celebrate a promotion.
The Mediterranean Makeover
Replace the thyme with minced fresh oregano and add a tablespoon of sun-dried tomato paste to the filling. Mix some grated Parmesan into the panko topping for extra umami punch. The sun-dried tomato adds a sweet-tart note that plays beautifully against the earthy mushrooms, while the oregano brings a Greek-island vibe that makes you want to break plates and dance.
The Breakfast of Champions
Add a teaspoon of everything bagel seasoning to the panko topping and mix some smoked salmon bits into the cream cheese filling. These make an incredible brunch item—savory, creamy, crunchy, and just unusual enough to make people think you're a culinary genius. Serve with mimosas and watch your friends start planning their next visit.
The Vegan Victory
Substitute cashew cream cheese for regular cream cheese and use nutritional yeast instead of Parmesan in the panko topping. The umami seasoning already makes this plant-based, and the result is so good that even die-hard dairy lovers won't miss the cream cheese. I've served these to vegans and carnivores alike, and everyone fights over the last one.
The Spicy Southern Belle
Add a teaspoon of your favorite hot sauce to the filling and mix some crumbled bacon into the panko topping. The heat from the hot sauce cuts through the richness while the bacon adds smoky crunch. It's like a mushroom decided to go to Mardi Gras and came back with stories to tell. This version is perfect for game day or any time you want to add a little kick to your appetizer game.
Storing and Bringing It Back to Life
Fridge Storage
If you somehow end up with leftovers (I've never seen this happen, but theoretically it's possible), let them cool completely before storing in an airtight container. They'll keep for up to 3 days in the fridge, though the panko topping will lose its crunch. Store them in a single layer if possible—stacking them creates condensation that makes everything soggy. If you must stack, separate layers with parchment paper.
Here's the thing about leftover stuffed morels: they're still incredible, just different. The flavors have had time to meld and deepen, creating a more complex taste experience. Reheat them in a 350°F oven for 8-10 minutes until warmed through. Add a fresh sprinkle of panko for the last 2 minutes if you want to recapture that crunch.
Freezer Friendly
These actually freeze beautifully, which is dangerous knowledge because now you'll want to make triple batches. Freeze them before the final baking step—stuff them, add the panko topping, then freeze on a baking sheet until solid. Once frozen, transfer to a freezer bag or container. They'll keep for up to 2 months, though honestly, mine never last more than a week because I keep finding excuses to eat them.
To cook from frozen, add 5-7 minutes to the baking time, and don't thaw them first. The slow thaw in the oven actually helps them cook more evenly. You'll know they're done when the panko is golden and the filling is heated through. It's like having a secret stash of gourmet appetizers ready for any occasion.
Best Reheating Method
Skip the microwave—it'll turn your beautiful morels into rubbery sadness. Instead, use a 350°F oven or toaster oven for 8-10 minutes. Add a tiny splash of water to the pan before reheating—it creates steam that helps rehydrate the mushrooms without making them soggy. If the panko needs reviving, pop them under the broiler for 30 seconds to 1 minute, watching like a hawk because they go from perfect to burnt in the blink of an eye.
Reheated stuffed morels are best served immediately. They're still good at room temperature, but that contrast between hot mushroom and creamy filling is what makes them special. If you're serving them at a party, consider keeping them warm in a 200°F oven on a wire rack over a baking sheet—they'll stay perfect for up to an hour without drying out.