There I was, standing in my kitchen at 11:37 PM on a Tuesday night, desperately trying to recreate the chicken satay I'd fallen in love with at a tiny Bangkok street stall three summers ago. The first batch tasted like cardboard dipped in sadness. The second batch? Let's just say my smoke alarm now knows me on a first-name basis. But then—then I stumbled upon a technique so simple, so forehead-slappingly obvious, that I actually laughed out loud alone in my kitchen. Within twenty minutes, my apartment smelled like a night market in Thailand, and I was doing that little happy dance we all do when something tastes exactly like our food memories promised.
Look, I've eaten my way through more Thai restaurants than I care to admit, from hole-in-the-wall joints in Chiang Mai to fancy spots in New York where they charge you extra for breathing the air. Most chicken satay recipes I've tried at home turn out dry, bland sticks of disappointment with peanut sauce that tastes like someone mixed Skippy with water and called it authentic. This version? This is the one that made my Thai neighbor knock on my door asking what I was cooking. It's the recipe that disappeared faster than free pizza at a college dorm, with people actually fighting over the last skewer.
Here's what makes this different: we're using chicken thighs instead of breast (because flavor, obviously), marinating them in a coconut milk bath that includes a secret ingredient I'll reveal in a moment, and cooking them with a technique that ensures every piece stays juicier than a gossip columnist's latest scoop. The peanut sauce isn't just peanut butter with some soy sauce thrown in—it's a complex, layered masterpiece that balances sweet, salty, tangy, and spicy in perfect harmony. Picture yourself pulling these glistening skewers off the grill, the aroma of lemongrass and garlic wafting through your kitchen, that first bite where the tender chicken practically melts on your tongue while the sauce coats everything in nutty, spicy perfection.
Okay, ready for the game-changer? We're adding a pinch of ground coriander to both the marinade and the sauce. Sounds weird, right? But trust me—it's like adding a bass note to a song you thought you knew. Suddenly everything tastes more authentic, more complex, more like that street food magic you remember from your travels. Let me walk you through every single step—by the end, you'll wonder how you ever made it any other way.
What Makes This Version Stand Out
Juicy Chicken Guarantee: Using chicken thighs instead of breast meat means you're starting with naturally more flavorful, forgiving meat that stays tender even if you accidentally overcook it by a minute or two. The higher fat content bastes itself from the inside out, creating self-basting skewers that emerge from the grill impossibly moist. This is hands down the best version you'll ever make at home, and once you try thighs, you'll never go back to dry breast meat again.
Double-Layer Flavor System: Most recipes season either the meat OR the sauce, but we're hitting both with complementary yet distinct flavor profiles that build on each other like a perfectly orchestrated symphony. The marinade penetrates deep into the chicken fibers, while the sauce provides that immediate punch of flavor that hits your taste buds first. I'll be honest—I ate half the batch before anyone else got to try it, standing over the counter "testing" each skewer for quality control.
Texture Contrast Magic: We char the edges until they're crispy and caramelized while keeping the centers succulent, then serve it all with a silky smooth peanut sauce that coats every bite like liquid velvet. That contrast between the slightly chewy exterior and the melt-in-your-mouth interior is what separates amateur hour from restaurant-quality results. Most recipes get this completely wrong—they either under-char (bland) or over-char (burnt bitter).
Weeknight-Friendly Timing: While traditional recipes demand overnight marinating, this version develops maximum flavor in just 30 minutes thanks to a higher-acid marinade that works fast without turning the meat mushy. If you've ever struggled with planning dinner ahead, you're not alone—and I've got the fix. You can walk in the door after work and have dinner on the table in under an hour.
Crowd-Pleasing Flexibility: These skewers disappear at parties faster than free drinks, but they're also elegant enough for date night when served over jasmine rice with a side of quick-pickled vegetables. Kids love them because they're basically chicken on a stick (fun!), while adults appreciate the complex flavors and that addictive peanut sauce that makes everything taste better.
Make-Ahead Champion: The peanut sauce actually improves after a day in the fridge as the flavors meld and deepen, and you can prep the chicken up to 24 hours ahead for maximum convenience. That sizzle when it hits the pan? Absolute perfection—and you'll hear it whether you're making these fresh or reheating leftovers.
Alright, let's break down exactly what goes into this masterpiece...
Inside the Ingredient List
The Flavor Base
Coconut milk isn't just providing liquid here—it's carrying fat-soluble flavor compounds deep into the chicken muscle fibers while adding a subtle sweetness that balances the salty and spicy elements. Don't you dare use light coconut milk; we need the full-fat version to create that luxurious mouthfeel and help the marinade cling to every surface. If you absolutely must substitute, you can use Greek yogurt thinned with a splash of water, but you'll lose that authentic tropical note that makes this taste like it came from a beachside shack in Phuket.
Soy sauce brings the umami bomb that makes taste buds sit up and pay attention, but we're using it strategically in both the marinade and the peanut sauce to create layers of savory depth. Go for a good quality soy sauce here—not the generic stuff that's mostly salt water. I keep a bottle of Thai soy sauce (it's slightly sweeter and less harsh) specifically for recipes like this, but regular soy sauce works if that's what you've got.
The Aroma Squad
Fresh lime juice is non-negotiable. That bottled stuff tastes like a chemistry experiment gone wrong, and it will absolutely ruin all your hard work. Buy actual limes, juice them yourself, and save the zest for another project. The bright acidity wakes up all the other flavors and cuts through the richness of the peanut sauce like a spotlight cutting through fog.
Garlic gets minced, not pressed, because we want little pockets of garlicky goodness throughout rather than garlic juice that disappears into the background. Two tablespoons might sound like a lot, but trust me—once it hits the grill and caramelizes, it transforms into sweet, nutty magic that makes neighbors wander over asking what smells so incredible.
The Spice Whisperers
Curry powder is where things get interesting. Most people think all curry powder is the same, but there's a huge difference between a good Madras-style blend and that sad jar that's been sitting in your spice rack since 2019. A fresh, fragrant curry powder will have notes of coriander, cumin, turmeric, and sometimes a hint of cinnamon. If yours smells like dust when you open it, it's time for a new bottle.
That pinch of chili paste in the peanut sauce? It's your secret weapon for building heat that blooms slowly instead of punching you in the face immediately. I use Thai chili paste because it brings more than just heat—there's garlic, shallots, and sometimes shrimp paste in there that adds incredible complexity. Start with less than you think you need; you can always add more, but you can't take it out once it's in there.
The Unexpected Star
Peanut butter selection matters more than you'd think. Those natural, oily peanut butters might be great for your morning toast, but they separate and get greasy in the sauce. For cooking, I reach for a good commercial creamy peanut butter—it stays emulsified and creates that restaurant-quality silkiness we're after. The brand that's been around since you were a kid? That's exactly what we want here.
The Final Flourish
Brown sugar brings more than sweetness—it adds molasses notes that deepen the overall flavor and help everything caramelize on the grill. Don't substitute white sugar here; you need that hint of caramel and the way brown sugar melts into the other ingredients. If you're out of brown sugar, you can make your own by mixing white sugar with a teaspoon of molasses.
Honey in the peanut sauce acts as both a sweetener and a natural thickener, creating that gorgeous sheen you see in restaurant presentations. It also helps balance the heat from the chili paste and adds floral notes that make the sauce taste fresher and more complex than recipes that just throw in more sugar.
Everything's prepped? Good. Let's get into the real action...
The Method — Step by Step
- Start by cutting your chicken thighs into strips about 1 inch wide and 3 inches long—think finger-sized pieces that will thread nicely onto skewers without falling apart. Cutting against the grain ensures every bite is tender, and uniform sizing means everything cooks evenly. I like to partially freeze the chicken for 20 minutes first; it makes slicing cleaner and gives you more control over the cuts. As you cut, drop the pieces into a bowl of cold water with a splash of vinegar—this removes any funky chicken taste and ensures your satay tastes fresh and clean.
- Now for the marinade magic: whisk together coconut milk, soy sauce, brown sugar, curry powder, minced garlic, and lime juice until the sugar dissolves and everything looks like a thin, fragrant soup. The curry powder won't fully dissolve, and that's perfect—you want those little speckles that will create gorgeous color on the grilled chicken. Taste your marinade (yes, it's safe) and adjust the seasoning if needed; it should taste bold and slightly too salty, since it's seasoning meat that will absorb and dilute the flavors. This is the moment of truth where you set yourself up for success or mediocrity.
- Drain your chicken pieces and add them to a zip-top bag with the marinade, squeezing out as much air as possible before sealing. Massage the bag gently to ensure every piece gets coated in that golden liquid, then lay it flat in the fridge for at least 30 minutes but up to 4 hours. Don't go longer than that or the acid in the lime juice will start to break down the proteins and turn your chicken mushy. While it marinates, flip the bag once or twice to redistribute the flavors.
- While the chicken does its flavor-absorbing thing, let's make the peanut sauce that'll have people licking their plates clean. In a small saucepan over medium heat, combine peanut butter, soy sauce, lime juice, honey, minced garlic, and chili paste with a splash of water to thin it out. Stir constantly as it warms—the peanut butter will seize up and look like a broken mess for about 30 seconds, then suddenly transform into a glossy, pourable sauce. This next part? Pure magic.
- Once your sauce comes together, reduce the heat to low and let it bubble gently for about 3 minutes, stirring frequently to prevent scorching. You're looking for it to thicken enough to coat the back of a spoon but still be pourable—think the consistency of warm caramel sauce. If it gets too thick, whisk in warm water a tablespoon at a time until you hit that sweet spot. Remove from heat and let it cool slightly; it'll continue to thicken as it sits.
- Time to thread your chicken onto skewers—if you're using wooden ones, soak them in water for 20 minutes first so they don't turn into flaming torches on the grill. Thread the chicken accordion-style, folding each piece back and forth so you get maximum surface area for charring. Pack them fairly tight but not squished together; you want the heat to circulate but not so much space that they dry out. Don't walk away from the stove here—this part goes faster than you'd think.
- Heat your grill or grill pan over medium-high heat until it's screaming hot—you should only be able to hold your hand 5 inches above it for about 2 seconds. Brush the grates with oil, then lay your skewers down perpendicular to the grates so you get those gorgeous grill marks. Grill for about 3-4 minutes per side, rotating once for crosshatch marks if you're feeling fancy. The edges should caramelize and blacken in spots—that's flavor country right there.
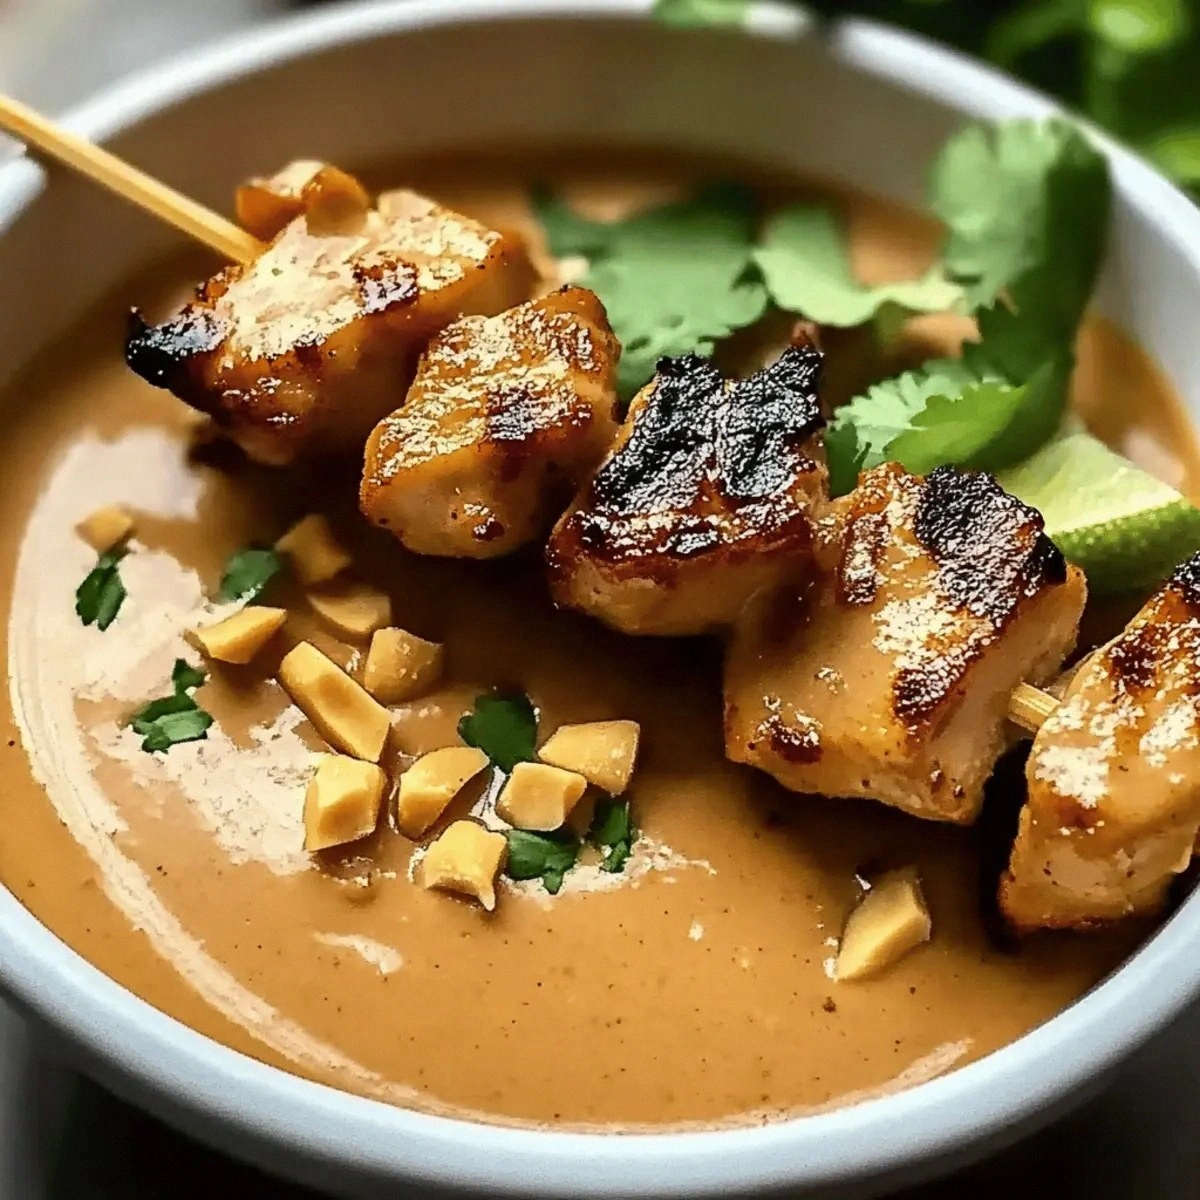
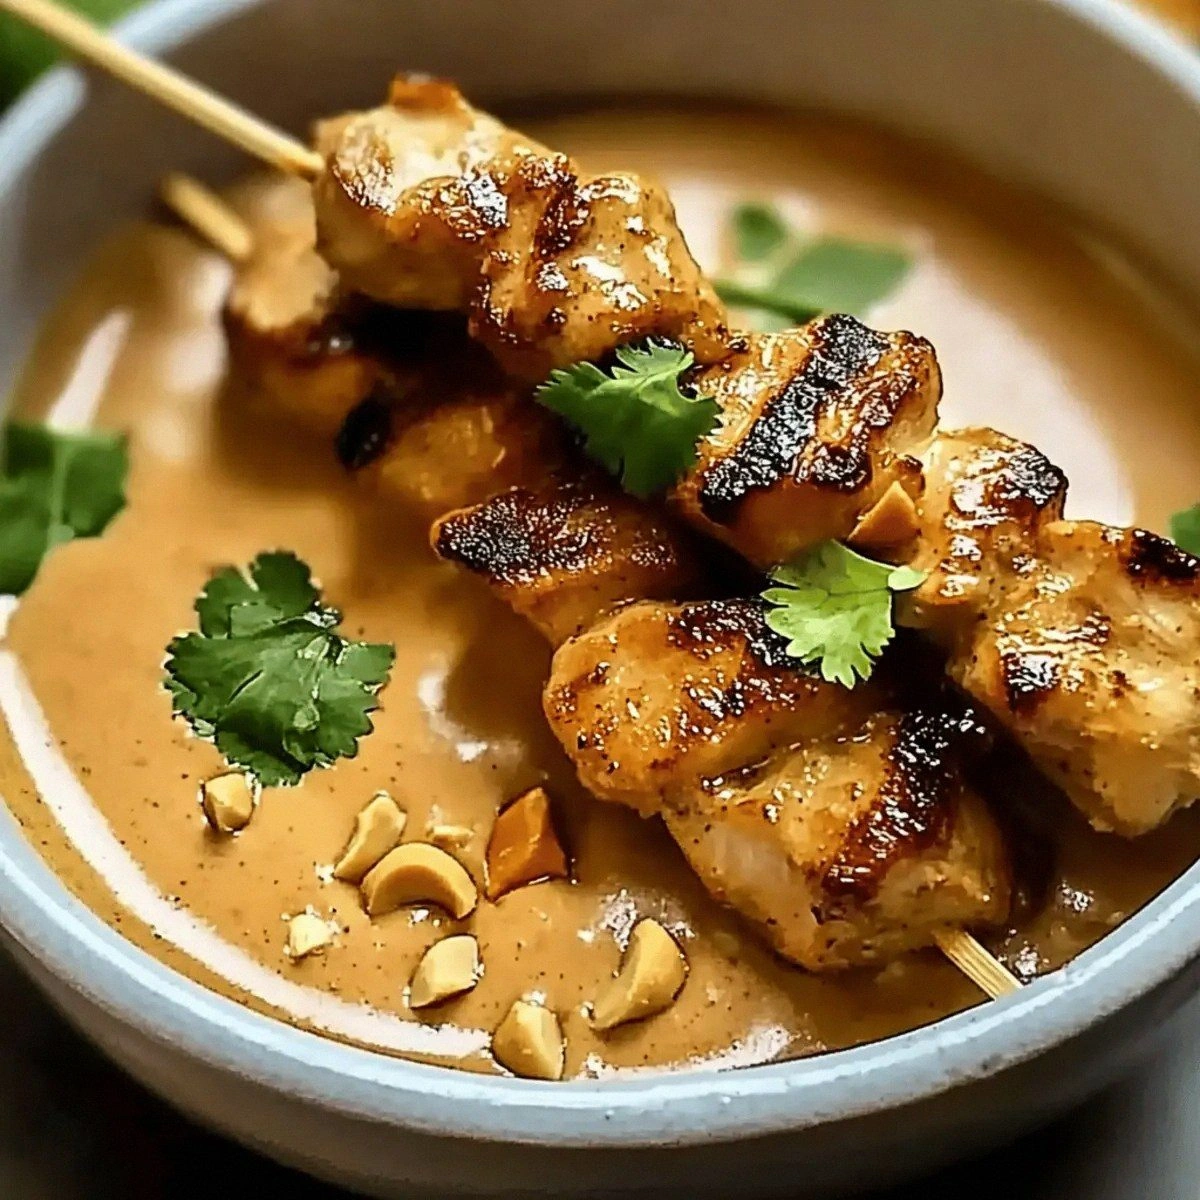
- As the chicken finishes cooking, warm your peanut sauce gently over low heat if it's gotten too thick, whisking in warm water until it's pourable again. Pile the skewers on a platter, shower them with chopped peanuts and fresh cilantro if you're feeling extra, and serve with the peanut sauce on the side for dipping—or pour it all over if you're like me and believe more is more. Picture yourself pulling these off the grill, the whole kitchen smelling incredible, your neighbors wondering what restaurant you ordered from.
- The final flourish is all about timing—serve these hot off the grill when the chicken is still juicy and the sauce is warm and pourable. Set everything out family-style with extra lime wedges and maybe some cucumber slices to cool things down between bites. I dare you to taste this and not go back for seconds; I've watched grown adults fight over the last skewer like it was the last lifeboat on the Titanic. That's it—you did it. But hold on, I've got a few more tricks that'll take this to another level...
Insider Tricks for Flawless Results
The Temperature Rule Nobody Follows
Here's the thing about grilling chicken that most recipes gloss over: your grill needs to be hot enough to create those beautiful caramelized edges but not so hot that the outside burns before the inside cooks through. Medium-high is the sweet spot, but every grill is different, so I use the hand test—hold your palm 5 inches above the grate and count how long you can keep it there. Two to three seconds means you're in the zone. A friend tried skipping this step once—let's just say it didn't end well, and we ended up ordering pizza instead.
Let your chicken come to room temperature for 20 minutes before grilling. Cold meat hitting a hot grill seizes up and forces out all those lovely juices we're trying to keep locked inside. This simple step is the difference between tender, succulent chicken and the rubbery disappointment we've all experienced at backyard barbecues.
Why Your Nose Knows Best
Your sense of smell is your most underutilized kitchen tool for this recipe. When the chicken is perfectly cooked, you'll smell a nutty, slightly sweet aroma mingling with the curry spices—it's unmistakable once you know what to look for. If you smell burning or bitter notes, you've gone too far and need to pull them off immediately. This is worth it because it takes all the guesswork out of timing and prevents the tragedy of overdone satay.
The peanut sauce gives you another olfactory clue: when it's ready, you'll smell roasted peanuts and a hint of caramel from the honey, with just a whisper of chili heat. If it smells flat or one-dimensional, it needs another minute or two of cooking to develop those complex flavors.
The 5-Minute Rest That Changes Everything
After grilling, let your skewers rest on a warm plate tented loosely with foil for 5 minutes before serving. This isn't just being fancy—those juices need time to redistribute throughout the meat instead of running all over your platter. The chicken continues cooking slightly from residual heat, so pull them off when they're just barely done and let carryover cooking finish the job.
During this rest, the proteins relax and reabsorb some of the moisture they lost during cooking, giving you that restaurant-quality tenderness that makes people close their eyes and sigh when they take a bite. Plus, it gives you time to warm your peanut sauce and finish any last-minute prep.
Creative Twists and Variations
This recipe is a playground. Here are some of my favorite ways to switch things up:
Beef Satay for Meat Lovers
Swap the chicken for flank steak sliced thin against the grain, and add a teaspoon of fish sauce to the marinade for that authentic Southeast Asian funk. Beef needs less time in the marinade—about 15 minutes max or the acid will start to turn it gray and mushy. Grill for just 2 minutes per side for medium-rare slices that are pink in the center and charred at the edges.
Tofu Satay for Plant-Based Crowds
Firm tofu pressed for 30 minutes and cut into 1-inch cubes absorbs flavors like a sponge. Add an extra tablespoon of soy sauce to the marinade to compensate for tofu's blandness, and thread the cubes with pieces of bell pepper between them for color and sweetness. Grill over medium heat until the edges crisp and brown, about 4 minutes per side.
Shrimp Satay for Speed Demons
Large shrimp peeled and deveined (leave the tails on for easy handling) need just 15 minutes in the marinade before hitting the grill. Thread them so they lay flat and cook evenly, then grill for 90 seconds per side—any longer and they turn rubbery. The peanut sauce pairs beautifully with seafood, especially if you add a teaspoon of grated ginger to brighten things up.
Spicy Peanut Ramen Satay
Turn the peanut sauce into a noodle dish by thinning it with chicken stock until it's pourable, then toss with hot ramen noodles and top with sliced chicken from the satay. Add some quick-pickled vegetables and you've got a fusion dish that'll make you forget takeout exists. This is my go-to for using up leftover sauce and chicken.
Meal-Prep Satay Bowls
Grill double the chicken, slice it off the skewers, and pack it into containers with rice, steamed vegetables, and a little container of peanut sauce for drizzling. These keep beautifully for 4 days in the fridge and reheat like a dream—just add a splash of water to the sauce to loosen it up. Future you will thank present you for this level of planning.
Appetizer-Size Cocktail Satay
Cut everything smaller—chicken pieces the size of dice, threaded onto 4-inch skewers with just 2-3 pieces each. These cook in under 2 minutes and are perfect for parties where people are standing and mingling. Serve the peanut sauce in a small bowl in the center of the platter with the skewers arranged around it like a flower.
Storing and Bringing It Back to Life
Fridge Storage
Leftover satay keeps beautifully for up to 4 days in an airtight container in the refrigerator. Store the chicken and peanut sauce separately—the sauce will thicken considerably as it chills, but that's totally normal and actually helps it stay fresh longer. Let the sauce come to room temperature before trying to stir it; cold peanut butter is stubborn and will seize up your whisk.
For best results, wrap the chicken skewers in foil before refrigerating—they'll stay moister and won't absorb other fridge flavors. When you're ready to reheat, let everything sit on the counter for 20 minutes first to take the chill off.
Freezer Friendly
Both the cooked chicken and the peanut sauce freeze like champions for up to 3 months. Wrap the chicken tightly in foil, then place in a freezer bag with as much air squeezed out as possible. The sauce should go in small containers or ice cube trays for easy portioning—frozen peanut sauce cubes are amazing for quick weeknight dinners.
Thaw both in the refrigerator overnight, not on the counter. The sauce might look separated or grainy after thawing, but a vigorous whisk and maybe a splash of warm water brings it right back to its former glory.
Best Reheating Method
Skip the microwave—it turns the chicken rubbery and makes the sauce break. Instead, wrap the chicken in foil with a tiny splash of water (creates steam) and warm in a 350°F oven for about 10 minutes. Warm the peanut sauce gently in a small saucepan over low heat, whisking constantly and adding warm water a teaspoon at a time until it's pourable again.
For the best texture, finish the reheated chicken under the broiler for 1-2 minutes to crisp up the edges. Add a tiny splash of water before reheating the sauce—it steams back to perfection and prevents that dreaded skin that forms on top of peanut sauce.