I still remember the first time I tried to make a German pancake. It was one of those Sunday mornings where the light hits the kitchen just right, the coffee's brewing, and you're feeling invincible. I whisked, I poured, I waited... and what emerged from the oven was a sad, deflated mess that looked more like a rubber frisbee than brunch. Fast forward through three failed attempts, a small kitchen fire (don't ask), and one very dramatic flour explosion later, and I finally cracked the code. This isn't just another baked German pancake recipe — this is the one that made my notoriously picky neighbor demand the recipe, the one that caused my brother to propose to his girlfriend over breakfast (she said yes, obviously), and the one that'll make you rethink everything you thought you knew about pancakes.
Picture this: you pull a puffed, golden masterpiece from your oven, its edges climbing impossibly high up the sides of your skillet like it's trying to escape. The kitchen smells like vanilla and butter had a beautiful baby, and as you dust it with powdered sugar, it collapses into the most tender, custardy center you've ever tasted. The edges? Crackling and crisp like the best crepe you've ever had, but with the soul of a cloud. I dare you to taste this and not go back for seconds — actually, I double-dog dare you, because I ate half the batch before anyone else even knew it was ready.
Most recipes get this completely wrong. They'll tell you to use cold ingredients, to gently fold things together like you're handling a newborn kitten, or worse — they'll have you flipping individual pancakes while your coffee gets cold and your guests wonder if brunch is actually happening. Here's what actually works: room temperature eggs that whip up like they're on a mission from the breakfast gods, a screaming hot skillet that makes the batter sizzle like applause when it hits, and a technique so simple you'll wonder why everyone else is overcomplicating it. Stay with me here — this is worth it.
The magic happens when you stop thinking of this as a pancake and start thinking of it as a sweet Yorkshire pudding that went to finishing school. That dramatic puff? It's not just for show — it's creating pockets where butter and vanilla can party together while the edges turn into the kind of crispy that makes a sound when you bite it. Let me walk you through every single step — by the end, you'll wonder how you ever made it any other way.
What Makes This Version Stand Out
Taste Explosion: This isn't your average eggy disappointment. We're talking about a flavor profile that balances buttery richness with a whisper of vanilla, creating something that tastes like the best parts of French toast, crepes, and custard had a beautiful baby together. The edges caramelize into something that tastes like the best part of a croissant, while the center stays tender and almost pudding-like.
Texture Paradise: Most recipes leave you with something that either resembles a thick omelet or a deflated balloon. This version gives you the best of both worlds — edges so crisp they shatter like thin ice over a puddle, while the interior stays custardy and almost soufflé-like. It's the kind of textural contrast that makes people close their eyes when they take a bite.
Foolproof Simplicity: If you can whisk eggs and preheat an oven, you can make this. No flipping, no babysitting, no standing over a hot stove while everyone else is enjoying mimosas. You literally throw everything in a blender, pour it into a hot skillet, and let the oven do all the work while you sip your coffee and pretend you're a breakfast genius.
Instagram-Worthy Drama: Okay, ready for the game-changer? When this comes out of the oven, it puffs up like a golden balloon, climbing the sides of your skillet like it's trying to escape. Your guests will gasp. Phones will come out. Someone will say "wow" under their breath. And then it deflates into the most beautiful, craggy surface that's begging for a dusting of sugar and maybe some berries.
Crowd-Pleasing Power: I've served this to picky toddlers who declared it "better than cake," to teenagers who asked for thirds, and to my 85-year-old grandmother who said it reminded her of something her mother used to make. It's the great equalizer — the breakfast that makes everyone feel like a kid again, but sophisticated enough for your fanciest brunch guests.
Make-Ahead Magic: Here's a secret most recipes won't tell you: you can blend the batter the night before and keep it in the fridge. In the morning, just preheat your skillet, pour, and bake. It's like having a breakfast butler, except the butler is yesterday-you who was smart enough to plan ahead.
Ingredient Quality Matters: Using real vanilla extract instead of imitation, good European butter, and farm-fresh eggs doesn't just make this better — it makes it transcendent. This recipe celebrates simplicity, which means every ingredient has to pull its weight and sing in harmony.
Alright, let's break down exactly what goes into this masterpiece...
Inside the Ingredient List
The Foundation Crew
Eggs are the backbone of this operation, and I'm not talking about those sad, pale supermarket specimens that have been sitting around for weeks. You want eggs with bright orange yolks that stand tall when you crack them — these will give your pancake that gorgeous golden color and rich flavor that makes people ask what your secret is. The protein in the eggs creates the structure that allows this baby to climb up the sides of your skillet like it's training for the breakfast Olympics. Skip the eggs or use old ones, and you'll end up with a flat, rubbery disappointment that tastes like scrambled eggs' depressed cousin.
Whole milk is non-negotiable here — none of that watery skim stuff that'll leave you with a thin, sad pancake. The fat in whole milk helps create that custardy center, while the proteins help with the puff. If you've only got 2% on hand, add a tablespoon of melted butter to compensate, but please don't tell me you're using 1% or skim because I can't be responsible for what happens next. The milk should be room temperature because cold liquid will shock your batter and give you a pathetic little rise that'll make you want to cry into your coffee.
The Flavor Makers
Real vanilla extract is where most recipes cheap out, and it's criminal. That fake stuff tastes like sadness and chemicals, while real vanilla adds this warm, floral note that makes people think you went to culinary school. You only need a teaspoon, but it's the difference between "this is good" and "oh my god, what is this and can I marry it?" The alcohol in the extract burns off in the oven, leaving behind pure aromatic magic that'll make your kitchen smell like a French bakery.
Butter does double duty here — it greases your skillet so nothing sticks, and it adds richness that makes this taste like you're eating something from a fancy brunch place that charges $18 for toast. Use unsalted European-style butter if you can find it; the higher butterfat content gives you better flavor and browning. Melt it until it's just barely golden and smells nutty — that's when you know it's perfect and your neighbors are probably wondering what smells so amazing.
The Rise Heroes
All-purpose flour seems boring until you realize it's doing all the heavy lifting to create those dramatic air pockets. Don't get fancy with cake flour or bread flour — all-purpose has just the right amount of protein to give you structure without making things tough. The key is not overmixing it; you want to blend just until the flour disappears, or you'll develop gluten and end up with something that chews like rubber. Sift it first if you're feeling fancy, but honestly, I just whisk it right in and mine still puffs like a dream.
Salt isn't optional, people. Without it, your pancake will taste flat and one-dimensional, like it forgot how to be delicious. Just a pinch wakes up all the other flavors and makes the vanilla sing. Use kosher salt if you've got it — the larger crystals distribute more evenly, and it doesn't have that harsh chemical taste that table salt sometimes has. This is the difference between a pancake that tastes like dessert and one that tastes like someone forgot to season it.
The Unexpected Star
Here's where I lose some people, but stay with me — a tiny pinch of nutmeg is the secret weapon that makes this taste like something from a European café. You won't identify it as nutmeg, but it'll add this warm, mysterious note that makes everyone ask what your secret ingredient is. Too much and you'll feel like you're eating potpourri, but just an eighth of a teaspoon adds complexity that takes this from good restaurant-level to people-proposing-marriage-over-brunch level. Freshly grated is best if you have it, but pre-ground works if that's what you've got.
Everything's prepped? Good. Let's get into the real action...
The Method — Step by Step
- Position your oven rack in the middle and preheat to 425°F. This isn't the time for shortcuts — a properly heated oven is what gives you that dramatic puff. Put your 10-inch cast iron skillet or oven-safe pan in there to heat up too. I know you're tempted to use a regular baking dish, but the cast iron retains heat like a champion and gives you those crispy edges that'll make you weep with joy. This whole heating process takes about 20-25 minutes, which is perfect because that's exactly how long you need for the next steps.
- Crack your eggs into the blender and give them a 30-second whirl on high. You're looking for them to become pale, frothy, and nearly double in volume — this is what's going to give your pancake its lift. If you've ever struggled with flat German pancakes, this is probably where you went wrong. The eggs should look like they're excited to be there, all bubbly and enthusiastic. Room temperature eggs will whip up faster and give you more volume than cold ones, which is why we planned ahead.
- Add the milk, flour, vanilla, salt, and nutmeg to your excited eggs. Blend on high for exactly 45 seconds — no more, no less. Over-blending develops the gluten and gives you a tough pancake, but under-blending leaves you with flour lumps that'll create weird pockets. The batter should be smooth, the color of heavy cream, and about as thick as melted ice cream. If you've got flour lumps, pulse a few more times, but resist the urge to keep going — you're not making cake here.
- When your skillet is smoking hot (literally — you should see wisps coming off it), carefully remove it from the oven using your thickest potholders. Drop the butter into the center and watch it melt instantly, foaming and sizzling like it's putting on a show. Tilt the pan to coat every surface — the butter should brown slightly and smell nutty. This is the moment of truth where you decide if you're making something transcendent or just okay.
- Pour the batter directly into the center of your buttery skillet from about 6 inches up — the height helps it spread evenly without disturbing the butter layer. Don't stir, don't swirl, just let it be. The batter should sizzle dramatically when it hits the pan, creating little bubbles around the edges. This is when you know you've got the temperature right. If it doesn't sizzle, your pan wasn't hot enough, and you'll get a sad, pale pancake that'll haunt your dreams.
- Slide the skillet back into the oven and bake for 20-25 minutes. Set a timer and resist the urge to peek for the first 15 minutes — opening the door too early can cause it to collapse like a soufflé with stage fright. Around minute 18, you should see it puffing up like a golden balloon, climbing the sides of your skillet like it's trying to escape. The edges should be deep golden brown and pulling away from the sides, while the center looks set but still has a slight jiggle.
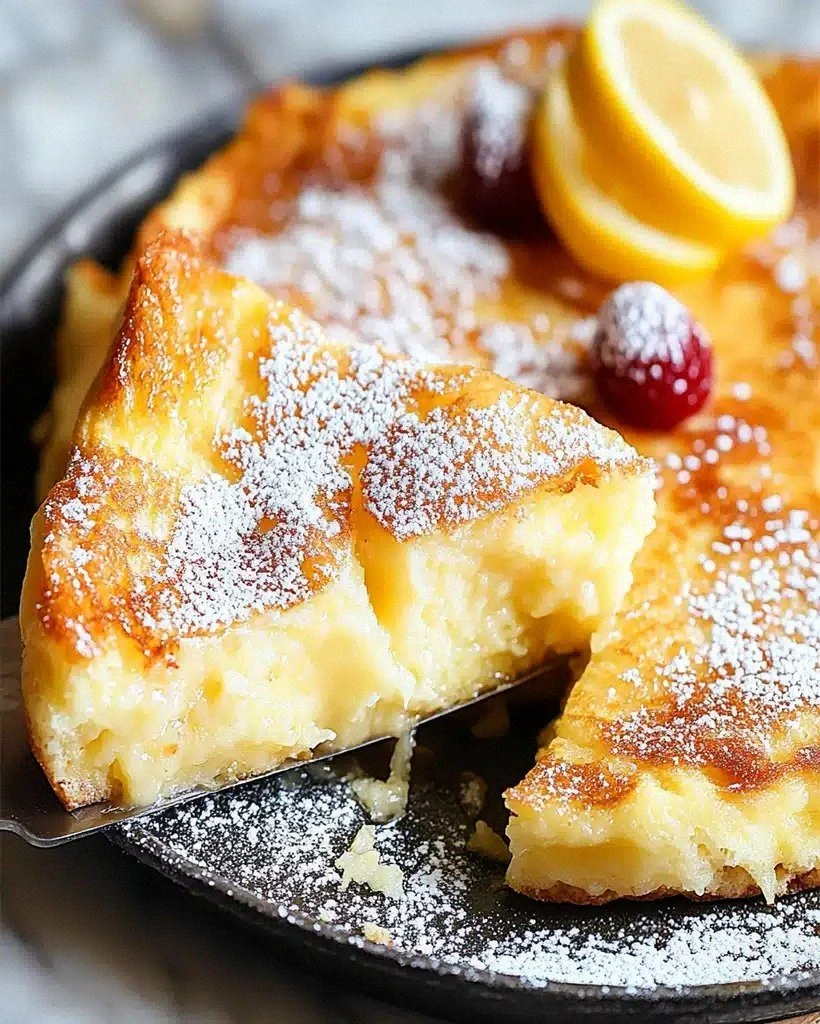
- Remove from the oven and behold your creation — it should look impossibly puffed and proud, like it's showing off for its Instagram moment. Dust immediately with powdered sugar, which will melt slightly into a sweet glaze. Add lemon wedges if you're feeling classic, or fresh berries if you want to make it Instagram-official. The dramatic puff will start to fall within minutes, creating those gorgeous craggy folds that catch every bit of topping.
- Slice into wedges and serve immediately — this is not a make-ahead dish that waits for anyone. The contrast between the crispy edges and custardy center is at its peak right now, and waiting even 10 minutes changes the texture significantly. Watch your guests' faces as they take their first bite — that moment when they realize this isn't just another pancake is pure magic. And now the fun part: listening to everyone argue over who gets the crispy edge pieces.
That's it — you did it. But hold on, I've got a few more tricks that'll take this to another level...
Insider Tricks for Flawless Results
The Temperature Rule Nobody Follows
Here's the thing that separates the pros from the pancake pretenders: every single ingredient needs to be room temperature, not just the eggs. Cold milk straight from the fridge will shock your batter and give you a pathetic little puff that'll make you want to order takeout. I leave everything on the counter for 45 minutes before I start, or speed things up by placing my milk container in a bowl of warm water for 10 minutes. Your future self will thank you when you're pulling a dramatically puffed masterpiece from the oven instead of a sad, flat disc.
Why Your Nose Knows Best
A friend tried skipping the preheating step once — let's just say it didn't end well. The butter should smell nutty and be just starting to brown when you pour in the batter. If it smells like regular melted butter, keep heating. If it smells burnt, you've gone too far and need to start over. The perfect moment is when it hits you with that warm, toasty aroma that makes your stomach growl. This is your built-in timer, and trust me, your nose is more reliable than any kitchen gadget.
The 5-Minute Rest That Changes Everything
After you blend your batter, let it rest for exactly 5 minutes. This allows the flour to fully hydrate and the gluten to relax, giving you a more tender interior. It's like the batter is meditating before its big performance. During this time, your skillet is heating up in the oven, so everything times out perfectly. Don't skip this step — I know you're hungry and impatient, but good things come to those who wait, and this wait is minimal with maximum payoff.
The Serving Sweet Spot
I'll be honest — I ate half the batch before anyone else got to try it, and I don't even feel bad about it. The key is cutting it immediately after adding your toppings, while it's still hot and dramatic. Use a sharp knife or pizza cutter for clean wedges, and don't be gentle — this isn't a delicate soufflé that'll collapse if you look at it wrong. The texture is best when it's hot, so gather your people around the skillet and serve it family-style. Watch the feeding frenzy commence.
Creative Twists and Variations
This recipe is a playground. Here are some of my favorite ways to switch things up:
The Apple Orchard Version
Thinly slice one apple (Honeycrisp or Granny Smith work best) and arrange it in your hot butter before pouring in the batter. The apples caramelize underneath, creating a tart-sweet layer that makes this taste like apple pie had a baby with a pancake. Dust with cinnamon sugar instead of powdered sugar, and suddenly you're eating dessert for breakfast, which is always the right choice.
The Chocolate Dream
Add two tablespoons of cocoa powder to your batter and reduce the flour by one tablespoon. The result is a dramatic dark puff that tastes like the best chocolate soufflé you've ever had, but without any of the soufflé stress. Top with chocolate shavings and a scoop of vanilla ice cream, and you've got a dessert that'll make people forget about cake forever.
The Savory Brunch Plot Twist
Omit the sugar and vanilla, add a pinch of herbs de Provence and some grated Gruyère to the batter. Top with smoked salmon, crème fraîche, and chives, and suddenly you've got a sophisticated brunch dish that pairs beautifully with champagne. It's like your German pancake grew up, got a job, and started wearing expensive perfume.
The Tropical Vacation
Add the zest of one lime and a tablespoon of coconut extract to your batter. Top with fresh mango, toasted coconut flakes, and a squeeze of lime juice. It tastes like you're eating breakfast on a beach in Hawaii, even if you're actually in a studio apartment in the middle of winter. Close your eyes and you can almost hear the waves.
The Pumpkin Spice Everything
During fall, add 1/4 cup pumpkin puree, 1 teaspoon cinnamon, 1/2 teaspoon nutmeg, and 1/4 teaspoon cloves to your batter. The pumpkin makes it extra custardy, while the spices turn your kitchen into autumn-scented heaven. Top with maple syrup and toasted pecans, and suddenly basic doesn't sound so bad after all.
The Breakfast for Dinner Deluxe
Add crispy bacon bits to your batter and serve with a fried egg on top. The salty-sweet combination is what breakfast dreams are made of, but eating it for dinner feels like you're getting away with something. Drizzle with maple syrup and watch as your dinner guests try to figure out why this simple combination tastes like pure comfort.
Storing and Bringing It Back to Life
Fridge Storage
If you somehow have leftovers (I don't understand you, but I respect you), let the pancake cool completely, then wrap tightly in plastic wrap and store in an airtight container. It'll keep for up to 3 days in the fridge, though the texture will never be quite as magical as fresh from the oven. The edges lose their crispness and the center firms up, but it's still miles better than most breakfast options.
Freezer Friendly
Cut into individual wedges and freeze between sheets of parchment paper in a freezer bag for up to 2 months. This is perfect for those mornings when you want something special but don't want to cook. Thaw overnight in the fridge, then reheat in a 350°F oven for 8-10 minutes. It's not quite the same as fresh, but it's infinitely better than cereal.
Best Reheating Method
Add a tiny splash of water before reheating — it steams back to perfection. The oven is your friend here; microwaves will turn it rubbery and sad. Reheat at 350°F for 8-10 minutes until warmed through, then add fresh toppings. If you're feeling fancy, pop it under the broiler for 30 seconds to crisp up the edges again. It's like giving your pancake a second chance at greatness.