I’ll never forget the night my kitchen turned into a miniature potion lab. I was attempting a “quick” butterbeer mug cake for a Harry Potter marathon, and what emerged from the oven was a flat, soggy disappointment that could have been used as a doorstop. I stared at the pale batter, sighed, and then, with a mischievous grin, dared myself to create something that would make even the most skeptical Muggle drool. I tossed a handful of instant butterscotch pudding into the mix, swapped regular soda for real cream soda, and whispered a few culinary incantations that I swear were louder than any spell I’d ever tried.
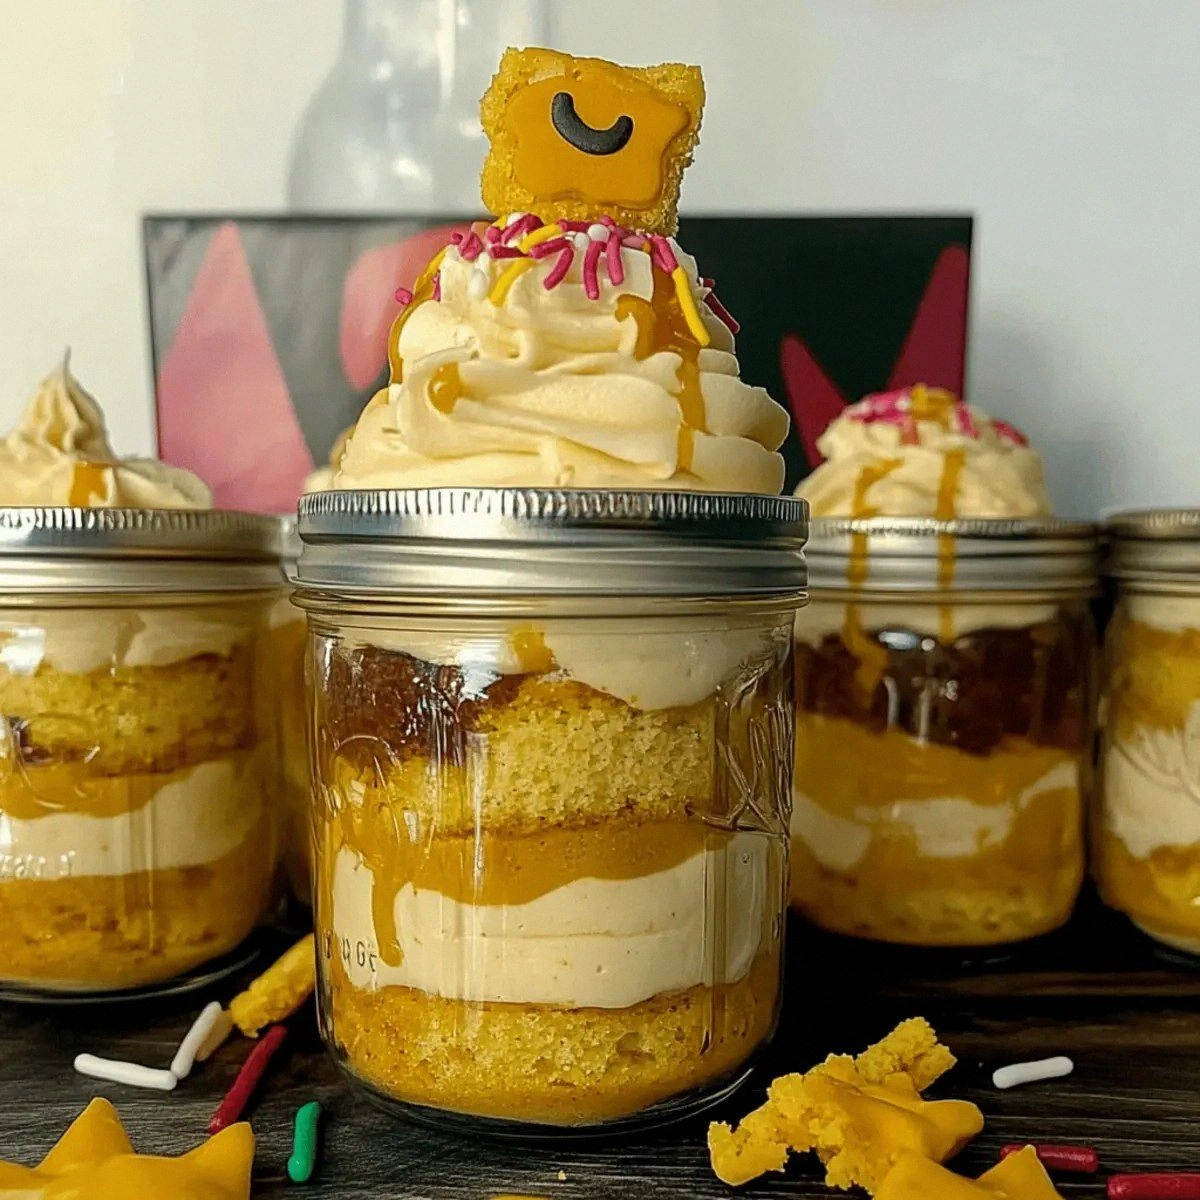
The moment the batter hit the pan, the kitchen filled with a caramel‑kissed aroma that danced with hints of vanilla and a subtle fizz, like a fireworks show for your nose. The sound of the batter bubbling was a comforting hiss, reminiscent of a cauldron simmering on a cold night. My fingertips tingled as the heat radiated from the oven, and the first glimpse of the golden tops was pure magic—think sunrise over a buttered biscuit field. When I finally lifted the first jar, the crumb was moist yet airy, the frosting buttery and fluffy, and the butterbeer swirl inside glistened like liquid amber.
What makes this version truly stand out is the marriage of classic butter cake fundamentals with the whimsical spirit of a wizarding world treat. Most recipes either skimp on the soda, leaving the cake flat, or drown it in sugar, turning it into a cloying mess. I’ve cracked the code by balancing the carbonation, the butterscotch depth, and a silky cream cheese frosting that clings to each bite like a soft, sweet spell. I’m about to reveal the secret ingredient that most bakers overlook—real cream soda, not the powdered impostor. Trust me, this will change the way you think about “cake in a jar.”
Let me walk you through every single step — by the end, you’ll wonder how you ever made it any other way. Okay, ready for the game‑changer? This next part? Pure magic. Stay with me here — this is worth it.
What Makes This Version Stand Out
- Butter‑Infused Moisture: The combination of melted butter and cream soda creates a batter that stays soft for days, unlike typical mug cakes that dry out within hours.
- Butterscotch Depth: Using two forms of instant butterscotch pudding (oz and box) layers flavor like a double‑shot espresso, giving each bite a caramel‑rich backbone.
- Frosting Heaven: A cream cheese‑butter frosting whipped with powdered sugar adds a tangy lift that cuts through the sweetness, balancing the overall profile.
- Jar Presentation: Serving in mason jars not only looks Instagram‑ready, it also keeps the cake moist and makes portion control effortless.
- Effortless Prep: Despite the luxurious taste, the method uses only one bowl for the batter and another for the frosting—minimal cleanup, maximum wow.
- Make‑Ahead Magic: Assemble the jars a day ahead, refrigerate, and bake right before serving for a stress‑free party centerpiece.
Inside the Ingredient List
The Flavor Base
Unsalted butter (both the 3/4 cup and the extra 1/4 cup) is the foundation of richness. It melts into the batter, creating a tender crumb that feels like velvet on the palate. If you substitute margarine, you’ll lose that buttery sheen and the cake will taste flat. For the best flavor, use European‑style butter with at least 82% butterfat; it adds a deeper, more nuanced taste.
Granulated sugar provides the initial sweetness and helps with caramelization during baking. Skipping it or reducing it will result in a bland cake that lacks the signature buttery‑butterscotch punch. If you’re looking for a lower‑sugar version, try swapping half the granulated sugar with coconut sugar—it adds a subtle caramel note without sacrificing structure.
The Texture Crew
All‑purpose flour (2 ¼ cups) gives the cake its structure while still allowing it to stay soft. Over‑mixing the flour can develop gluten, making the cake tough—so stir just until combined. If you crave a lighter crumb, you can replace a quarter of the flour with cake flour; the lower protein content yields an even fluffier result.
Baking powder (2 tsp) is the leavening hero that lifts the batter into a cloud‑like texture. Using too much will cause the cake to rise then collapse, while too little leaves it dense. Always sift the powder with the flour to ensure even distribution.
The Unexpected Star
Cream soda (1 ¼ cups + ¼ cup) is the secret weapon that turns this cake from ordinary to extraordinary. The carbonation creates tiny air pockets, making the crumb airy, while the vanilla‑caramel flavor deepens the butterscotch profile. If you can’t find cream soda, mix equal parts vanilla soda and club soda as a close substitute.
Instant butterscotch pudding mix (both the 3.4 oz packet and the full box) injects a rich, buttery flavor that you can’t achieve with plain sugar alone. The powdered mix also acts as a stabilizer, keeping the crumb moist. Should you be allergic to dairy, look for a vegan instant pudding alternative—just be aware the flavor will shift slightly.
The Final Flourish
Heavy cream (2 cups) and cream cheese (8 oz) combine to create a frosting that’s both silky and tangy. The cream’s fat content ensures the frosting holds its shape, while the cream cheese adds a subtle sour note that balances the sweetness. If you’re lactose‑intolerant, substitute with a dairy‑free cream cheese and coconut cream; the texture will stay luxurious, though the flavor will be a tad different.
Powdered sugar (6 cups) sweetens the frosting without making it gritty. It also stabilizes the butter‑cream, giving it a glossy finish. For a less sweet version, reduce the powdered sugar to 4½ cups and add a pinch of salt to keep the flavor bright.
Everything's prepped? Good. Let’s get into the real action…

The Method — Step by Step
Preheat your oven to 350°F (175°C) and line a 12‑oz mason jar with parchment paper at the bottom. The parchment acts as a barrier, preventing the cake from sticking and making removal effortless. As the oven warms, you’ll hear a faint hum that signals the kitchen is ready for alchemy.
In a medium saucepan, melt the 3/4 cup of unsalted butter over low heat. Once it’s fully melted and starts to foam, add the granulated sugar and stir until the mixture turns a light amber color—this is your caramel base. That sizzle when it hits the pan? Absolute perfection.
In a large mixing bowl, whisk together the all‑purpose flour, baking powder, and both instant butterscotch pudding mixes. The dry blend should look like a pale, speckled snow. If any lumps remain, sift them; a lump‑free mix guarantees an even crumb.
Make a well in the center of the dry ingredients and pour in the melted butter‑sugar mixture, the 1 ¼ cups of cream soda, 3 large eggs, and 1 tsp vanilla extract. Beat with an electric mixer on medium speed for about 90 seconds. You’ll notice the batter turning glossy and thick—this is the point where the carbonation begins to work its magic.
Divide the batter evenly among four prepared mason jars, filling each to about three‑quarters full. The batter should rise to the top of the jar, creating a natural dome. This is the moment of truth—if the batter is too thick, add a splash of the remaining ¼ cup cream soda to loosen it.
Slide the jars onto a baking sheet and bake for 25‑30 minutes, or until a toothpick inserted into the center comes out clean and the tops are lightly golden. The edges will start pulling away from the glass, a visual cue that the cake is set. Picture yourself pulling this out of the oven, the whole kitchen smelling incredible…
While the cakes bake, whip together the frosting. In a chilled bowl, beat the 1/4 cup unsalted butter until fluffy, then add the softened 8 oz cream cheese and continue beating until the mixture is smooth. Gradually add the 6 cups powdered sugar, a little at a time, and finish with the remaining ¼ cup cream soda for a glossy sheen.
When the cakes are done, let them cool in the jars for 10 minutes, then gently run a thin knife around the edge to release the cake from the glass. Pipe or spoon a generous swirl of frosting on top of each cake, letting it cascade down the sides. The frosting should melt slightly into the warm cake, creating a luscious, buttery river.
Serve the jars warm or at room temperature. For an extra touch of wizardry, drizzle a drizzle of caramel sauce and sprinkle a pinch of sea salt on top. That final salty‑sweet kiss? It’s the crescendo of the whole flavor symphony.
That’s it — you did it. But hold on, I’ve got a few more tricks that'll take this to another level…
Insider Tricks for Flawless Results
The Temperature Rule Nobody Follows
Always bring your butter, cream cheese, and even the heavy cream to room temperature before mixing. Cold ingredients can cause the batter to seize, leading to a gritty texture. I once tried to rush this step and ended up with a cake that felt like chewing on a rubber band. Letting everything sit for 20‑30 minutes eliminates that risk and yields a smoother crumb.
Why Your Nose Knows Best
Before you pull the cakes out of the oven, trust the aroma. When the butter‑butterscotch scent fills the kitchen and you hear a faint crackle from the edges, the cake is ready—even if the timer says a minute or two more. Over‑baking turns that buttery caramel into a bitter burnt note, so let your senses be the final timer.
The 5‑Minute Rest That Changes Everything
After removing the cakes from the oven, let them sit in the jars for exactly five minutes before frosting. This brief rest allows the interior steam to settle, preventing the frosting from sliding off. I’ve seen friends frost immediately and end up with a soggy topping that slides off like a melted snowball.
Frosting Consistency Control
If your frosting is too runny, add an extra half cup of powdered sugar. If it’s too stiff, whisk in a tablespoon of cream soda or a splash of milk. The key is to achieve a spreadable yet pipe‑ready consistency that holds its shape on the jar’s curve.
The Secret Salt Boost
A pinch of flaky sea salt sprinkled on the frosting just before serving elevates the entire flavor profile. It cuts through the sweetness and brings out the buttery notes, making each bite feel like a sophisticated dessert rather than a candy‑overload. I dare you to taste this and not go back for seconds.
Jar Prep Perfection
Line the bottom of each mason jar with a small circle of parchment paper cut to fit. This prevents the cake from sticking to the glass, making removal a breeze and preserving the perfect dome shape. If you skip this step, you might end up with a broken cake that looks more like a crumbled spell gone wrong.
Creative Twists and Variations
This recipe is a playground. Here are some of my favorite ways to switch things up:
Spiced Pumpkin Butterbeer
Swap half of the cream soda for pumpkin puree and add a teaspoon of pumpkin pie spice. The result is a cozy autumnal twist that still retains the buttery caramel core. Perfect for a chilly evening by the fire.
Chocolate‑Covered Butterbeer
Stir ¼ cup of cocoa powder into the dry ingredients and drizzle melted dark chocolate over the frosting. The bitter chocolate balances the sweet butterscotch, creating a sophisticated flavor duet.
Salted Caramel Swirl
Fold a swirl of homemade salted caramel sauce into the batter before baking. Each bite delivers a molten caramel river that mingles with the buttery cake, ideal for caramel lovers.
Vegan Butterbeer Delight
Replace butter with coconut oil, cream cheese with a vegan alternative, and use almond milk in place of heavy cream. The flavor remains rich, and the texture stays luxuriously soft—proof that you don’t need dairy to conjure magic.
Berry‑Burst Butterbeer
Fold fresh raspberries or blueberries into the batter just before filling the jars. The berries burst during baking, adding a tart contrast that brightens the deep caramel notes.
Storing and Bringing It Back to Life
Fridge Storage
Seal the cooled jars with airtight lids and store them in the refrigerator for up to three days. The cake stays moist thanks to the soda, and the frosting holds its shape. When ready to serve, let the jars sit at room temperature for 15 minutes to soften the frosting.
Freezer Friendly
Wrap each jar tightly in plastic wrap, then place them in a freezer‑safe bag. They freeze beautifully for up to two months. To reheat, remove the wrap, let the jar thaw in the fridge overnight, then warm in a 300°F oven for 10‑12 minutes. Add a tiny splash of water before reheating; it steams the cake back to perfection.
Best Reheating Method
For a quick fix, microwave a single jar on medium power for 45 seconds. The center should be warm but not rubbery. If you prefer a crisp top, finish under the broiler for 30 seconds—just watch closely to avoid burning.