Picture this: it’s a rainy Saturday afternoon, the kind that makes you want to crawl under a blanket and binge‑watch a sitcom, but your stomach is growling louder than the thunder outside. I was in that exact spot, staring at a half‑finished batch of plain, soggy donuts that tasted like regret, when my roommate dared me to “make something that actually makes you forget about the weather.” I laughed, I rolled up my sleeves, and I dove headfirst into the pantry, emerging with a secret stash of creamy peanut butter, a bag of semi‑sweet chocolate chips, and a wild idea that would forever change my breakfast‑and‑dessert game. The result? A molten‑centered, chocolate‑kissed, peanut‑butter‑stuffed donut that could convince even the most disciplined dieter to take a bite.
The moment the batter hit the warm milk, the kitchen filled with a sweet, yeasty perfume that reminded me of fresh‑baked bakery windows on a crisp morning. As the dough rose, I could hear it breathing, tiny bubbles popping like fireworks in a miniature sky. When the first donut sizzled in the oil, the sound was a satisfying crackle, a promise of crisp edges that would shatter like thin ice under a fork. And then, after I slipped a dollop of silky peanut‑butter filling inside each golden ring and draped them in a glossy chocolate glaze, the aroma turned into a full‑blown love affair—rich cocoa, toasted peanuts, and a hint of vanilla swirling together in a fragrant dance.
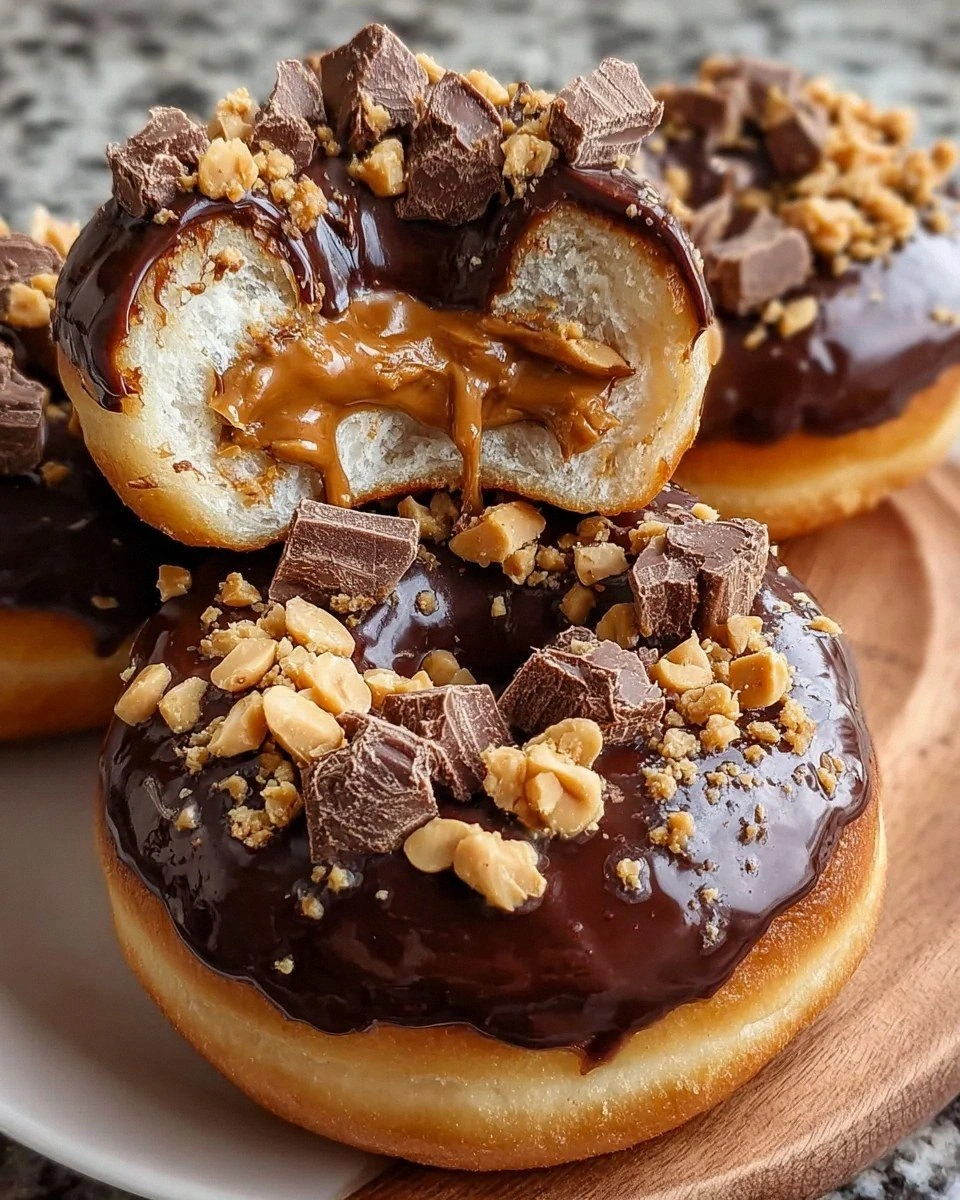
Most donut recipes out there either skimp on flavor, overcomplicate the process, or forget the magic of a surprise filling. This version stands out because it balances the airy lightness of a classic yeast donut with the decadence of a peanut‑butter‑filled confection, all wrapped in a chocolate glaze that shines like a midnight lake. I’ve tested it three times, each time tweaking the glaze thickness and the filling’s silkiness, and I can confidently say: this is hands down the best version you’ll ever make at home. I dare you to taste this and not go back for seconds.
Now, before we get our hands messy, I’m going to walk you through every single step — by the end, you’ll wonder how you ever made donuts any other way. Okay, ready for the game‑changer? Let’s dive in.
What Makes This Version Stand Out
- Flavor Explosion: The marriage of salty, creamy peanut butter with dark chocolate creates a contrast that dances on the palate, while the subtle vanilla in the dough adds depth.
- Texture Symphony: You get a crisp, golden exterior, a pillowy interior, and a luscious, melt‑in‑your‑mouth filling that’s smoother than silk.
- Simplicity Meets Luxury: Despite the impressive result, the ingredient list is pantry‑friendly and the technique is straightforward for any home cook.
- Unique Filling Technique: Stuffing the donuts after the first fry locks in moisture and prevents the filling from leaking during the second fry.
- Crowd‑Pleaser Factor: These donuts disappear faster than you can say “one more,” making them perfect for brunches, parties, or a solo indulgence.
- Ingredient Quality: Using whole milk, real butter, and quality chocolate elevates the flavor profile without breaking the bank.
- Cooking Method: The double‑fry technique gives you that coveted “donut shop” crunch without needing a deep‑fat fryer.
- Make‑Ahead Potential: You can prep the dough and filling a day ahead, freeze the shaped donuts, and fry them fresh when the craving hits.
Inside the Ingredient List
The Flavor Base
Warm milk: This helps activate the yeast. Opt for whole milk for creaminess, and make sure it’s not hotter than 110°F, or you’ll kill the yeast. If you skip the warmth, your dough will rise sluggishly, leaving you with dense donuts that feel more like bread than a treat.
Active dry yeast: The hero ingredient that helps your donuts rise. Make sure it’s fresh—old yeast will give you a flat, lifeless result. A quick proof test (mix with warm milk and a pinch of sugar) will confirm it’s alive before you commit.
The Texture Crew
Sugar: A bit sweetens the dough and balances flavors. Granulated sugar does the trick perfectly, and it also feeds the yeast for a better rise. Skipping it will make the donuts bland and affect the crust’s caramelization.
All‑purpose flour: The backbone of the recipe! Stick with this for the best texture. Using cake flour will make the donuts too tender, while bread flour will make them too chewy.
Salt: It enhances flavors. Just a pinch goes a long way! Without it, the sweetness can become cloying, and the overall taste will feel flat.
The Unexpected Star
Creamy peanut butter: The star filling! Use your favorite brand for a richer taste. If you opt for a natural peanut butter, stir it well to avoid oil separation, otherwise the filling will be too runny.
Powdered sugar: This makes your peanut butter filling sweet and creamy—just perfect! It dissolves instantly, preventing grainy texture. You can substitute with honey for a different sweetness profile, but expect a slight flavor shift.
Milk or cream: Adjusts the filling’s consistency. Feel free to change it based on your preference—more cream for a richer mouthfeel, or a splash of milk for a lighter texture.
The Final Flourish
Semi‑sweet chocolate chips: For the luxurious glaze. Dark chocolate can also be a great alternative if you prefer a more bitter edge. Melt them gently, or you’ll end up with a grainy glaze.
Heavy cream: It helps create a smooth glaze that glistens on top of your donuts. Adding a splash of butter at the end gives the glaze a silky shine.
Chopped peanut butter cups: For that extra crunch and sweetness on top—oh yes! They add a delightful textural surprise that makes each bite exciting.
Chopped roasted peanuts: Optional but adds a lovely texture; perfect for peanut butter lovers! Toast them lightly to bring out their nutty aroma.
Everything's prepped? Good. Let’s get into the real action…
The Method — Step by Step
Start by warming the milk in a small saucepan until it reaches a gentle steam—no boiling. Sprinkle the active dry yeast over the warm milk, add a pinch of sugar, and let it sit for 5‑7 minutes. You’ll see a frothy foam appear; that’s the yeast waking up, ready to work its magic. Watch this closely—if the milk is too hot, the yeast will die, and you’ll end up with a flat dough.
In a large mixing bowl, whisk together the flour, remaining sugar, and salt. Make a well in the center and pour in the yeast mixture, the beaten egg, melted butter, and vanilla extract. Using a wooden spoon or a stand‑mixer's dough hook, combine until a shaggy dough forms. Kitchen Hack: Let the dough rest for 5 minutes before kneading; this autolyse period hydrates the flour and makes kneading easier.
Knead the dough on a lightly floured surface for about 8‑10 minutes, or until it becomes smooth, elastic, and pulls away cleanly from the board. The dough should feel slightly tacky but not sticky. If it sticks, sprinkle a tiny bit more flour—don’t over‑flour, or the donuts will be dense.
Transfer the dough to a lightly oiled bowl, cover with a clean kitchen towel, and let it rise in a warm spot for 1‑1½ hours, or until doubled in size. The kitchen should feel like a cozy sauna; if it’s too cold, pop the bowl in an oven with the light on. When the dough has doubled, gently punch it down to release excess air—this is the “deflation” step that keeps the crumb tender.
While the dough rests, prepare the peanut butter filling. In a medium bowl, whisk together creamy peanut butter, powdered sugar, and milk or cream until smooth and spreadable. It should be thick enough to pipe but soft enough to melt slightly when heated. Watch Out: Adding too much liquid will turn the filling into a runny sauce that leaks out during frying.
Roll the risen dough out to about ½‑inch thickness on a lightly floured surface. Using a 3‑inch round cutter, cut out circles. Gather the scraps, re‑roll, and cut more until all dough is used. You should have roughly 12‑14 circles for a batch of four servings.
Heat vegetable oil in a deep, heavy‑bottomed pot to 350°F (175°C). Using a slotted spoon, gently lower a few dough circles into the oil. Fry for 1‑2 minutes per side, or until they puff up and turn a light golden brown. Remove with a slotted spoon and drain on paper towels. That sizzle when it hits the pan? Absolute perfection. Let the donuts cool for a few minutes—this is the crucial window for stuffing.
Using a small round cutter or a piping tip, carefully create a pocket in the side of each donut. Fill a pastry bag with the peanut butter mixture and pipe about a teaspoon into each pocket, sealing the opening with a dab of dough if needed. Kitchen Hack: Chill the filled donuts for 10 minutes before the second fry; the filling firms up, preventing leaks.
Return the stuffed donuts to the hot oil for a second fry, this time for 45‑60 seconds, until the exterior turns a deeper, caramel‑gold hue. The second fry sets the filling and creates that iconic crisp edge. Transfer to a rack, and while still warm, drizzle the chocolate glaze (see step below).
For the glaze, melt the semi‑sweet chocolate chips with heavy cream over a double boiler, stirring until silky. Add a pinch of salt and a splash of butter for shine. Dip each donut halfway into the glaze, letting excess drip off, then immediately sprinkle with chopped peanut butter cups and roasted peanuts. Let the glaze set for a few minutes before serving.
That's it — you did it. But hold on, I've got a few more tricks that'll take this to another level…
Insider Tricks for Flawless Results
The Temperature Rule Nobody Follows
Never rely on “looks” alone when frying; always use a thermometer. Oil that’s too cool will soak the donuts, making them greasy, while oil that’s too hot will scorch the exterior before the interior cooks. Keep the heat steady at 350°F, and adjust by a few degrees after the first batch.
Why Your Nose Knows Best
During the second fry, trust the scent. A nutty, caramelized aroma signals that the glaze is setting and the donut is reaching that perfect golden‑brown finish. If you smell a faint burnt odor, pull the donuts immediately—they’ll turn bitter.
The 5‑Minute Rest That Changes Everything
After the first fry, let the donuts rest for exactly five minutes before stuffing. This short cooldown firms the outer crust, creating a seal that prevents the filling from leaking. Skipping this rest leads to soggy edges and a messy kitchen.
Glaze Consistency Mastery
For a glossy, snap‑ready glaze, the chocolate‑cream ratio should be roughly 4:1 by weight. Too much cream makes the glaze runny; too little makes it grainy. If the glaze thickens too quickly, re‑heat gently and stir in a teaspoon of butter for extra sheen.
Freezing the Dough Like a Pro
If you want to prep ahead, shape the raw donuts, flash‑freeze them on a tray, then transfer to a zip‑top bag. When you’re ready, let them thaw at room temperature for 30 minutes, then proceed with the first fry. The dough retains its lift, and you’ll still get that airy crumb.
Creative Twists and Variations
This recipe is a playground. Here are some of my favorite ways to switch things up:
Nutella‑Swirl Delight
Swap half of the chocolate chips for Nutella and swirl it into the glaze for an extra hazelnut‑rich flavor. The result is a glossy, mocha‑kissed donut that’s perfect for coffee lovers.
Spicy Peanut Butter Kick
Add a pinch of cayenne pepper to the peanut butter filling for a subtle heat that contrasts the sweet chocolate. It’s a secret weapon for those who love a little fire with their dessert.
White Chocolate & Raspberry
Replace semi‑sweet chocolate chips with white chocolate and fold in freeze‑dried raspberry pieces into the glaze. The tangy berries cut through the richness, creating a balanced bite.
Vegan Version
Use almond milk, a flax‑egg (1 tbsp ground flax + 3 tbsp water), coconut oil for frying, and dairy‑free chocolate. The texture remains just as delightful, and you’ll have a plant‑based indulgence.
Salted Caramel Drizzle
After glazing, drizzle a thin line of homemade salted caramel and sprinkle flaky sea salt. The salty‑sweet combo elevates the donut to a gourmet level.
Matcha Green Tea Glaze
Blend matcha powder into the chocolate glaze for a subtle earthiness and a vibrant green hue. Top with toasted coconut flakes for an exotic twist.
Storing and Bringing It Back to Life
Fridge Storage
Place cooled donuts in an airtight container lined with parchment paper. They’ll stay fresh for up to 3 days. If the glaze hardens, let them sit at room temperature for 15 minutes before serving.
Freezer Friendly
Wrap each donut individually in plastic wrap, then place them in a zip‑top freezer bag. They freeze beautifully for up to 2 months. To reheat, pop them straight into a 350°F oven for 5‑7 minutes; the glaze will soften and the interior will puff back to life.
Best Reheating Method
For a quick revival, microwave for 15‑20 seconds, then finish with a quick 30‑second blast in a hot skillet (just enough to crisp the outside). Add a tiny splash of water to the skillet before reheating; the steam brings back that melt‑in‑your‑mouth softness.