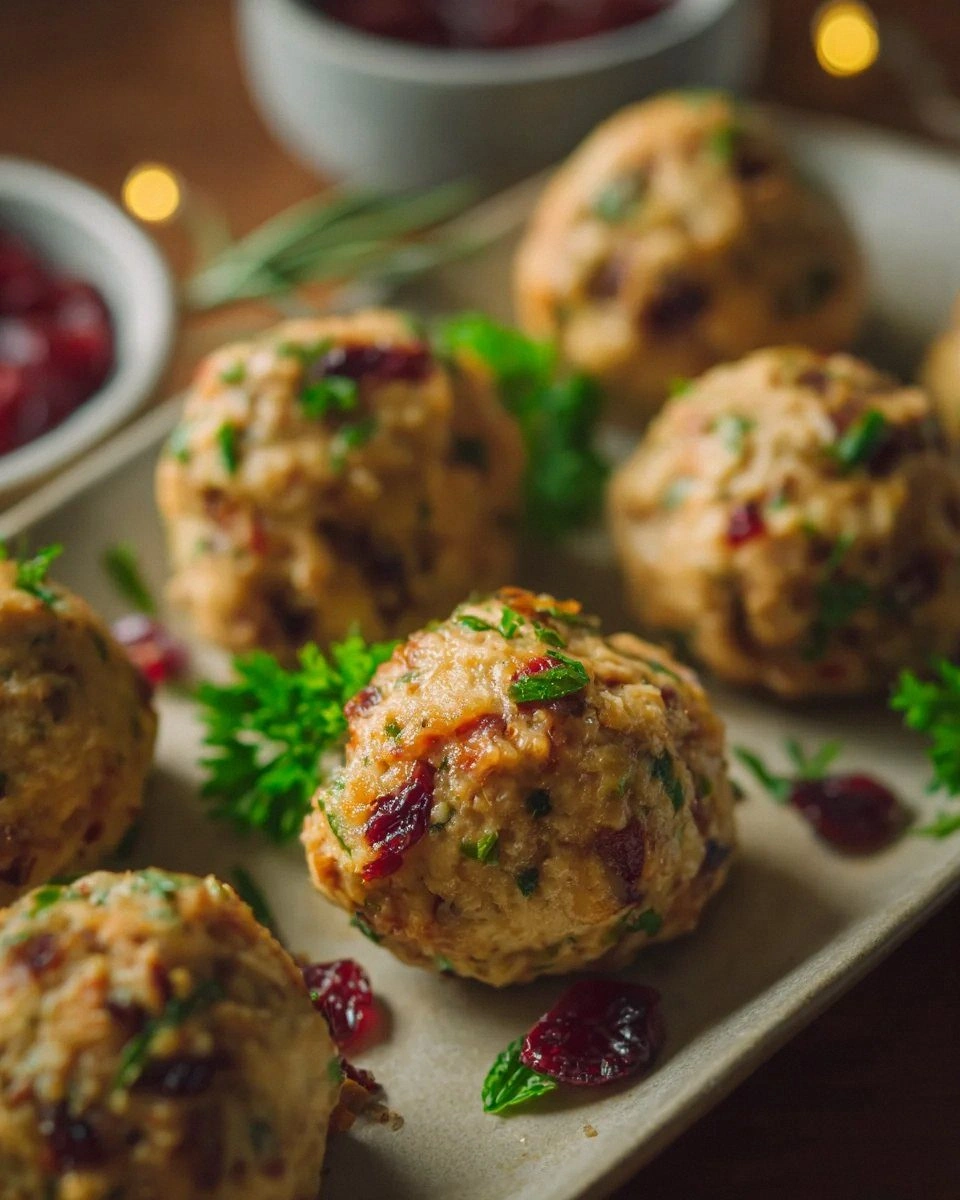
I still remember the year I swore off holiday cooking forever. There I stood, elbow-deep in a turkey cavity, wrestling with soggy bread stuffing that tasted like wet cardboard mixed with sadness. My mother-in-law was due any minute, the smoke alarm was serenading my failure, and I was one burnt casserole away from ordering Chinese takeout for Christmas dinner. Fast forward to today, and I'm practically bouncing with excitement to share the recipe that single-handedly restored my holiday hosting confidence — these festive cranberry turkey stuffing balls that will make you the legend of your family gathering.
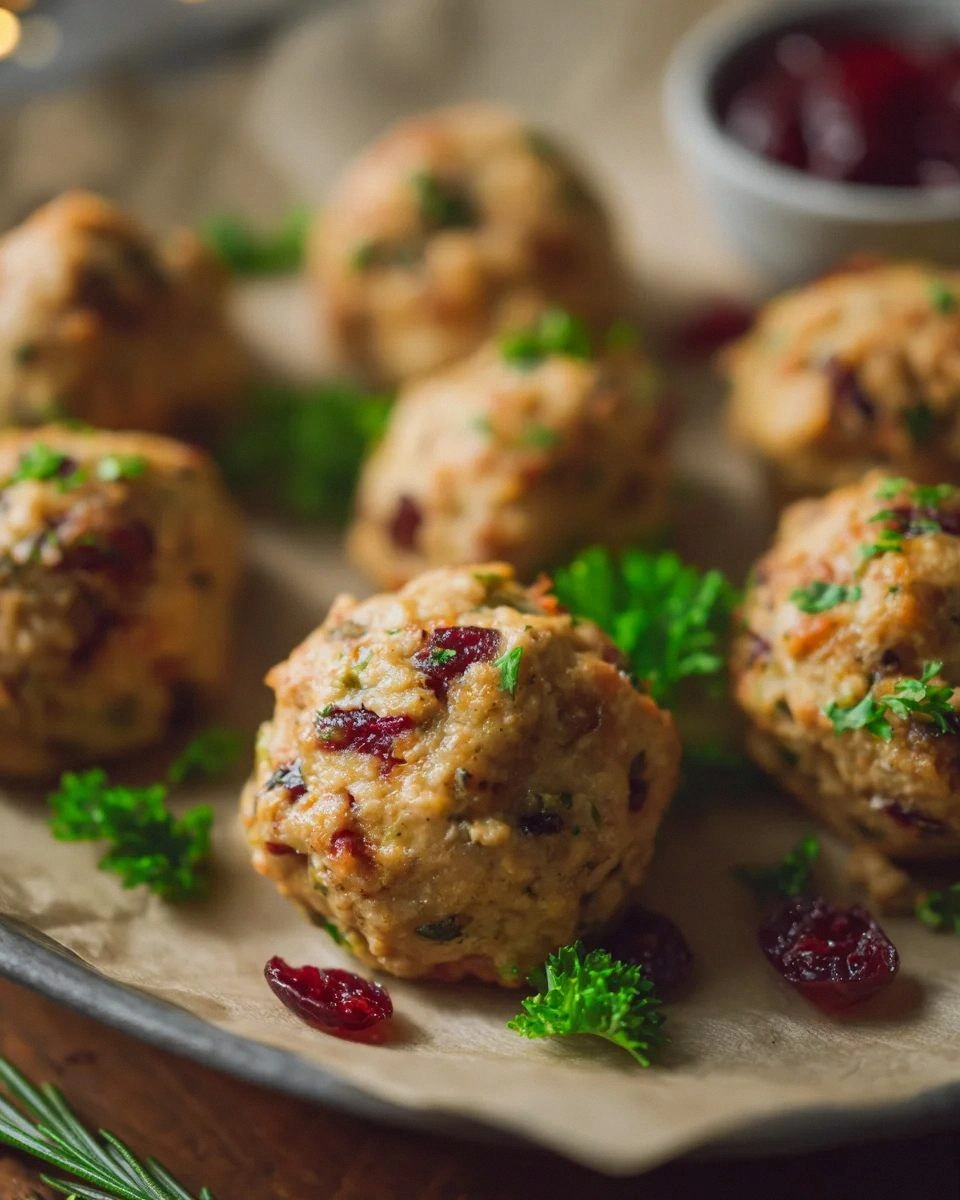
Picture this: golden-brown orbs of crispy-edged perfection, each bite bursting with tender turkey, tart cranberries, and herbs that smell like December itself decided to take up residence in your kitchen. The outside shatters like thin ice under your fork, revealing a steamy center so moist and flavorful that even your pickiest nephew will beg for the recipe. I dare you to taste these and not go back for thirds — yes, thirds, because seconds happen before you even realize what you've done.
What makes these stuffing balls completely different from every other holiday side dish is the revolutionary technique I stumbled upon during my kitchen redemption arc. Instead of packing bread into a bird where it turns to mush, we're creating individual portions that get crispy on every single edge while staying impossibly tender inside. The secret? We're essentially making stuffing fritters, but with a few tricks that keep them light instead of leaden.
Stay with me here — this is worth it. I'm about to show you how to transform humble ingredients into something that'll have your guests fighting over the last ball like it's the last lifeboat on the Titanic. Let me walk you through every single step — by the end, you'll wonder how you ever made it any other way.
What Makes This Version Stand Out
Crispy Everywhere: Traditional stuffing has two textures: mushy middle and maybe some crispy top if you're lucky. These balls deliver shatteringly crisp exteriors on every single surface while maintaining a cloud-soft interior that'll make you weep with joy.
Make-Ahead Magic: Most holiday dishes demand your attention at the worst possible moment. These beauties can be rolled, chilled, and popped in the oven while you're carving the turkey, giving you the gift of timing that actually works.
Flavor Bombs: Each ball contains the perfect ratio of savory turkey, sweet-tart cranberries, and aromatic herbs in every bite. No more hunting through bland bread cubes hoping for a piece with actual taste.
Portion Control: Gone are the days of Uncle Bob hogging all the crispy stuffing edges. Everyone gets their own perfectly portioned sphere of deliciousness, which somehow makes them taste even better.
Kid-Friendly Fancy: Children who won't touch "weird" holiday food will devour these because they're essentially stuffing meatballs. It's sneaky gourmet that works on every age level.
Leftover Gold: If you somehow have extras, these reheat like champions and make incredible next-day sandwiches that'll have you looking forward to leftovers more than the original meal.
Crowd Psychology: There's something about food in ball form that makes people lose their minds. I've seen grown adults elbow each other for the last one like it's Black Friday at Best Buy.
Alright, let's break down exactly what goes into this masterpiece...
Inside the Ingredient List
The Flavor Base
Let's start with the turkey because, honestly, this is where most recipes go wrong. I'm not talking about that sad, dry bird that gets passed around every holiday table. We're using leftover roasted turkey that's been properly stored and still has some moisture, or if you're making these as a main dish, grab some turkey thighs from the store. Dark meat works better here — it's more forgiving and brings a deeper flavor that stands up to all our other bold ingredients. If all you have is breast meat, don't panic, but do yourself a favor and mix it with a tablespoon of melted butter to add back some richness.
The cranberries are your next superstar, and here's where I'm going to get a little controversial. Fresh cranberries are fine, but I actually prefer the dried ones for this recipe because they concentrate that tart-sweet flavor and don't water down our mixture. Look for the ones that still have some softness to them — if they're rock hard, give them a quick soak in orange juice for ten minutes. This little trick plumps them up and adds another layer of flavor that makes people ask "what's that amazing taste?"
The Texture Crew
Bread selection will make or break your stuffing balls, and I've tested them all. Sourdough brings a tangy complexity that plays beautifully with the cranberries, but a good quality white bread works if that's what you have. The key is letting it stale properly — we're talking cubes that feel like croutons, not soft pillows. If you're in a rush (and who isn't during the holidays?), cube your bread and toast it in a 250°F oven for 45 minutes, stirring every 15 minutes. That slow drying process concentrates flavor and ensures your balls hold together instead of falling apart into sad, mushy piles.
Eggs are your binding agent, but they're doing double duty here. Beyond holding everything together, they add richness and help create that custardy interior that makes these special. I use one whole egg plus one yolk — the extra yolk adds luxuriousness without making them taste eggy. If you're watching cholesterol, you can use two whole eggs, but don't skip the yolks entirely. That's where all the flavor lives, and we're not about making healthy holiday food here.
The Unexpected Star
Here's where we depart from traditional stuffing with a secret ingredient that'll have everyone guessing: a tablespoon of soy sauce. Before you click away in horror, hear me out. That umami bomb deepens all the savory notes and makes the turkey taste more turkey-y. It's like adding MSG but more socially acceptable. Use the good stuff — not the generic bottle that's been in your fridge since 2019. If you're gluten-free, tamari works perfectly, or you could use Worcestershire sauce in a pinch.
Sage is non-negotiable for me, but I see you eyeing that jar of rubbed sage that's been in your spice rack since the Clinton administration. Fresh sage is a completely different beast — it's brighter, more complex, and doesn't taste like dusty potpourri. If you absolutely must use dried, use half the amount and add it to the sautéed onions so it has a chance to wake up. Better yet, if you've got a neighbor with a sage plant, offer to trade them some finished stuffing balls for a few fresh leaves.
The Final Flourish
Butter is what separates good stuffing balls from life-changing ones, and we're using it three ways. First, we'll sauté our aromatics in it, letting it brown slightly for nutty flavor. Then we'll melt more and drizzle it over the formed balls before baking — this creates those insanely crispy edges we're chasing. Finally, we'll brush the finished balls with garlic butter right when they come out of the oven. Yes, it's excessive. No, you shouldn't skip any of these steps unless you hate joy and deliciousness.
For the onion and celery, I want you to dice them smaller than you think you need — like, almost minced. Big chunks create weak points in our balls where they can fall apart. Plus, smaller pieces distribute more evenly, ensuring every bite has that classic stuffing flavor. If you're a texture person who loves the crunch of vegetables, save some of the celery leaves and sprinkle them on top at the end for that fresh, green pop.
Everything's prepped? Good. Let's get into the real action...
The Method — Step by Step
- Start by melting three tablespoons of butter in a large skillet over medium heat. You want it to foam gently but not brown yet — we're building flavors here, not racing to the finish line. Once melted, toss in your diced onion and celery with a generous pinch of salt. The salt helps draw out moisture and seasons from the inside out. Stir occasionally for about five minutes until the vegetables soften and become translucent, but don't let them brown. That sizzle when they hit the pan? Absolute perfection.
- While your aromatics are doing their thing, grab your biggest mixing bowl and combine the stale bread cubes with your dried cranberries and herbs. Give everything a good toss so the cranberries don't clump together in one unfortunate ball. Nobody wants to bite into a cranberry bomb when they're expecting balanced flavor. This is also when I like to add a few grinds of black pepper — not enough to make it spicy, just enough to add complexity. Think of pepper like bass in music — you shouldn't necessarily notice it, but you'd miss it if it were gone.
- Now here's the game-changer that most recipes skip: let your sautéed vegetables cool for about five minutes before adding them to the bread mixture. Hot vegetables will start cooking the eggs immediately when we add them, creating scrambled egg pockets in your stuffing balls. We're making stuffing, not breakfast. While they cool, chop your turkey into small, even pieces — about the size of a blueberry. Consistent sizing ensures every ball has the perfect meat-to-bread ratio.
- Beat your eggs in a separate small bowl with the soy sauce and a splash of turkey or chicken stock. You want the mixture to be well-combined but not frothy — we're not making a soufflé here. The stock adds moisture and helps distribute flavors, but go easy. Too much liquid and your balls will fall apart faster than my resolve during holiday cookie season. Start with two tablespoons and add more only if your mixture seems dry when you test it.
- This is the moment of truth — time to combine everything. Pour your cooled vegetables over the bread mixture, add the chopped turkey, and give everything a gentle toss. Now drizzle your egg mixture evenly over the top and use your hands to combine. Yes, your hands. A spoon won't give you the feedback you need about texture. The mixture should hold together when squeezed but not be wet or mushy. If it crumbles apart, add another beaten egg. If it's soggy, add more bread cubes.
- Now for the fun part — rolling these beauties into balls. I use a small ice cream scoop to ensure they're all the same size, which helps them cook evenly. Scoop, then roll between your palms until smooth and round. They should be about the size of a golf ball — bigger than a ping pong ball but smaller than a tennis ball. Place them on a parchment-lined baking sheet as you go. If the mixture starts sticking to your hands, wet them slightly with cold water. This trick works like magic and keeps everything neat.
- Here's where we separate the amateurs from the pros — chilling your formed balls for at least 30 minutes before baking. This step is non-negotiable if you want them to hold their shape and develop those crispy edges we're after. The cold firms up the butter and gives the bread time to absorb the flavors. You can even do this step the night before and keep them covered in the fridge. Trust me on this one — a friend tried skipping this step once, and let's just say it didn't end well.
- Preheat your oven to 400°F and position a rack in the upper third. We're going hot and fast to get maximum crispiness without drying out the centers. While the oven heats, melt another three tablespoons of butter and get ready for the magic. Brush each ball generously with melted butter — don't be shy here. The butter helps create that golden-brown crust that makes people weak in the knees. If you're feeling extra indulgent (and why wouldn't you be?), drizzle a little more butter over them halfway through baking.
- Bake for 20-25 minutes, rotating the pan halfway through for even browning. You'll know they're done when they're deep golden brown and crisp on the bottom. The tops should be beautifully bronzed, and if you tap one gently with a spoon, it should sound hollow. That's the sound of success, my friend. Let them rest for five minutes before serving — this allows the centers to set up and prevents molten-hot stuffing from burning impatient mouths.
That's it — you did it. But hold on, I've got a few more tricks that'll take this to another level...
Insider Tricks for Flawless Results
The Temperature Rule Nobody Follows
Here's the thing about stuffing that drives me absolutely bonkers — everyone focuses on ingredients but ignores temperature, which is honestly more important. Your bread cubes need to be room temperature when you start mixing, not cold from the fridge. Cold bread won't absorb flavors properly, leading to bland balls that taste like seasoned cardboard. I leave my bread out overnight, but if you're in a rush, spread it on a baking sheet and pop it in a 200°F oven for 10 minutes. It should feel dry and slightly warm to the touch, not hot or cold.
The same rule applies to your turkey — cold turkey straight from the fridge will make your mixture seize up and refuse to bind. Let it sit out for 20-30 minutes while you prep everything else. This isn't about food safety since we're baking these thoroughly anyway. It's about creating the perfect texture that makes people close their eyes when they take a bite. And honestly, isn't that what we're all after? That moment when someone tastes your food and their whole face changes.
Why Your Nose Knows Best
I'll be honest — I ate half the batch before anyone else got to try it because I couldn't resist the smell wafting through my kitchen. That aroma is your built-in doneness indicator, and learning to trust it will make you a better cook than any thermometer ever could. When your stuffing balls are perfectly golden, your kitchen will smell like the best Thanksgiving you've ever had, times ten. It's nutty and buttery with hints of sage and onion that make your mouth water uncontrollably.
If your kitchen smells amazing but your timer says you have five minutes left, trust your nose and check them. Ovens vary, and that sensory feedback is more reliable than any recipe timing. On the flip side, if they look golden but don't smell incredible yet, give them another few minutes. This is the difference between good stuffing balls and the kind that people text you about three days later, asking for the recipe with multiple exclamation points.
The 5-Minute Rest That Changes Everything
Picture yourself pulling these out of the oven, the whole kitchen smelling incredible, and your family circling like vultures. Your instinct will be to serve them immediately — resist it. Those five minutes of resting time allow the starches to firm up, the flavors to settle, and the surface to achieve the perfect texture. It's like letting a steak rest, but instead of red meat, we're talking about the most incredible stuffing you'll ever eat.
During this rest, the residual heat continues cooking the centers gently while the exterior stays crispy. If you cut one open immediately, it'll seem too soft in the middle. Wait five minutes, and you get that perfect contrast of crispy outside and tender, moist inside. Use this time to finish your other dishes or pour yourself a well-deserved glass of wine. You've just created magic — take a moment to appreciate it.
Creative Twists and Variations
This recipe is a playground. Here are some of my favorite ways to switch things up:
The Italian Holiday
Swap the sage for a tablespoon of minced fresh rosemary and add a half-cup of diced pancetta that you've crisped up in the pan before the vegetables. Use ciabatta instead of regular bread and add a quarter-cup of grated Parmesan to the mixture. The result tastes like Christmas in Rome, with smoky, herbal flavors that pair beautifully with a glass of Chianti. My Italian neighbor tried these and immediately invited me to dinner, which I consider the highest compliment possible.
The Southern Belle
Add a cup of cooked crumbled breakfast sausage and swap the cranberries for dried cherries. Use cornbread instead of white bread and add a tablespoon of hot sauce to the egg mixture. These have a sweet-heat thing going on that makes them completely addictive. Serve them with honey butter for dipping and watch Southerners and Yankees alike lose their minds over the flavor combination. The sausage adds richness while the cherries provide a more subtle sweetness than cranberries.
The Vegetarian Champion
Replace the turkey with roasted mushrooms that you've chopped fine and sautéed until they're deeply caramelized. Add a tablespoon of miso paste to the egg mixture for umami depth that mimics meat. Use vegetable stock instead of chicken stock and add some toasted chopped walnuts for protein and crunch. Even dedicated carnivores devour these, and you'll feel virtuous about providing an option that doesn't feel like a sad afterthought.
The Fancy Pants
Add a half-cup of diced foie gras or chicken liver mousse if you're feeling extravagant. Swap the dried cranberries for dried cherries soaked in port wine, and add some fresh thyme along with the sage. These taste like something from a Michelin-starred restaurant but cost a fraction of what you'd pay for the privilege. Save these for your most discerning foodie friends — they'll be impressed that you know what foie gras is, let alone how to cook with it.
The Breakfast Remix
Add a cup of diced cooked breakfast sausage and swap the cranberries for dried apple pieces. Use stuffing mix that's seasoned with sage and add a quarter-teaspoon of maple extract to the egg mixture. Serve these with maple syrup for dipping and suddenly you've got the most incredible breakfast side dish ever created. My sister makes these for brunch and serves them with mimosas — it's become a tradition that rivals the actual holiday dinner.
The Spice Route
Add a teaspoon each of ground coriander and cumin, swap the cranberries for golden raisins, and add some chopped dried apricots. Use fresh cilantro instead of parsley and add a pinch of cinnamon. These taste like they came from a Moroccan souk, with warm spices that make your whole house smell like an exotic adventure. They're particularly good with lamb or if you're serving a Middle Eastern-inspired holiday meal.
Storing and Bringing It Back to Life
Fridge Storage
Okay, ready for the game-changer? These actually taste better the next day, once the flavors have had time to meld and intensify. Store completely cooled balls in an airtight container with parchment paper between layers. They'll keep for up to four days in the refrigerator, though I doubt they'll last that long. The key is letting them cool completely before storing — any trapped heat will create condensation that makes them soggy. If you're storing them overnight before the initial bake, keep them on the baking sheet, covered tightly with plastic wrap.
For make-ahead magic, you can roll these balls and keep them unbaked in the refrigerator for up to 24 hours. Just make sure they're well-covered so they don't dry out. When you're ready to bake, let them sit at room temperature for 30 minutes while the oven preheats. This takes the chill off and ensures even cooking. I've done this for three years running, and it's saved my sanity during holiday cooking marathons.
Freezer Friendly
These freeze beautifully, either baked or unbaked, which makes them perfect for holiday prep. For unbaked balls, flash-freeze them on a baking sheet until solid, then transfer to freezer bags. They'll keep for up to three months and can go straight from freezer to oven — just add 5-10 minutes to the baking time. For already-baked balls, cool them completely, then freeze in a single layer before transferring to containers. They reheat best in a 350°F oven for about 15 minutes, which restores that crispy exterior.
Here's a pro tip: freeze them in portions that make sense for your family. I do bags of six because that's perfect for a weeknight dinner when I want something special without the fuss. Label them with the date and reheating instructions, because three months from now you'll thank yourself for being so organized. If you've ever found a UFO (unidentified frozen object) in your freezer, you know why labeling matters.
Best Reheating Method
The microwave is your enemy here — it'll turn your crispy balls into sad, soggy lumps that taste like disappointment. Instead, use a 350°F oven or toaster oven for 10-15 minutes until heated through and crispy again. If they seem a little dry (which can happen with freezing), add a tiny splash of water to the baking sheet before reheating — it steams back to perfection. The water creates a little steam that rehydrates the interior without making the exterior soggy.
For smaller portions, I've had great success using my air fryer at 350°F for 5-7 minutes. They come out almost as good as fresh, with edges that shatter like the top of a crème brûlée. If you don't have an air fryer, a skillet works too — just add a touch of butter and reheat over medium heat, turning occasionally. The key is gentle heat that warms them through without burning the outside while leaving the inside cold.