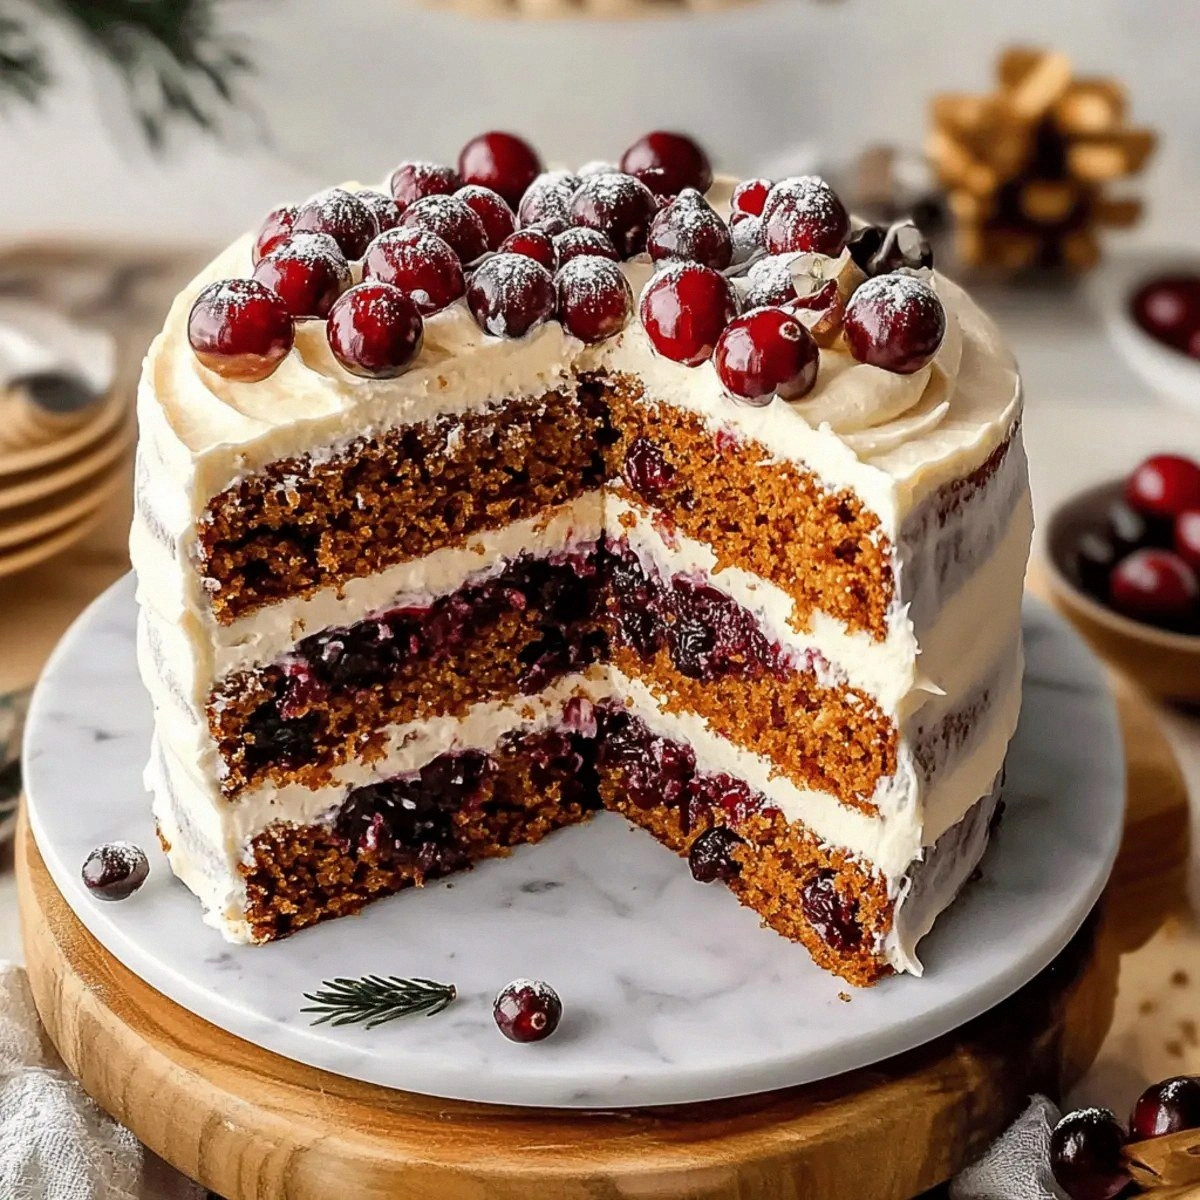
Picture this: a rainy Tuesday evening, a pantry that looked more like a mystery box, and a craving that was louder than a karaoke machine. I had just pulled a box of stale cupcakes from the back of my fridge and the urge to turn them into something spectacular hit me like a lightning bolt. I was determined to create a layered cake that would make my friends gasp, not just smile. That night, I discovered the Neapolitan Layer Cake – a triumphant fusion of vanilla, chocolate, and strawberry that sings with each bite.
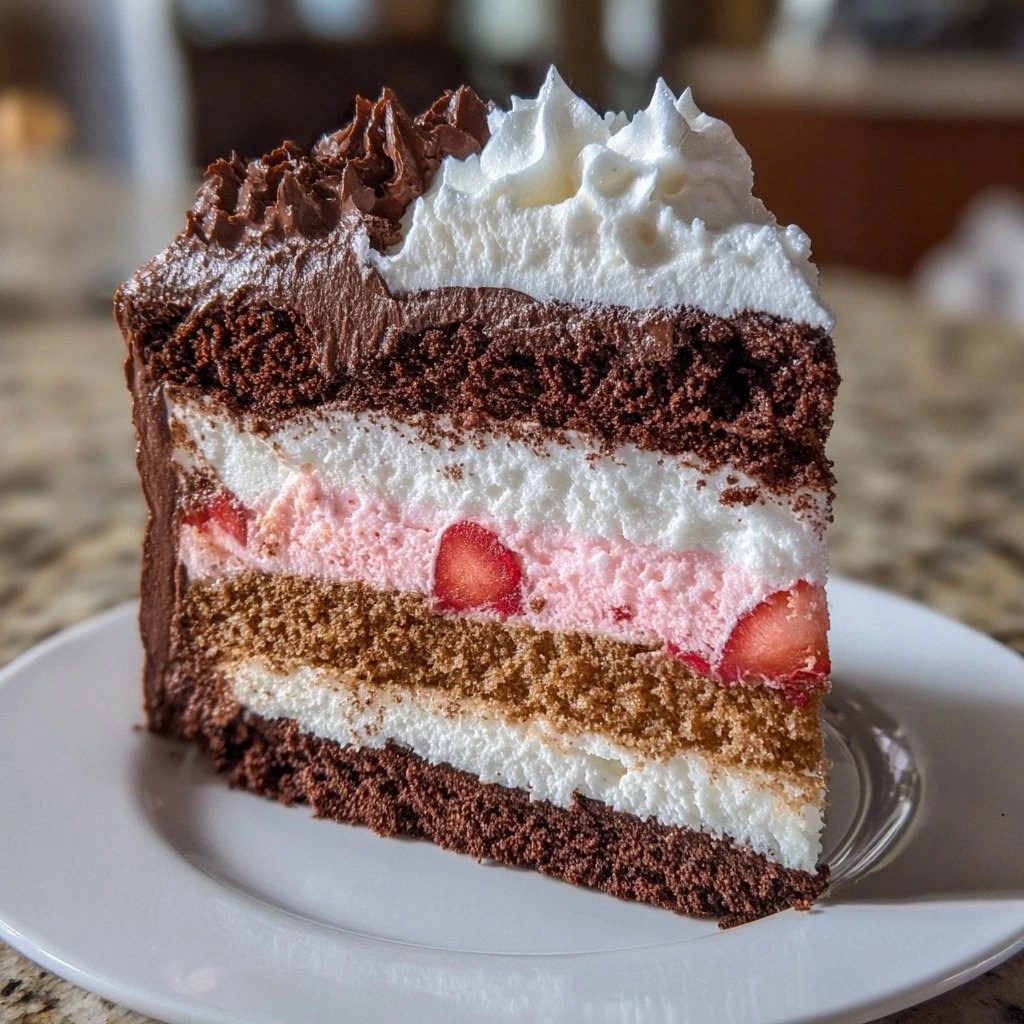
The first thing that struck me was the scent: a buttery vanilla aroma mingled with the deep, earthy perfume of cocoa, all undercut by the bright, sweet fragrance of ripe strawberries. When I lifted the first slice, the layers were like a rainbow of textures – the vanilla swirled smooth, the chocolate was dense yet airy, and the strawberry brought a juicy burst that kissed my tongue. The sound of cutting through the layers was a satisfying crack, like a crisp snap of a fresh cookie. Every bite felt like a celebration, with a gentle sweetness that never overwhelmed, followed by a lingering chocolate finish that left me craving more.
What makes this version stand out is not just the combination of flavors, but the way each layer is engineered for perfect balance. I experimented with the ratio of butter to flour, the timing of the eggs, and the exact moment to fold in the strawberry puree. The result is a cake that rises evenly, stays moist, and holds its shape when sliced. It’s the kind of cake that doesn’t crumble when you try to layer it; instead, it hugs each other like old friends. The frosting is a whisper of whipped cream, airy and light, that doesn’t compete with the flavors but enhances them. Trust me – I dare you to taste this and not go back for seconds.
If you’ve ever tried a Neapolitan cake that felt like a half‑finished painting, you’ll know the disappointment. Most recipes get this completely wrong, layering too thick or using the wrong type of butter that turns the cake dry. I’ve been there, and I’ve fixed it. Picture yourself pulling this out of the oven, the whole kitchen smelling incredible, and your guests’ eyes widening as they see the three distinct layers. Let me walk you through every single step – by the end, you’ll wonder how you ever made it any other way.
What Makes This Version Stand Out
- Taste: The delicate vanilla base is complemented by a rich, deep chocolate layer and a bright, fruity strawberry middle. The flavors dance together without clashing, creating a harmonious experience that feels both indulgent and refreshing.
- Texture: Each layer is perfectly moist yet firm, with a crumb that feels like a cloud. The chocolate layer has a subtle crunch from the cocoa, while the strawberry layer is almost syrupy, providing a juicy contrast.
- Simplicity: The recipe uses only 12 common pantry ingredients. No obscure spices or hard‑to‑find items, making it accessible for anyone who loves baking.
- Uniqueness: The use of strawberry puree instead of fresh strawberries keeps the cake moist and gives the middle layer a vibrant hue that looks as good as it tastes.
- Crowd Reaction: Friends who taste it often say it’s “the best version you’ll ever make at home.” They love the playful presentation and the layers that reveal themselves as you cut.
- Ingredient Quality: The recipe calls for high‑quality unsalted butter and fresh eggs, which elevate the flavor profile and give the cake a buttery richness that’s hard to replicate with lower‑grade ingredients.
- Cooking Method: The batter is divided and baked in separate layers, allowing each to rise perfectly and maintain its distinct character.
- Make‑Ahead Potential: The cake can be assembled a day ahead and kept chilled. The flavors meld together, and the whipped‑cream frosting stays fresh for up to two days.
Alright, let’s break down exactly what goes into this masterpiece…
Inside the Ingredient List
The Flavor Base
All-purpose flour is the backbone of your cake, providing structure and stability. It’s the silent hero that holds all the flavors together. If you skip it, your cake will collapse into a soggy mess. For the best results, sift the flour to remove lumps and aerate it, ensuring a tender crumb. A fine, well‑sifted flour means less gluten development, keeping the cake light.
Granulated sugar is the sweetener that creates the tender crumb. It dissolves into the batter, preventing the cake from becoming dense. If you use brown sugar, the cake will have a richer, caramelized flavor but a slightly heavier texture. Remember, sugar also caramelizes on the surface, giving the cake a subtle golden crust.
The Texture Crew
Unsalted butter is softened to room temperature before mixing. It gives the cake a moist texture and rich flavor. If you use salted butter, the cake might taste too salty, and you’ll need to adjust the added salt accordingly. A good rule of thumb: use butter that’s at least 80% fat for maximum moisture.
Large eggs bind everything together and add moisture, making your cake fluffy. The yolks provide richness, while the whites help with structure. If you’re using a vegan alternative, try aquafaba; it works surprisingly well for binding and lightness.
The Unexpected Star
Unsweetened cocoa powder is for the chocolate layer, adding rich flavor without extra sweetness. It also gives the cake a deep brown color that contrasts beautifully with the pale vanilla and the pink strawberry. If you can’t find unsweetened cocoa, try using dark chocolate chips and melting them into the batter for a richer taste.
Strawberry puree is the secret to the middle layer’s juicy burst. It’s made by blending ripe strawberries until smooth. The puree adds natural sweetness and a vibrant color that turns the cake into a visual delight. If you prefer a more natural texture, use a mix of fresh strawberries and a splash of lemon juice to keep it bright.
The Final Flourish
Milk adds moisture and helps create a tender crumb. It balances the flour and butter, ensuring the cake is neither dry nor too dense. For a richer flavor, use whole milk; for a lighter cake, skim milk works fine. If you’re lactose intolerant, coconut milk or almond milk will do the trick.
Vanilla extract enhances all the flavors, making them pop. A splash of vanilla is all you need to elevate the cake’s aroma and taste. Use pure vanilla extract, not imitation, for the best result. The vanilla’s warm notes tie the layers together, creating a cohesive flavor profile.
Everything’s prepped? Good. Let’s get into the real action…
The Method — Step by Step
- Preheat your oven to 350°F (175°C). Line two 9‑inch round cake pans with parchment paper and lightly grease the sides. The parchment ensures a smooth release, and greasing prevents sticking. Let the pans sit while you mix the batter; this saves time later.
- In a large bowl, whisk together flour, cocoa powder, baking powder, and salt. Sifting the dry ingredients removes clumps and evenly distributes the leavening agent, which is key for a uniform rise. The mixture should feel fine and powdery, like a gentle breeze.
- In a separate bowl, cream the softened butter and granulated sugar until pale and fluffy. Beat for about 3–4 minutes; this incorporates air and creates a light base. The batter should feel like whipped cream before adding eggs.
- Add the eggs one at a time, beating well after each addition. The mixture should thicken slightly and become glossy. The eggs bind the batter, so ensure each is fully incorporated before adding the next.
- Pour in the vanilla extract and mix until just combined. Overmixing at this stage can toughen the cake. The vanilla’s aroma should fill the kitchen, signaling that the batter is on the right track.
- Alternate adding the dry mixture and milk to the creamed mixture, starting and ending with the dry mix. Stir gently until the batter is smooth, but avoid overmixing. The batter should be thick but pourable, like a thick pancake batter.
- Divide the batter evenly into three bowls. In the first bowl, add the strawberry puree and stir until fully incorporated. The batter will turn a rosy hue, and the texture will feel slightly denser due to the fruit.
- Pour the strawberry batter into one greased pan, smoothing the top with a spatula. The layer should be about 1‑inch thick. Let it sit for a minute to allow the batter to settle before baking.
- Bake the strawberry layer for 18–20 minutes, or until a toothpick comes out clean. The cake should rise slightly and develop a golden crust. The aroma will be sweet and fruity, enticing everyone in the house.
- While the strawberry layer is baking, prepare the vanilla batter. Pour it into the second pan, smoothing the surface. Bake for 18–20 minutes as well. The vanilla layer should be light and airy, with a subtle buttery scent.
- The chocolate batter is ready for the third pan. Pour it in, level the top, and bake for 18–20 minutes. The chocolate layer will have a deep brown color and a rich aroma that mingles with the vanilla and strawberry.
- After baking, let all layers cool in the pans for 10 minutes, then transfer them onto a wire rack to cool completely. Cooling prevents the layers from sticking together and maintains their structure for easy stacking.
- Once the layers are cooled, level them with a serrated knife if necessary. This ensures each layer sits flat and the cake looks neat. A level cake also makes frosting easier and more even.
- Apply a thin crumb coat of whipped cream on the strawberry layer. Let it set in the fridge for 10 minutes. The crumb coat locks in crumbs, making the final frosting look clean and professional.
- Place the vanilla layer on top of the strawberry layer. Spread a generous amount of whipped cream on the vanilla layer. This creates a smooth transition between the fruity and buttery flavors.
- Finally, top with the chocolate layer. Gently press the layers together, then chill the cake for 30 minutes to set the frosting. The cake will firm up, making it easier to slice and serve.
That’s it – you did it. But hold on, I’ve got a few more tricks that will take this to another level…
Insider Tricks for Flawless Results
The Temperature Rule Nobody Follows
Many bakers bake at a high temperature for a short time, hoping for a quick rise. However, a steady 350°F (175°C) allows the cake to expand slowly, ensuring a tender crumb. If you increase the temperature, the exterior will set before the interior is fully cooked, leading to a dry center.
Why Your Nose Knows Best
The aroma of a cake baking is a subtle indicator of doneness. When the smell turns sweet and caramelized, the cake is almost done. A lingering raw batter scent means you need more time. Trust your nose – it’s a seasoned judge.
The 5‑Minute Rest That Changes Everything
After removing the cake from the oven, let it rest on the pan for 5 minutes before transferring. This pause allows the cake to set, preventing it from breaking apart when you move it. It’s a quick step that saves a lot of frustration later.
The Whipped‑Cream Trick
Whipped cream can be stiff or runny. For a firm frosting, add a pinch of powdered sugar and whip until stiff peaks form. If you prefer a lighter texture, beat the cream until glossy but not stiff. The right consistency keeps the cake from becoming soggy.
Layering Order Matters
Start with the fruit layer at the bottom. This prevents the strawberry puree from soaking into the other layers, keeping each distinct. If you reverse the order, the chocolate may become overly sweet, and the vanilla will lose its delicate flavor.
Cooling Time Is Key
Never rush the cooling process. Let the layers cool completely before applying frosting. A warm cake will melt the whipped cream, creating a mess. Patience ensures a pristine finish.
Creative Twists and Variations
This recipe is a playground. Here are some of my favorite ways to switch things up:
Almond Joy Twist
Swap the vanilla layer with almond‑flavored batter and add shredded coconut to the chocolate layer. The result is a tropical delight that feels like a dessert sandwich. The almond flavor pairs well with the cocoa, while the coconut adds a chewy texture.
Minty Fresh Variation
Add a teaspoon of peppermint extract to the chocolate batter for a refreshing mint kick. The minty chocolate pairs perfectly with the strawberry layer, creating a balanced flavor profile that’s ideal for spring.
Dark Chocolate Lover’s Edition
Replace the cocoa powder with dark chocolate chips melted into the batter. The chocolate layer becomes richer, almost like a fudgy brownie. This variation is great for those who prefer a deeper chocolate taste.
Citrus Burst
Add a tablespoon of orange zest to the vanilla batter and a splash of lemon juice to the strawberry puree. The citrus brightens the cake, adding a zesty punch that lifts the sweetness. The layers will have a fresh, lively aroma.
Nutty Surprise
Incorporate chopped walnuts into the chocolate batter. The nuts add a delightful crunch and nutty flavor that complements the chocolate’s richness. The walnut pieces also provide a visual contrast when sliced.
Vegan Version
Use a plant‑based butter substitute, flax eggs, and oat milk. Replace whipped cream with coconut cream whipped to peaks. The cake stays moist, and the vegan frosting is light and airy, making the cake suitable for all dietary preferences.
Storing and Bringing It Back to Life
Fridge Storage
Wrap the assembled cake in parchment paper and then in plastic wrap. Store in the refrigerator for up to 5 days. The cold environment preserves the cake’s moisture and keeps the whipped cream fresh. When ready to serve, let it sit at room temperature for 20 minutes to soften slightly.
Freezer Friendly
Place the cake in a freezer‑safe container, ensuring it’s fully cooled. Freeze for up to 3 months. When thawing, let it sit in the fridge overnight, then bring to room temperature for an hour. The cake will regain its original texture, and the frosting will soften just enough for slicing.
Best Reheating Method
If you need to warm the cake slightly, wrap it in foil and heat in a preheated 300°F (150°C) oven for 5 minutes. The heat will revive the cake’s moisture without drying it out. Add a tiny splash of water to the foil to create steam, which helps keep the cake moist.