I still remember the first time I attempted to make a runza casserole. It was one of those grey February afternoons where the sky looked like an old dish towel, and I was craving something that tasted like Nebraska in a bowl—hearty, nostalgic, and just a little bit rebellious. I had torn through half the internet, convinced I’d find a recipe that captured the pillowy cabbage rolls my grandma used to smuggle out of her church-basement potluck, but every version I tried tasted like a bland hot-dish that had given up on life. So I did what any rational food-obsessed person would do: I bought a six-pack of crescent roll dough, cranked my oven to 375°F, and dared myself to build something better. By the time the sun set, my kitchen smelled like buttered onions and sizzling beef, and I had devoured so many test bites that dinner was basically unnecessary. I’ll be honest — I ate half the batch before anyone else got to try it, and I have zero regrets.
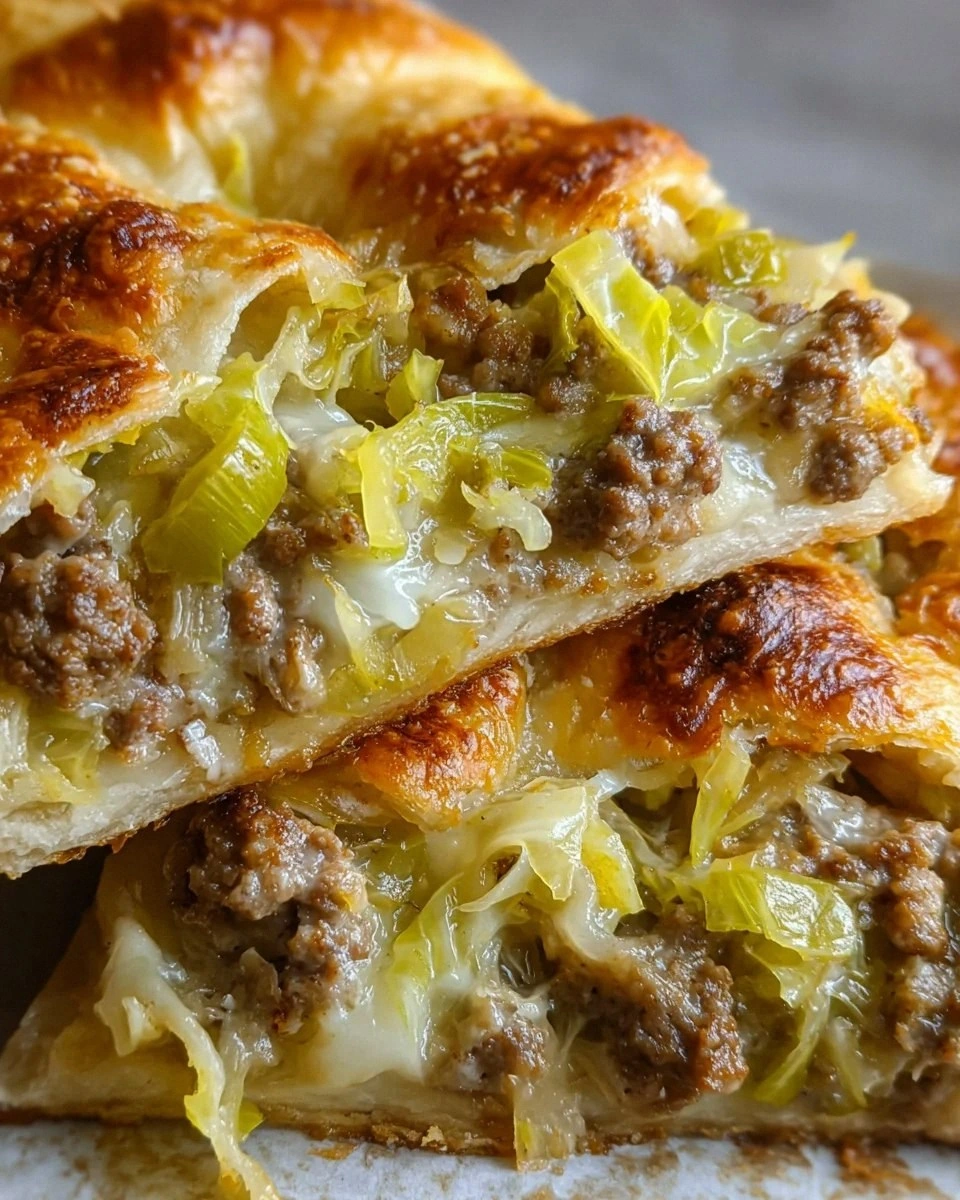
Picture yourself pulling this out of the oven, the whole kitchen smelling incredible, the cheese bubbling like a golden lava field and the crescent crust flaking into buttery shards that shatter like thin ice under your fork. That first bite is a time machine: the savory depth of perfectly browned ground beef, the sweet whisper of cabbage that’s relaxed into silky submission, and the mozzarella that stretches just far enough to make you feel like a culinary rock star. Most recipes get this completely wrong by treating the dough like an afterthought or drowning the filling in canned soup. Here, the dough is the buttery envelope that cradles the filling, the cabbage is sautéed until it develops those gorgeous caramelized edges, and the layering is strategic so every slice holds together like a dream. If you’ve ever struggled with soggy bottoms or flavorless fillings, you’re not alone — and I’ve got the fix.
This is hands-down the best version you’ll ever make at home because it respects the spirit of the Midwestern runza while flirting with casserole convenience. We’re talking about a dish that feeds a crowd, reheats like a champ for Monday-night football, and freezes so well you’ll thank yourself on those evenings when even ordering take-out feels like effort. Okay, ready for the game-changer? We’re going to brown the beef until it sings in its own fat, deglaze the pan with nothing but the moisture from the cabbage, and season in layers so every bite tastes intentional. Stay with me here — this is worth it. Let me walk you through every single step — by the end, you’ll wonder how you ever made it any other way.
What Makes This Version Stand Out
- Flavor Bomb: Instead of dumping everything together, we build flavor in stages—first the beef, then the onions, then the cabbage—so every forkful tastes like it was crafted by someone who actually cares.
- Texture Play: Crispy crescent edges meet melty mozzarella and tender-crisp cabbage, giving you that crave-worthy contrast most casseroles only dream about.
- Weeknight Friendly: From fridge to table in 45 minutes, with pantry staples you probably already have and only one skillet plus a baking dish to wash.
- Nebraska Nod: It keeps the soul of the classic runza—beef, cabbage, onion, dough—but flattens it into shareable squares so nobody has to fight over who got the bigger roll.
- Make-Ahead Magic: Assemble it the night before, cover tight, and bake straight from the fridge tomorrow; the flavors mingle like old friends at a reunion.
- Crowd Reaction: I dare you to taste this and not go back for seconds; every time I serve it someone asks for the recipe before the casserole even cools.
- Ingredient Quality: We skip the canned soups and pre-shredded mystery cheese—real butter, real beef, real cabbage, real love.
- Leftover Glow-Up: Next-day squares reheat into something almost better than fresh, with the crust absorbing just enough juices to turn almost croissant-like.
Alright, let's break down exactly what goes into this masterpiece...
Inside the Ingredient List
The Flavor Base
Ground beef is the savory star, and you want 85% lean so you get enough fat to brown the meat properly without swimming in grease. If you go leaner, the pan will be dry and the fond (those gorgeous brown bits) won't develop; go fattier and you'll need to drain, which means draining flavor. I’m a sucker for grass-fed chuck—it tastes beefier, like the difference between a vinyl record and a streaming track. You can swap in ground turkey if you must, but add a tablespoon of olive oil to compensate for the lost fat; plant-based crumbles work too, but sauté them only until heated through or they turn rubbery like an old bicycle tire.
The Texture Crew
Green cabbage brings the crunch that balances all that richness, and when you shred it thinly it wilts quickly while keeping a little backbone. Skip the bagged coleslaw mix; it’s often cut too chunky and can taste like refrigerator. Yellow onion, chopped fine, practically melts into the beef and leaves behind a mellow sweetness that raw onion never gives. Butter is your best friend here—just two tablespoons coax the onions into caramel submission and create a glossy coat that makes the filling look like it belongs on a magazine cover.
The Unexpected Star
Refrigerated crescent roll dough is the cheat code that makes this doable on a Tuesday night. It puffs into flaky layers that taste like you spent the day laminating butter into homemade dough. When you press it into the baking dish, seal the perforations by pinching so the filling stays put. Some folks swear by puff pastry, but crescents have a slightly sweet note that plays beautifully with savory beef, like a secret handshake between dinner and dessert.
The Final Flourish
Shredded mozzarella is the melty blanket that pulls everything together, but don’t stop there—season boldly with kosher salt and freshly ground black pepper at every layer. Salt amplifies the beefiness, pepper gives a gentle kick, and together they make the cabbage taste like it graduated summa cum laude from flavor university. Taste as you go; under-seasoned filling is the culinary equivalent of a joke without a punchline.
Everything's prepped? Good. Let's get into the real action...
The Method — Step by Step
- Preheat your oven to 375°F and position a rack in the center. While the oven wakes up, melt the butter in a heavy 12-inch skillet over medium-high heat. When the foaming subsides—this next part? Pure magic—scatter in the chopped onions and listen for that gentle sizzle. Stir just enough to coat every strand in butter, then back off and let them sit for a solid two minutes so the edges turn translucent and sweet. Your kitchen should start smelling like the best diner in town.
- Crumble in the ground beef, using the edge of a stiff spatula to break it into pebble-sized pieces. Let it sit undisturbed for a full minute so the bottom browns; that’s where the umami lives. Now stir occasionally until only a blush of pink remains. Tilt the pan—if you see more than a tablespoon of fat, spoon it off, but leave a glossy sheen because dry beef is sad beef.
- Okay, now watch this part closely: mound the shredded cabbage on top like a green volcano and don’t stir yet. Cover the skillet for three minutes so the steam wilts the cabbage. Remove the lid, season with a generous pinch of kosher salt and several cracks of black pepper, and fold everything together. The cabbage will shrink dramatically and pick up the beefy fond—this is the moment the filling goes from meh to magnificent.
- Reduce the heat to low and let the mixture simmer for five minutes, stirring once halfway. You want the cabbage tender but still sporting a little backbone, like a good friend who tells you when you’ve got spinach in your teeth. Taste and adjust seasoning; it should make you close your eyes involuntarily.
- Meanwhile, unroll the crescent dough and press it into a 9×13-inch baking dish, sealing perforations by pinching them together like you’re mending a tiny sidewalk. Let a little dough ride up the sides to form a rustic rim; think of it as the shoreline to your savory sea.
- Spoon the beef-cabbage mixture onto the dough and spread it into an even layer, right to the edges. The filling should still be steamy—this jump-starts the bottom crust so it cooks through rather than staying gummy. Sprinkle the shredded mozzarella evenly, all the way to the corners so nobody gets a naked bite.
- And now the fun part: top with a second layer of crescent dough, again sealing seams. Tuck the edges like you’re tucking in a toddler—snug but not tight. Cut three small slits so steam can escape; these vents prevent the top from ballooning into a doughy balloon animal.
- Bake for 22–25 minutes, rotating halfway, until the crust is deep golden and the cheese is bubbling up through the vents like a giddy hot spring. If the edges brown too fast, tent loosely with foil. Cool for five minutes—yes, you can wait—then slice into six generous squares. The bottom crust should release cleanly, and the cheese should stretch into Instagram-worthy strands.
That's it—you did it. But hold on, I've got a few more tricks that'll take this to another level...
Insider Tricks for Flawless Results
The Temperature Rule Nobody Follows
Most people yank the casserole when the top looks done, but the real test is the bottom crust. Slip a thin spatula under a corner; it should feel crisp, not doughy. If it’s pale and soft, lower the rack and bake five more minutes. A friend tried skipping this step once—let’s just say it didn’t end well, and we ended up calling it “deconstructed runza soup.”
Why Your Nose Knows Best
Trust your sense of smell. When the buttery aroma shifts from “raw dough” to “toasted croissant,” you’re within two minutes of perfection. That nutty scent means the milk solids in the butter are browning, adding a depth no timer can calculate.
The 5-Minute Rest That Changes Everything
Resist the urge to cut immediately. A short rest lets the molten cheese relax so your squares hold their shape instead of oozing like a tragic lava cake. Cover loosely with foil to keep warm; five minutes is the sweet spot between food-safety paranoia and fork-flinging impatience.
Season in Layers, Not All at Once
Salt the onions when they’re translucent, the beef when it’s half-cooked, and the cabbage after it wilts. Each ingredient grabs just enough seasoning to taste like itself, rather than a salty monolith. Think of it as giving each player a solo before the whole band joins in.
The Cheese Blend Upgrade
Swap one-third of the mozzarella for sharp white cheddar for a nuttier finish, or add a handful of grated Gruyère for French-onion vibes. Just keep the total quantity the same so you don’t flood the crust.
Creative Twists and Variations
This recipe is a playground. Here are some of my favorite ways to switch things up:
Spicy Southwest Runza
Add a diced jalapeño to the onions and swap the mozzarella for pepper jack. Stir a teaspoon of smoked paprika into the beef and finish with fresh cilantro. The heat sneaks up like a playful kitten—present but not overwhelming.
Mushroom & Swiss Forest Edition
Replace half the beef with finely chopped cremini mushrooms sautéed until they give up their juice. Use Swiss cheese on top and a sprinkle of thyme. It tastes like a cozy cabin in casserole form.
Breakfast-for-Dinner Runza
Fold in a cup of browned breakfast sausage and a handful of shredded hash browns. Crack four eggs over the top during the last ten minutes of baking for runny yolks that act like built-in sauce. Brinner has never been this exciting.
Bacon & Beer Luxury
Render three strips of bacon first, use the fat instead of butter, and deglaze the pan with a splash of amber beer. Top with smoked gouda and crumbled bacon bits. It’s basically a sports bar in a baking dish.
Vegetarian Harvest
Skip the meat entirely and double the cabbage, adding grated carrot and a cup of cooked lentils seasoned with soy sauce and a whisper of fennel seed. The lentils give heft while the fennel nods to Italian sausage without the pork.
Mini Handhelds
Press crescent dough into muffin tins, fill, and top with a smaller circle of dough to make individual runza pockets. Perfect for game-day buffets and kid-approved lunchboxes.
Storing and Bringing It Back to Life
Fridge Storage
Cool completely, then refrigerate in an airtight container for up to four days. For best texture, cut into squares first so cold air doesn’t trap steam and sog the crust. Place parchment between layers if you stack them.
Freezer Friendly
Wrap individual squares in plastic wrap, then foil, and freeze up to two months. Label with the date—future you will appreciate not playing frozen-mystery-casserole roulette. Thaw overnight in the fridge before reheating.
Best Reheating Method
Revive squares in a 350°F oven for 12 minutes, adding a tiny splash of water on the pan to create steam that revives the crust. Microwaves work in a pinch, but they turn the dough chewy; if you must, cover with a damp paper towel and heat at 70% power for 90 seconds.