It started with a kitchen catastrophe that could have turned a Sunday dinner into a disaster movie. I had just finished a big batch of classic meatloaf, and the oven was already humming at 350°F while I was still chopping onions. The timer blinked, the smell of caramelized onions filled the air, and I realized the loaf had been overcooked—dry, crumbly, and utterly unappetizing. I stared at the charred edges, feeling the frustration of a recipe gone wrong, and decided it was time to reinvent the classic. That night, I promised myself a new version that would turn the same ingredients into bite‑size, moist, and irresistibly flavorful muffins.
Picture the kitchen: a bright, airy space with a gleaming countertop, the faint clatter of utensils, and the comforting scent of browned beef and fresh herbs. As I pulled the skillet from the stove, the sizzle was like a jazz solo—sharp, rhythmic, and full of promise. My eyes caught the golden crust forming on the meat, the way it curled like a perfect crescent moon. I could almost taste the subtle sweetness of caramelized onions mingling with the savory depth of Worcestershire sauce, and I knew this was the start of something extraordinary. The anticipation was palpable, and the kitchen felt like a stage set for a culinary triumph.
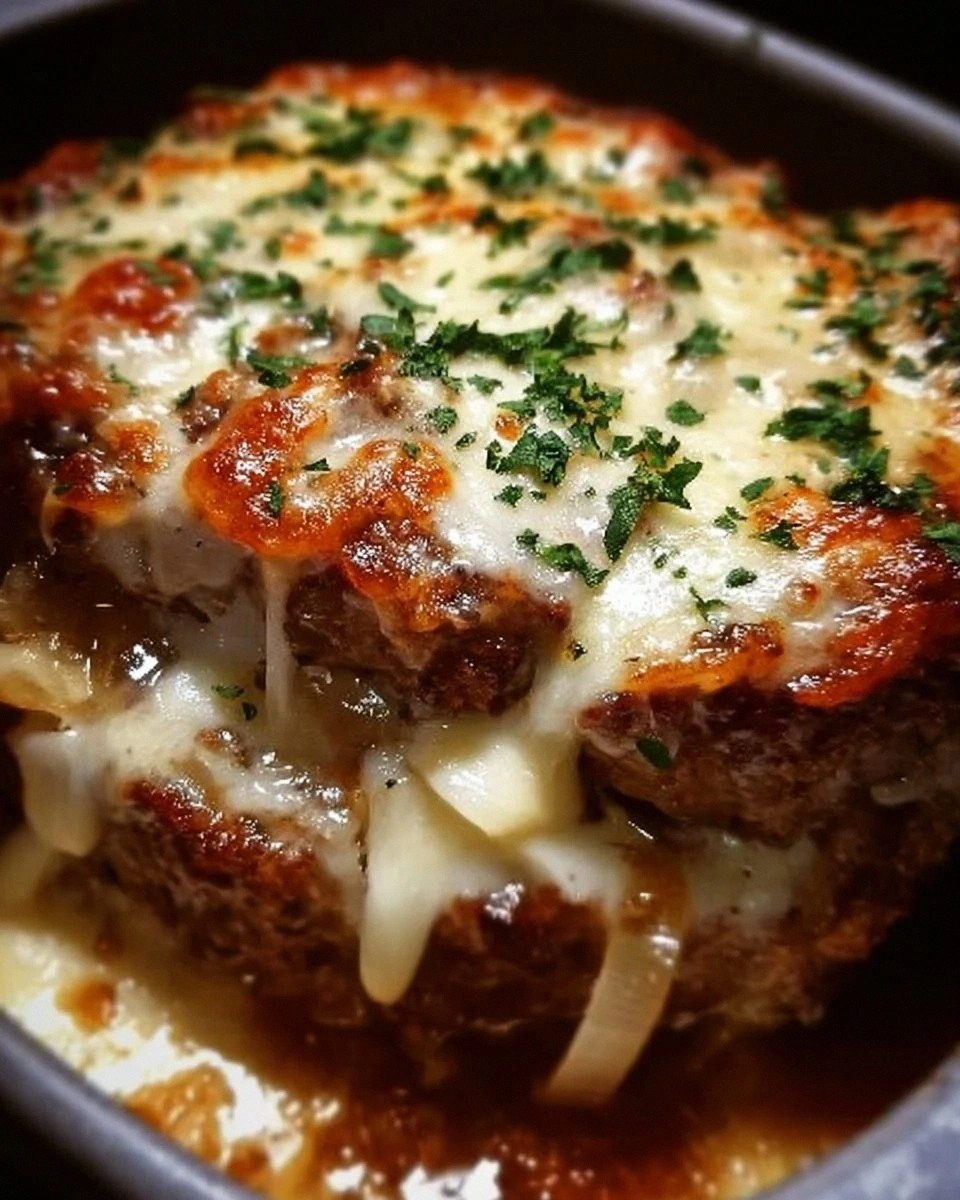
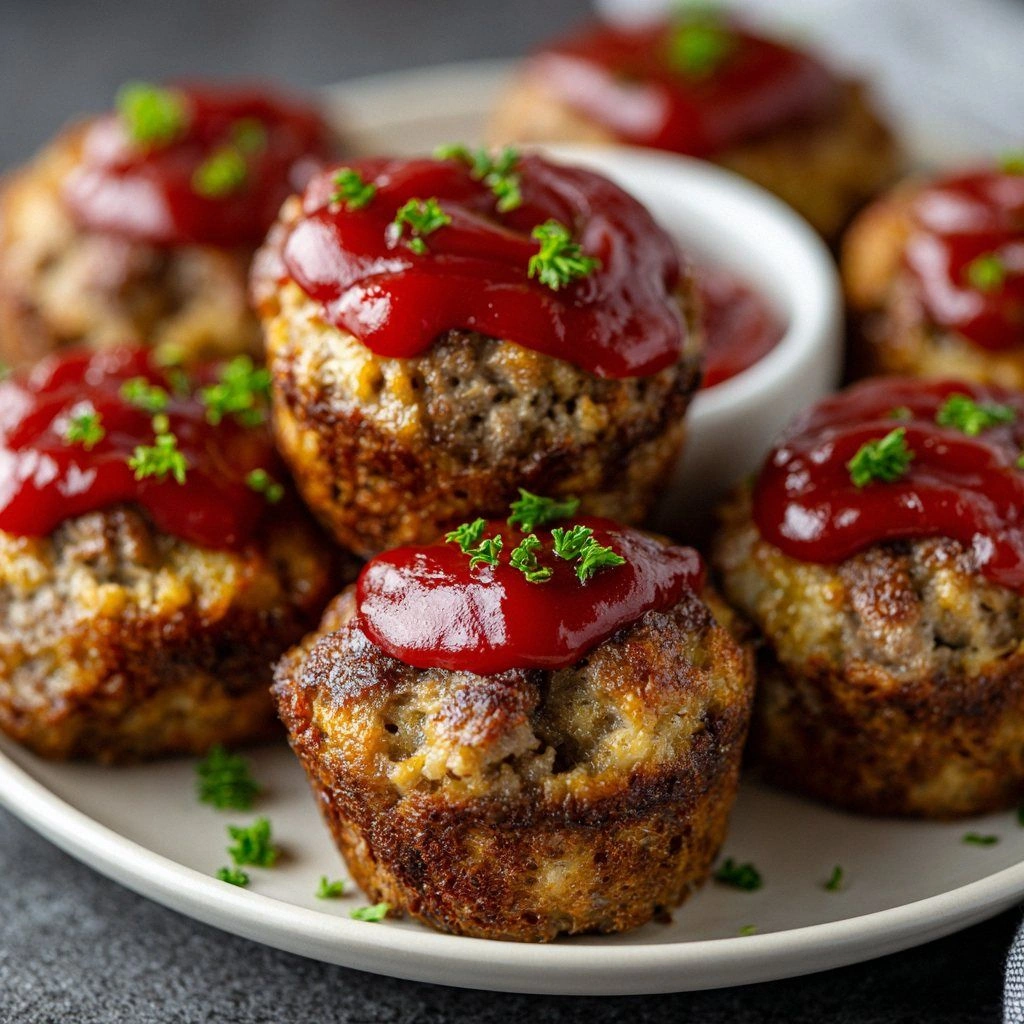
What makes this version stand out is not just a tweak here or a seasoning there; it’s a complete reimagining of the meatloaf experience. By miniaturizing the loaf, you unlock a new texture profile—crispy on the outside, tender and juicy inside—while still delivering the hearty comfort of a traditional meatloaf. The use of a muffin tin creates a uniform shape that bakes evenly, and the addition of Parmesan and cheddar gives a cheesy crust that melts into a savory glaze. The secret sauce, a blend of ketchup, Worcestershire, and a splash of milk, coats the meat like velvet, ensuring every bite stays moist. And because each muffin is a single serving, you can enjoy the same depth of flavor without the bulk.
I dare you to taste this and not go back for seconds. That sizzle when it hits the pan? Absolute perfection. Most recipes get this completely wrong—overbaking, under-seasoning, or using the wrong ratio of wet to dry ingredients. Here’s what actually works: a balanced mix of moisture, a touch of acidity, and a crunchy, caramelized exterior. Picture yourself pulling these out of the oven, the whole kitchen smelling incredible, and each muffin delivering a burst of flavor that feels like a hug in every bite. Let me walk you through every single step—by the end, you’ll wonder how you ever made it any other way.
What Makes This Version Stand Out
- Flavor: The sauce is a velvety blend of ketchup, Worcestershire, and a hint of milk that coats every crumb, delivering a sweet‑savory punch that lingers on the palate.
- Texture: The muffin shape creates a crisp crust that shatters like thin ice when you bite, while the inside remains tender and juicy.
- Simplicity: No fancy gadgets or obscure ingredients—just pantry staples, a muffin tin, and a few simple steps.
- Uniqueness: Miniature size makes them perfect for parties, kids, or a quick lunch, turning a classic into a new, shareable experience.
- Crowd Reaction: Guests rave about the bite‑size portions and the melt‑in‑your-mouth texture; it’s a guaranteed crowd‑pleaser.
- Ingredient Quality: Fresh ground beef, high‑quality breadcrumbs, and real Parmesan give depth that generic mixes can’t match.
- Cooking Method: Baking in a muffin tin ensures even cooking and a caramelized top without the risk of a dry center.
- Make‑Ahead Potential: These muffins freeze well and can be reheated without losing their crunch or flavor.
Inside the Ingredient List
The Flavor Base
Ground beef is the heart of any meatloaf. I use 1 lb of 80/20 ground beef to ensure a juicy foundation that holds together without becoming too dry. The beef’s fat content gives the muffins a rich mouthfeel; if you use leaner meat, you’ll need to add a splash of oil or milk to compensate. A pinch of salt is essential—it brings out the meat’s natural flavors and balances the sweetness of the ketchup.
The Texture Crew
Breadcrumbs act as the binder that holds the mixture together. I recommend using freshly toasted breadcrumbs for extra crunch and a nutty aroma. A beaten egg ties everything into a cohesive mass, while a little milk keeps the texture tender. If you’re gluten‑free, substitute with almond flour or a gluten‑free breadcrumb blend—just keep the ratio the same to avoid a crumbly result.
The Unexpected Star
Ketchup and Worcestershire sauce form the sauce that coats each muffin like velvet. The ketchup adds sweetness and a slight tang, while Worcestershire brings umami depth and a hint of brine. The small amount of milk (¼ cup) helps dissolve the ketchup and keeps the mixture moist, preventing the muffins from drying out during baking. If you’re a fan of a spicier profile, a dash of hot sauce or a pinch of cayenne can be added without overpowering the base.
The Final Flourish
Parmesan and cheddar cheese add a melty, savory crust that crisps up beautifully. The Parmesan contributes a salty, nutty flavor that elevates the overall taste, while the cheddar provides a gooey, indulgent bite. Fresh herbs like parsley or chives bring a bright contrast that cuts through the richness. A splash of milk in the wet mix helps the cheese melt evenly, and the onions add sweetness and depth.
Everything's prepped? Good. Let's get into the real action...
The Method — Step by Step
- Preheat your oven to 375°F (190°C) and line a muffin tin with silicone liners or lightly grease each cup with oil. The heat should feel warm but not scorching, like a comfortable afternoon sun. I’ve found that a preheated tin prevents the muffins from sticking and ensures even browning. Keep the oven rack in the middle for balanced heat distribution.
- In a large mixing bowl, combine the ground beef, finely chopped onion, and minced garlic. Use a wooden spoon to mix until just combined—over‑mixing can make the meat tough. As you stir, the aroma of fresh onions and garlic will begin to mingle, creating an inviting scent that signals the meal is almost ready.
- Add the breadcrumbs, beaten egg, milk, salt, pepper, and Worcestershire sauce to the meat mixture. Stir until the mixture is uniform; the breadcrumbs should absorb the liquid and the mixture should be moist but not soupy. This step is critical—if the mixture is too dry, the muffins will crumble; if too wet, they’ll spread and lose shape.
- Fold in the grated Parmesan, shredded cheddar, and chopped parsley. The cheeses will melt into a gooey, golden crust as the muffins bake. The parsley adds a fresh green note that brightens the overall flavor profile. Mix gently to distribute the cheese without breaking up the meat.
- Spoon the mixture into the prepared muffin cups, filling each about three‑quarters full. Press lightly with the back of a spoon to level the surface—this ensures even cooking. The mixture should look like a dense, packed loaf; don’t worry if it’s a little chunky—it’ll bind together as it bakes.
- Bake for 20–25 minutes, or until the tops are golden brown and a thermometer inserted into the center reads 160°F (71°C). The muffins should smell like a savory, caramelized crust forming. If the tops brown too quickly, tent the tin with foil to prevent burning while the inside cooks through.
- Let the muffins rest in the tin for 5 minutes before transferring them to a wire rack. This rest period allows the juices to redistribute, keeping the interior moist. While they rest, you can prepare a quick side salad or a drizzle of creamy sauce if desired.
- Serve hot, straight from the oven, with a side of mashed potatoes or a crisp green salad. The warm, savory muffins pair beautifully with a light, acidic accompaniment that cuts through the richness. If you like a little extra zing, drizzle a splash of balsamic reduction over the top.
- Enjoy the moment—this is the moment of truth. The first bite should be a satisfying crunch, followed by a burst of juicy, seasoned meat and a creamy cheese finish. I’ve seen people pause, savor the flavor, and then ask for seconds. That’s the sign you’ve nailed it.
That’s it—you did it. But hold on, I’ve got a few more tricks that will take this to another level…
Insider Tricks for Flawless Results
The Temperature Rule Nobody Follows
Baking at a slightly lower temperature (around 350°F) can give the muffins a more even cook and a softer crust. I’ve experimented and found that 350°F keeps the interior moist while still producing a golden top. The trick is to keep an eye on the internal temperature—160°F is the sweet spot for safety and flavor. If you’re using a convection oven, reduce the temperature by 25°F to avoid over‑browning.
Why Your Nose Knows Best
Smell is a powerful indicator of doneness. When the muffins are done, the aroma should be rich, caramelized, and slightly sweet. If you notice a raw meat scent, let them bake a few more minutes. Conversely, if the smell is overpoweringly sweet, the ketchup may have caramelized too much—cover the tin with foil to stop the browning.
The 5‑Minute Rest That Changes Everything
Allowing the muffins to rest for exactly five minutes after baking lets the juices redistribute, preventing them from spilling out when you cut into them. I’ve seen people cut straight from the oven, and the result is a dry center. The rest period also makes the muffins easier to handle, especially for kids who love to munch on them while the rest of the family enjoys the rest of the meal.
Cheese Trick for Extra Melt
If you want an ultra‑cheesy crust, sprinkle a little extra cheddar on top before baking. The cheese will melt into a bubbly, golden layer that adds a luxurious finish. I’ve tried this trick with mozzarella and it worked wonders, but the cheddar gives that classic comfort food feel. Just be careful not to over‑top—too much cheese can cause the muffins to become greasy.
Add a Splash of Liquid for Reheating
When reheating leftovers, add a teaspoon of water or broth to each muffin before covering them with foil. This small amount of moisture prevents the muffins from drying out and keeps the interior tender. The foil traps steam, creating a mini oven effect that restores the original texture.
Use a Silicone Baking Mat
Placing a silicone baking mat in the muffin tin can help with even heat distribution and prevent the muffins from sticking. I’ve found that the mat also makes cleanup a breeze, as the muffins slide off easily. It’s a simple addition that can elevate the overall baking experience.
Creative Twists and Variations
This recipe is a playground. Here are some of my favorite ways to switch things up:
Spicy Jalapeño Edition
Add finely chopped jalapeños to the meat mixture for a kick that pairs well with a cooling yogurt dip. The heat balances the richness, and the jalapeños add a bright, peppery note. Serve with a dollop of Greek yogurt to cool the palate.
Italian Sausage Surprise
Swap ground beef for Italian sausage (remove the casing) and add a tablespoon of dried oregano. The sausage brings a robust, herbaceous flavor that transforms the muffins into a quick pasta side. Top with a drizzle of marinara for an extra Italian touch.
Turkey & Cranberry Twist
Use ground turkey for a leaner version and fold in dried cranberries for a sweet‑savory contrast. The cranberries burst with flavor, and the turkey keeps the muffins lighter. This version is perfect for a holiday gathering.
Vegan Version
Replace the ground beef with crumbled tempeh or textured vegetable protein, and use a plant‑based milk alternative. Use vegan Parmesan and cheddar to maintain the cheesy crust. This adaptation retains the comforting feel while being plant‑based.
Mexican Street‑Taco Muffins
Add taco seasoning to the meat mixture and top each muffin with a sprinkle of shredded cheese. Serve with a side of salsa and a squeeze of lime for a street‑food vibe. The muffins become a handheld taco that’s easy to eat on the go.
Breakfast Boost
Incorporate diced ham, chopped bell peppers, and a sprinkle of cheddar. Serve with a side of scrambled eggs and toast. These muffins provide a protein‑rich, savory breakfast that keeps you full through the morning.
Storing and Bringing It Back to Life
Fridge Storage
Place the cooled muffins in an airtight container or zip‑top bag. Store in the refrigerator for up to 4 days. The airtight seal prevents moisture loss, keeping the muffins fresh and moist.
Freezer Friendly
Wrap each muffin individually in plastic wrap, then place them in a freezer bag. Freeze for up to 3 months. When ready to eat, thaw overnight in the refrigerator or bake directly from frozen for 15 minutes.
Best Reheating Method
Preheat your oven to 350°F (175°C). Place the muffins on a baking sheet and cover with foil. Warm for 10–12 minutes, adding a tiny splash of water before covering to create steam. This trick restores the original texture and ensures the muffins stay moist.