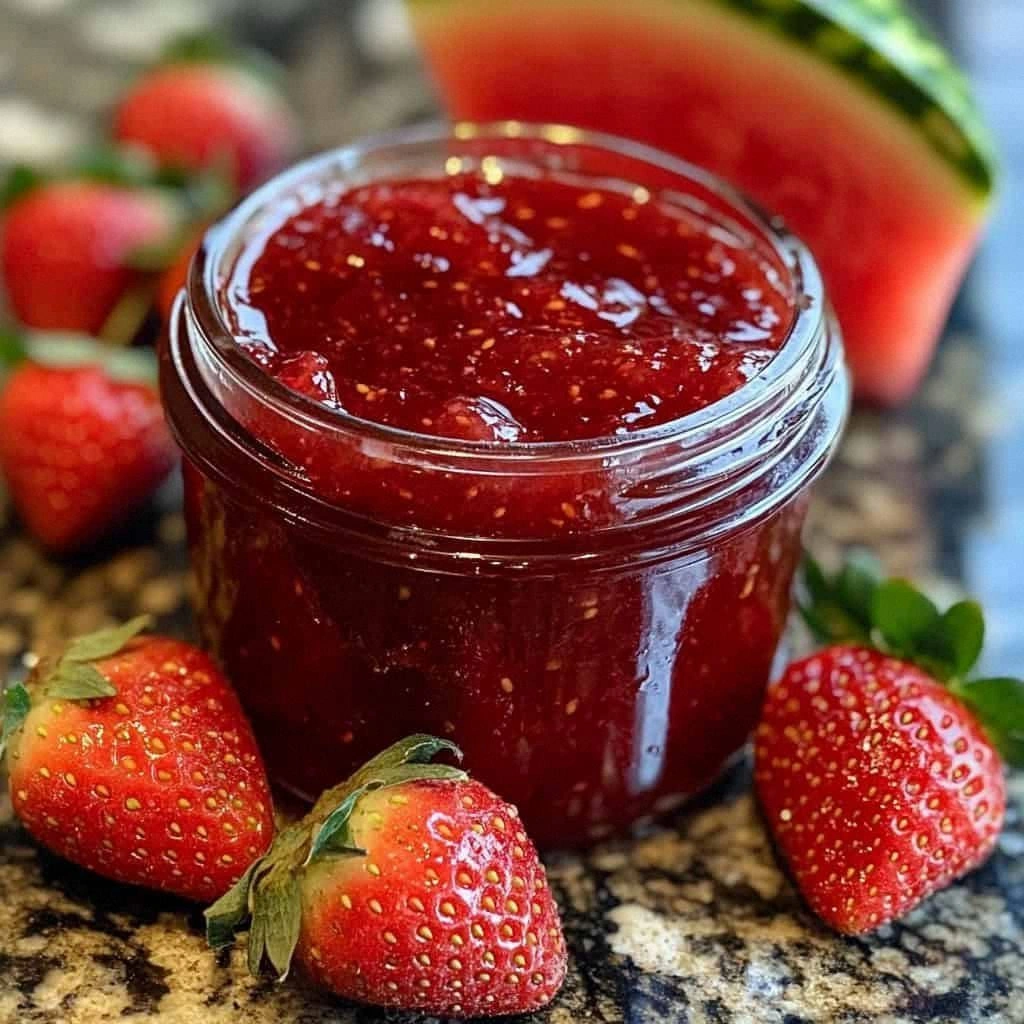
Last Tuesday, I stood in my kitchen at 2:17 a.m., spoon in hand, contemplating the ethics of eating the entire fourth jar of jam before sunrise. The house was quiet except for the gentle pop of canning lids sealing—a sound that still makes me feel like I've got my life together even when I'm wearing mismatched socks and a T-shirt with a hole the size of a watermelon slice. Strawberry Watermelon Jam had happened, and it was so good it should probably be illegal in at least three states. I blame my grandmother for this obsession; she once told me the best recipes happen when you break the rules, and apparently, I took that as permission to throw watermelon into strawberry jam like some kind of fruit renegade.
Picture this: summer's sweetest strawberries doing the tango with watermelon's subtle perfume, creating a spread that tastes like cannonballing into a pool while holding a strawberry shortcake. The first time I made this, my neighbor barged in, demanding to know why my kitchen smelled like "childhood and sunshine had a baby." That's the magic here—this isn't just jam, it's a time machine that transports you to July even when it's raining sideways in October. The color alone should win awards: a ruby-pink so vibrant it makes rubies look dull.
Most recipes get this completely wrong by treating watermelon like some kind of watered-down afterthought. They cook it into oblivion until it tastes like sad fruit leather. Here's what actually works: we treat watermelon like the delicate diva it is, adding it at precisely the right moment so it keeps that fresh, almost floral note that makes people close their eyes and say "wow" without realizing they're doing it. The strawberry brings the depth, the complexity, the "I've been aging like a fine wine" attitude, while watermelon contributes this ethereal lightness that prevents the whole thing from becoming jam-clubbed-to-death sweetness.
Let me walk you through every single step—by the end, you'll wonder how you ever made it any other way. Fair warning: once you taste this, store-bought jam will taste like someone mixed fruit with disappointment and added extra sugar to hide the shame.
What Makes This Version Stand Out
- Taste Explosion: This isn't your grandma's jam (unless your grandma was a fruit whisperer who understood that watermelon brings this subtle honey-melon note that makes strawberries taste more like themselves). The combination creates a third flavor that's neither strawberry nor watermelon but something entirely new—like they had a beautiful baby that inherited the best traits from both parents.
- Texture Perfection: Most fruit jams are either too chunky (hello, fruit salad pretending to be spreadable) or cooked so long they become fruit leather. We hit that sweet spot where you get tender strawberry pieces suspended in watermelon-kissed gel that's firm enough to hold its shape but soft enough to spread on warm toast without tearing holes in your bread like some kind of breakfast vandal.
- Simplicity Wins: No fancy equipment, no ingredients you need to special order from a monastery in the Alps. If you've got a pot, a spoon, and the ability to read a candy thermometer without having an existential crisis, you can make this. I've taught this recipe to people who burn water, and they still nailed it.
- Unique Factor: Bring this to a potluck and watch people's brains short-circuit. "Is that... watermelon in jam form?" they'll ask, eyes wide with wonder. You'll become that friend who makes mysterious delicious things, and honestly, that's a pretty great reputation to have.
- Crowd Reaction: I've seen grown adults fight over the last jar of this stuff like it contains the secret to eternal youth. My cousin tried to trade me her firstborn for a case (I considered it). Kids love it because it's pink and sweet; adults love it because it tastes like summer bottled up for winter emergencies.
- Ingredient Quality: This recipe celebrates produce at its peak. When strawberries are cheap and watermelon is practically free at roadside stands, that's your jam-making window. The fruit quality matters more than any fancy technique—great fruit makes great jam, period.
- Cooking Method: We use a technique I call "respectful cooking"—treating each fruit according to its personality. Strawberries get the long, slow treatment to develop deep flavor. Watermelon jumps in at the end like a rockstar making a surprise appearance, keeping its fresh character intact.
- Make-Ahead Magic: This jam ages like George Clooney—getting better, deeper, more interesting with time. Make it now, enjoy it through winter. Or make it for gifts and become the person whose presents people actually want to receive instead of regifting.
Inside the Ingredient List
The Flavor Base
Strawberries aren't just strawberries here—they're the backbone, the foundation, the reason this jam tastes like it was kissed by summer itself. You want berries that smell like candy and have that deep red color that goes all the way through. White-centered strawberries are traitors that will betray you with blandness. Buy them when they're affordable enough that you won't cry if you eat half while "tasting for quality control." The natural pectin in strawberries helps with setting, but more importantly, they bring this complex berry flavor that develops beautifully when cooked slowly.
Watermelon selection is where most people panic and grab whatever's closest to the checkout line. Don't be that person. Look for a creamy yellow field spot (that's where it sat ripening in the sun), a dull rather than shiny rind, and when you thump it, the sound should be deep and hollow, not high-pitched. A good watermelon sounds like a drum—this is science, not produce poetry. Seedless is easier but seeded often has better flavor if you're willing to play fruit dentist for twenty minutes.
The Sweetness Squad
Granulated sugar isn't just here for sweetness—it's the structural engineer keeping your jam from becoming fruit soup. Sugar binds with the natural pectins and fruit acids to create that gel network that makes jam spreadable instead of pourable. I've tried reducing sugar in this recipe exactly once, and the result was strawberry watermelon ice cream topping that ran off toast like it was late for a meeting. Respect the sugar ratio; it's been perfected by people with more jam experience than you or I will ever accumulate.
Lemon juice brightens everything like a tiny citrus-shaped lightbulb. It balances the sweetness, enhances the fruit flavors, and provides the acid necessary for proper pectin activation. Use bottled lemon juice here—it's consistent in acidity, which matters when you're preserving. Fresh lemon juice varies too much and could leave you with runny jam that mocks you from the refrigerator shelf.
The Unexpected Star
Liquid pectin is your insurance policy against jam failure. Sure, you could cook this down until the water content evaporates and hope for the best, but you'd end up with strawberry watermelon leather that could sole shoes. Liquid pectin goes in at the end, after the fruit has developed its flavor, creating a perfect set without overcooking your precious fruit. It's like having a jam fairy godmother who guarantees your happily-ever-after spreadability.
The Final Flourish
Butter gets a bad rap in jam making, but a tiny pat (I'm talking half a teaspoon) stirred in at the end prevents that foamy scum that makes your jam look like it's trying to grow a beard. This isn't about flavor—it's about appearance. Skim if you must, but the butter trick works every time and nobody needs to know you cheated.
The Method — Step by Step
- Start with your strawberries—hull them like you're performing tiny fruit surgery, removing every bit of white core that tastes like disappointment and regret. Quarter them into pieces about the size of your thumbnail; they'll break down during cooking but you want some texture remaining. Place them in your widest, heaviest pot (wider surface area equals faster evaporation equals better jam), and mash about a third of them with a potato masher. This releases juice to prevent burning while leaving enough whole pieces for that desirable chunky texture. Your kitchen should already smell like a strawberry field at sunrise.
- Add the sugar and lemon juice to the strawberries, stirring like you're gently waking someone from a nap. Let this mixture sit for at least 15 minutes—30 is better if you can wait that long without eating half the strawberries. This maceration does magical things: it draws juice from the berries, starts dissolving the sugar, and begins the marriage of flavors that makes this jam taste like it was made by someone who knows secrets. During this time, you can cube your watermelon into pieces slightly smaller than dice—think elegant spreadable size, not fruit salad chunks.
- Place your pot over medium heat and bring to a boil that makes you slightly nervous but not panicked. Stir constantly with a wooden spoon (metal spoons get too hot and make your hand sad), scraping the bottom to prevent any berry from committing suicide by burning. When it reaches a rolling boil that continues even while you stir, start timing. Let it boil hard for exactly 8 minutes—set a timer because guessing leads to jam that's either syrup or concrete. The mixture will foam up like a pink cloud, this is normal and beautiful.
- Reduce heat to medium-low and add your watermelon cubes. Here's where timing gets crucial—watermelon is delicate and doesn't appreciate rough treatment. Stir gently, folding rather than stirring vigorously, for about 3 minutes. You want the watermelon heated through and starting to release its juice, but not cooked into mush. Think of it as warming the watermelon, not cooking it. The color will shift from bright red to a deeper ruby, shot through with pink watermelon pieces that look like edible jewels.
- Return to a gentle boil and cook for another 5-7 minutes, stirring more frequently now. You're looking for the moment when the jam sheets from your spoon—when you lift it up, the last drops should cling together and fall off in a unified sheet rather than individual drops. This is called the "sheet test" and it's more reliable than cold plate tests or trying to remember what 220°F looks like when you're half-asleep. If you run your finger through the jam on the spoon, it should leave a clear path that doesn't immediately fill back in.
- Remove from heat and let cool for exactly 2 minutes. This is when you add your liquid pectin, but here's the trick: pour it in a thin stream while stirring constantly. Think of it as whisking in oil for mayonnaise—you want it incorporated, not sitting in blobs. Return to heat and bring back to a boil for 1 minute, stirring the whole time. This activates the pectin without overcooking your fruit. The jam will suddenly look glossier and more cohesive, like it just got back from a spa day.
- Add the butter now if you're using it—just a tiny pat, about the size of a marble. Stir until it disappears, taking any foam with it. Remove from heat and let settle for 5 minutes. This resting period allows the fruit to distribute evenly so your first jar isn't all watermelon while your last jar is pure strawberry. It's like giving everyone a chance to find their seat before the concert starts.
- Ladle into sterilized jars, leaving 1/4 inch headspace. Wipe rims with a clean, damp cloth—any jam on the rim prevents proper sealing and creates a sticky mess that will torment you later. Process in a boiling water bath for 10 minutes if you're canning, or let cool and refrigerate if you're planning to eat it all within three weeks. I dare you to make it last that long. The satisfying "ping" of sealing lids is the sound of summer being captured and held hostage against winter's arrival.
Insider Tricks for Flawless Results
The Temperature Rule Nobody Follows
Here's what separates jam masters from jam disasters: understanding that 220°F is not just a suggestion, it's the law. But here's the twist—don't let it stay there long. Once you hit 220°F, remove from heat immediately. Every extra 30 seconds at this temperature takes you further into caramel territory, where your beautiful fruit becomes sticky taffy that could cement bricks together. I learned this the hard way when I got distracted by a phone call and ended up with strawberry watermelon concrete that required power tools to remove from the jar.
Why Your Nose Knows Best
Trust your sense of smell—it knows when jam is done before any thermometer or timer. When the jam shifts from smelling like fresh fruit to smelling like concentrated fruit essence, you're there. It should fill your kitchen with a scent so intoxicating that neighbors appear at your door with empty jars and hopeful expressions. If it starts smelling like caramel or toffee, you've gone too far and should prepare for a very chewy breakfast experience. The smell test has never failed me, even when thermometers lie like cheating ex-boyfriends.
The 5-Minute Rest That Changes Everything
After cooking, let your jam rest for exactly 5 minutes before jarring. This isn't lazy cooking—it's strategic. The fruit needs time to absorb the gel, the gel needs time to set slightly, and you need time to find your canning funnel that disappeared into the depths of your junk drawer. During this rest, stir gently once or twice. The jam will thicken noticeably, and you'll avoid the dreaded "fruit float" where all your strawberry pieces rise to the top like they're trying to escape. This rest also allows the foam to settle, giving you crystal-clear jam that looks professionally made instead of homemade by someone having a nervous breakdown.
The Stirring Secret
Stir in a figure-eight pattern, scraping the bottom and sides, but also fold from bottom to top. This ensures even cooking and prevents hot spots that can scorch your precious fruit. Think of it as giving your jam a gentle massage rather than beating it into submission. A wooden spoon with a flat edge works best—you can scrape the bottom while also feeling for any bits that might be thinking about burning. When the spoon starts meeting resistance and the jam sounds like thick soup rather than water, you're approaching the finish line.
Creative Twists and Variations
This recipe is a playground. Here are some of my favorite ways to switch things up:
Mint Julep Jam
Add a handful of fresh mint leaves during the last 2 minutes of cooking, then remove them before jarring. The mint gives this incredible freshness that makes you feel like you're drinking a cocktail on a porch swing. It's breakfast that thinks it's happy hour, and nobody's complaining. Serve this on buttered toast with a cup of coffee, and you'll swear you can hear bluegrass music.
Spicy Watermelon Wonder
Throw in a quarter teaspoon of cayenne or half a jalapeño (seeds removed unless you're feeling brave) with the strawberries. The heat blooms slowly, creating this sweet-spicy dance that makes your tongue tingle in the best way. It's like your jam went on vacation to Mexico and came back with stories and a tan. Kids won't notice the heat much, but adults will get that pleasant back-of-the-throat warmth that makes them reach for another piece of toast.
Basil Strawberry Bliss
Chiffonade a few basil leaves and add them with the watermelon. Basil and strawberry are best friends who never get to hang out enough, and watermelon is the cool mutual friend who makes their reunion epic. The basil adds this subtle savory note that makes people ask "what is that?" in the best way. It's sophisticated without being pretentious, like wearing a great outfit that looks effortless.
Lime in the Coconut
Replace the lemon juice with lime juice and add 1/4 cup of unsweetened coconut flakes. Suddenly you're on a beach somewhere, even if you're actually in a studio apartment during a snowstorm. The lime brightens everything while the coconut adds texture and tropical vibes. This version makes excellent thumbprint cookies or a glaze for coconut cake that will make people propose marriage.
Rosewater Romance
Add 1/4 teaspoon of rosewater with the pectin. Be careful—rosewater is like perfume for food, and too much makes jam taste like soap. But the right amount transforms this into something that tastes like an English garden in June. It's romantic without being cloying, perfect for afternoon tea or making ordinary Tuesday feel like a special occasion.
Balsamic Strawberry Elegance
Stir in a tablespoon of good balsamic vinegar with the butter. The vinegar reduces and concentrates, adding this mysterious depth that makes people unable to stop eating it. It's like your jam got a graduate degree in flavor complexity. This version pairs beautifully with cheese—try it on a cracker with goat cheese and watch people lose their minds.
Storing and Bringing It Back to Life
Fridge Storage
Properly processed jars will keep for up to a year in a cool, dark pantry, but let's be honest—you'll eat it all before the first snow. Once opened, refrigerate and use within 3 weeks, though I've never tested this limit because it disappears faster than free samples at Costco. The jam may crystallize slightly if stored too cold; this is normal and doesn't affect safety or flavor. Let it sit at room temperature for 15 minutes before serving, and it'll spread like a dream again. If you notice any mold (fuzzy spots, usually colored), discard the entire jar—this isn't cheese where you can cut off the bad part.
Freezer Friendly
Leave 1/2 inch headspace if freezing, as jam expands when frozen. Use plastic jars or special freezer-safe glass to avoid explosions that'll make you question your life choices. Frozen jam keeps for 6 months, though quality peaks at 3 months. Thaw overnight in the refrigerator, never at room temperature—this prevents texture breakdown and keeps your jam from separating into weird layers. Once thawed, treat like fresh jam and use within 2 weeks. The watermelon pieces may soften slightly after freezing, but the flavor stays incredible.
Best Serving Method
Bring jam to room temperature before serving for maximum flavor impact—cold mutes flavors while warmth releases them. Stir gently before using to redistribute any separated liquid. For toast, spread on warm bread so it melts slightly into the surface rather than sitting on top like a fruit condiment. This jam also makes incredible salad dressing when whisked with olive oil and vinegar, or glaze for roasted chicken during the last 10 minutes of cooking. I've even stirred it into Greek yogurt for instant fruit-on-the-bottom that puts store versions to shame.