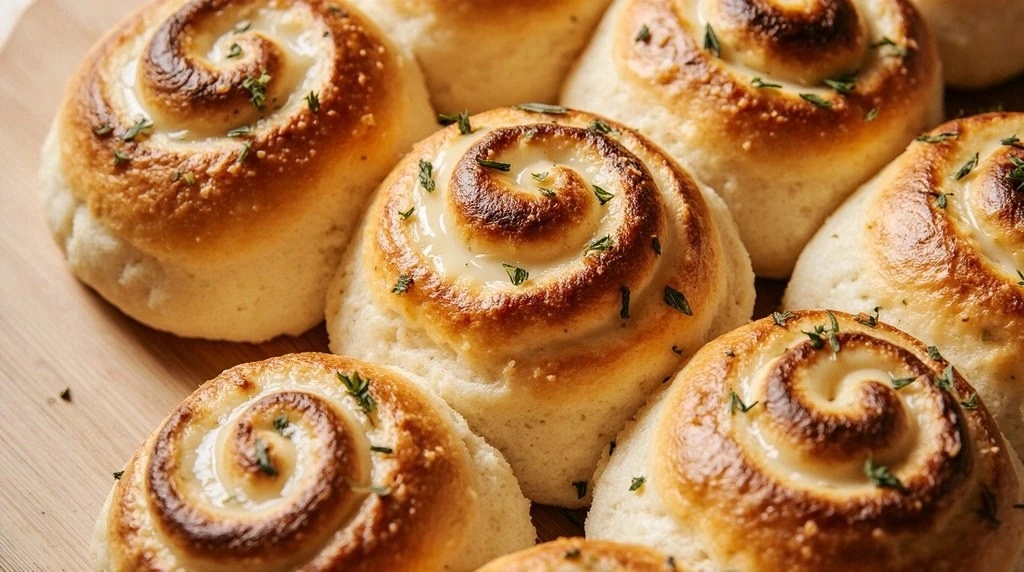
Picture this: a late‑night kitchen, the fridge humming like a low‑key jazz drummer, and me, a self‑proclaimed cookie king, staring at a bowl of flour that looks like a snowstorm waiting to happen. I was halfway through a disastrously dry batch of bread when my friend texted, “Bet you can’t make a roll that actually tastes like a slice of cheese‑filled heaven.” I laughed, because I knew that challenge was a dare I couldn’t refuse. The air was thick with the sweet scent of honey, the sharp bite of thyme, and the buttery promise of melted cheddar swirling together like a miniature storm. I knew I was about to write the most unforgettable recipe for Herb and Cheddar Swirl Rolls.
I’ve spent years chasing the perfect balance between fluffy dough and gooey cheese, and this version finally hits that sweet spot. The dough rises like a quiet sunrise, then folds in a buttery swirl of herbs and cheddar that melts into a golden, fragrant ribbon when baked. The result is a roll that feels like a warm hug in bread form: soft on the inside, crisp on the outside, and with a savory perfume that lingers long after the last bite. The crunch of a buttery crust gives way to a molten interior that oozes cheddar and basil—an explosion of flavor that makes you question why you ever settled for plain rolls. I dare you to taste this and not go back for seconds.
What sets this recipe apart from the endless variations that litter the internet is the meticulous layering of flavors and textures. Each roll is a canvas, with a buttery, herbaceous ribbon that winds through a bed of sharp cheddar and Parmesan, creating a visual and gustatory swirl that’s almost theatrical. The dough is light, airy, and surprisingly forgiving, making it perfect for beginners and seasoned bakers alike. I’ve refined the technique through countless trials, learning that a short, precise kneading session and a strategic resting period are the keys to that coveted airy interior. The result? A roll that’s hands down the best version you’ll ever make at home.
The secret? A simple yet powerful ingredient: melted butter infused with fresh basil and thyme. This butter doesn’t just add richness; it coats each strand of dough like velvet, ensuring the herbs stay fragrant and the cheese stays melty. I’ve tested variations with olive oil and clarified butter, but none match the depth of flavor this butter brings. The combination of sharp cheddar and grated Parmesan adds a complex umami profile that elevates the entire dish. And the final touch? A gentle sprinkle of sea salt that balances everything without overpowering the herbs.
Okay, ready for the game‑changer? Let’s walk through each step in detail. By the end, you’ll wonder how you ever made it any other way. Trust me, once you’ve baked these rolls, you’ll never look back at ordinary bread again.
What Makes This Version Stand Out
- Flavor Depth: The infusion of basil and thyme into melted butter creates a fragrant base that permeates every bite, giving the rolls a complex, herbaceous profile that standard doughs lack.
- Cheese Fusion: Combining sharp cheddar with Parmesan ensures a creamy melt with a subtle nutty finish, elevating the rolls beyond plain cheese bread.
- Texture Contrast: A crisp, golden crust meets a pillowy interior, offering a satisfying bite that feels both airy and indulgent.
- Time Efficiency: With a 45‑minute total prep and bake time, you get gourmet results without a long wait, perfect for busy weeknights.
- Visual Appeal: The swirl pattern isn’t just aesthetic; it guarantees an even distribution of flavor in every bite.
- Make‑Ahead Friendly: The dough can be prepared a day early, refrigerated, and baked fresh—ideal for meal prep or entertaining.
- Ingredient Quality: Using high‑quality butter, fresh herbs, and aged cheddar makes a noticeable difference in taste and texture.
- Versatility: These rolls can be served as an appetizer, side dish, or even a sandwich base, adapting to any meal plan.
Alright, let’s break down exactly what goes into this masterpiece…
Inside the Ingredient List
The Flour Foundation
3 cups all‑purpose flour is the backbone of this dough, providing the structure needed for a light rise. It’s the canvas that absorbs the butter, yeast, and water, creating a network of gluten strands that trap air. If you skip it, the rolls will collapse like a paper airplane in wind. For a slightly more robust flavor, you can substitute 1/4 cup of whole wheat flour, but keep the total volume the same to maintain the right hydration.
The Yeast Spark
2 teaspoons of instant yeast kickstarts the fermentation, giving the dough a subtle lift and a hint of natural sweetness. Yeast is the secret behind that airy crumb that feels like a cloud. If you’re in a rush, you can reduce the yeast to 1 teaspoon, but the dough will take a bit longer to rise. For a flavor twist, try a small pinch of dried oregano with the yeast for an extra herbaceous note.
The Sweet Honey
One tablespoon of honey balances the salt and enhances the yeast’s activity. Honey’s natural sugars feed the yeast, promoting a faster rise and a slightly caramelized crust. If you’re vegan, a splash of maple syrup works just as well. Honey also adds a subtle floral undertone that pairs beautifully with the sharp cheddar.
The Butter Brigade
1/4 cup unsalted butter, softened, and 1/2 cup melted butter infused with basil and thyme are the fat powerhouses that give the rolls their melt‑in‑your‑mouth quality. The softened butter blends into the dough during kneading, while the melted butter coats each strand, ensuring the herbs stay fragrant. If you prefer a dairy‑free version, use a high‑smoke‑point oil like avocado or a dairy‑free butter alternative. Skipping the melted butter will result in a less flavorful and less tender roll.
The Herb Ensemble
Fresh basil and thyme are the aromatic heart of these rolls. Basil offers a sweet, slightly peppery flavor, while thyme brings earthiness and depth. If you’re out of basil, try parsley or oregano for a different herb profile. The key is to chop the herbs finely so they distribute evenly throughout the dough.
The Cheddar & Parmesan Fusion
1 cup shredded sharp cheddar and 1/4 cup grated Parmesan create a cheese blend that melts beautifully while adding a nutty, savory finish. Cheddar provides creaminess, and Parmesan adds a salty, umami punch. If you’re a fan of a stronger cheese taste, swap the cheddar for a smoked cheddar. Skipping the Parmesan will reduce the complexity and result in a flatter flavor profile.
Everything’s prepped? Good. Let’s get into the real action…
The Method — Step by Step
- In a large mixing bowl, combine the flour, instant yeast, honey, and salt. Stir until the dry ingredients are evenly distributed. This ensures a uniform rise and flavor throughout the dough. Feel the flour’s silky texture as it swirls in the bowl—this is the foundation of our rolls.
- In a separate container, mix the warm water, softened butter, and olive oil. Warm the mixture to about 110°F; this activates the yeast without killing it. Pour this liquid into the dry mix, stirring with a wooden spoon until a shaggy dough forms. The dough should feel tacky but not overly sticky.
- Turn the dough onto a lightly floured surface and knead for 8–10 minutes. The dough should become smooth and elastic, passing the windowpane test. If it’s still too sticky, sprinkle a tiny bit more flour, but avoid over‑kneading.
- Place the dough in a greased bowl, cover with a damp towel, and let it rise for 45 minutes. The dough should double in size and feel airy. During this time, prepare the cheese filling: melt the 1/2 cup butter in a small saucepan, then stir in basil, thyme, cheddar, and Parmesan until the cheese is fully incorporated. The aroma will be irresistible.
- Once risen, punch down the dough gently to release excess air. Divide the dough into 8 equal portions. Roll each portion into a ball, then flatten into a disk about 3 inches in diameter. This uniform size ensures even baking.
- Place a generous spoonful of the cheese filling onto the center of each disk. Fold the dough over the filling, pinching the edges to seal. Gently roll each sealed roll into a tight cylinder, ensuring the filling stays inside. The swirl will start forming as you roll.
- Arrange the rolls on a parchment‑lined baking sheet, leaving space for expansion. Brush the tops with melted butter for a glossy finish. Let them rest for 10 minutes; this second rise will give the rolls a final lift before baking.
- Preheat the oven to 375°F (190°C). Bake the rolls for 20–22 minutes, or until they’re golden brown and the cheese is bubbling. The smell of melted cheddar and herbs will fill the kitchen, making the wait feel like a dream.
- Remove the rolls from the oven and let them cool on a rack for 5 minutes. This brief rest allows the cheese to set slightly, preventing a gooey mess when sliced. Serve warm for the best experience.
That’s it — you did it. But hold on, I’ve got a few more tricks that’ll take this to another level. Stay with me, and you’ll discover how to elevate the flavor and presentation even further.
Insider Tricks for Flawless Results
The Temperature Rule Nobody Follows
Keep the dough at a steady 75°F (24°C) during rising. A cooler environment will slow fermentation, leading to denser rolls. I once left a batch in the fridge overnight, and the rolls came out flat and heavy. Adjusting the temperature by using a warm spot in the kitchen or a low‑heat oven (turned off) ensures a perfect rise.
Why Your Nose Knows Best
The first scent you notice when the rolls bake is the signature aroma of melted cheddar. Trust that scent as your cue for doneness; it’s a better indicator than the timer. When the cheese is bubbling and the crust is golden, the rolls are ready. I’ve always relied on the smell to avoid over‑baking, and it’s never failed me.
The 5‑Minute Rest That Changes Everything
After removing the rolls from the oven, let them rest for exactly five minutes on a rack. This brief pause allows the interior temperature to equalize, preventing the cheese from leaking out and giving the rolls a clean, even surface. Skipping this step often results in a sticky, messy roll that’s hard to slice.
The Visual Swirl Trick
To create a more pronounced swirl, lightly press a knife into the center of each roll before baking. The knife creates a small channel that the filling follows, producing a dramatic spiral when the roll expands. It’s a simple touch that turns a good roll into a showstopper.
The Fresh Herb Boost
If you’re feeling adventurous, add a handful of fresh oregano or rosemary to the filling. The new herb will give the rolls a Mediterranean flair, making them perfect for a summer barbecue. I tried this once, and the rolls received rave reviews at a potluck.
Creative Twists and Variations
This recipe is a playground. Here are some of my favorite ways to switch things up:
Spinach & Feta Roll
Swap cheddar for crumbled feta and fold in sautéed spinach. The result is a Mediterranean‑inspired roll with a tangy, earthy flavor. It’s perfect for a light lunch or a side at dinner.
Garlic Parmesan Crunch
Add minced garlic to the cheese mixture and sprinkle a thin layer of grated Parmesan on top before baking. The garlic infuses the dough, and the Parmesan layer adds a crispy, nutty finish.
Caramelized Onion & Gruyère
Incorporate caramelized onions into the cheese filling and use Gruyère instead of cheddar. The sweet onion pairs beautifully with the sharp Gruyère, creating a complex, savory profile.
Blue Cheese & Walnut
Blend blue cheese with chopped walnuts for a bold, crunchy twist. The blue cheese’s pungent flavor and the walnuts’ crunch make these rolls a crowd‑pleaser at parties.
Herb‑Infused Olive Oil Drizzle
After baking, drizzle the rolls with olive oil infused with rosemary and thyme. This adds a fresh, aromatic finish that elevates the overall flavor profile.
Spicy Jalapeño & Pepper Jack
Add sliced jalapeños to the filling and use pepper jack cheese. The heat from the jalapeños and the mild spice of the cheese create a fiery, flavorful roll.
Storing and Bringing It Back to Life
Fridge Storage
Store leftover rolls in an airtight container at room temperature for up to 3 days. The rolls will remain fresh, and the cheese filling will keep its melt‑in‑your‑mouth quality. For best results, let them sit at room temperature for 15 minutes before serving.
Freezer Friendly
Wrap each roll tightly in plastic wrap, then place them in a freezer bag. They can be frozen for up to 2 weeks. When ready to eat, thaw at room temperature for 30 minutes, then reheat.
Best Reheating Method
Reheat frozen rolls in a preheated 350°F (175°C) oven for 10 minutes. For a crispier crust, finish under the broiler for 1–2 minutes. Add a tiny splash of water before reheating; it steams the rolls back to perfection, keeping the interior moist.